# 2021年03月技术日常
# 2021/03/28 周日
# import 解构与 export 和 export default
在封装功能函数时,我们经常需要在 import 时使用解构 {} 来仅导出部分模块功能。在有些情况会发现是无法解构的,下面来看看
// ./modlues/common/index
export default {
  en: {
    msg: 'hello',
  },
  cn: {
    msg: '你好',
  },
}

// index.js
import { en, cn } from './modlues/common/index'
console.log(en, cn)
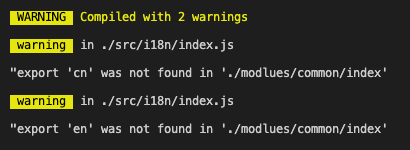
这里是无法解构的,提示警告,需要写成这样
import common from './modlues/common/index'
let { en, cn } = common
console.log(en, cn)
如果是需要在 import 时就能解构,需要使用下面的写法
// ./modlues/common/index
export const en = {
  msg: 'hello',
}

export const cn = {
  msg: '你好',
}
或者
const en = {
  msg: 'hello',
}
const cn = {
  msg: '你好',
}
export { en, cn }
- 一般 export default 的内容,需要使用
import xxx from 'xx'直接接收,不能在 import 时解构 - 通过 export xx 的内容,需要使用
import { xx, xx } from 'xx'或import * as xx from 'xx'接收
参考: 详解ES6 export default 和 import语句中的解构赋值 (opens new window)
# Vue 使用 vue-i18n 国际化
在 vue 项目中,可以使用 vue-i18n (opens new window) 来做国际化。
- 安装
npm install vue-i18n --save
- 在 main.js 引入,并做初始化配置,使用 locale 设置默认语言,使用 messages 对象属性,指定不同语言对应的内容。
// main.js
import Vue from 'vue'
import VueI18n from 'vue-i18n'

Vue.use(VueI18n)

const i18n = new VueI18n({
  locale: 'ja', // 设置默认语言环境
  // 在 vue template 的 {{}} 中,使用 $t('un') 即可拿到 un 属性指定的值
  // 不需要在 data() {} 中设置什么
  messages: {
    en: { // 中文
      un: 'hi',
      message: {
        hello: 'hello world',
      },
    },
    ja: { // 日文
      un: 'ちは',
      message: {
        hello: 'こんにちは、世界',
      },
    }
  },
})

new Vue({
  i18n,
  router,
  store,
  render: (h) => h(App),
}).$mount('#app')
- 在 vue template 中直接使用。如果想动态切换语言,使用
this.$root.$i18n.locale = 'en'即可修改语言
<template>
  <div id="app">
    <div id="nav">
      <p>{{ $t('un') }}</p>
      <p>{{ $t('message.hello') }}</p>
    </div>
    <router-view />
  </div>
</template>

<script>
export default {
  data() {
    return {}
  },
  created() {
    setTimeout(() => {
      console.log('lang change')
      this.$root.$i18n.locale = 'en' // 5s 后变更默认语言为英文
    }, 5000)
  },
}
</script>
注意如果信息较多,messages 信息的内容,最好模块化,尽量分割成子模块,不要全部写在一起。
# ESLint 与 Prettier 冲突的问题
在安装 @vue/cli 后,使用 vue create xx 创建项目,如果选择了 eslint + prettier,可能会出现冲突。比如
在 .eslintrc.js 的 rules 中设置了强制单引号,而默认情况下 prettier 是双引号。如果有双引号,eslint 会提示 error。如果有单引号 prettier 会警告提示,保存自动 fix 会在单双引号之间来回切换,总是会有异常提示。
// .eslintrc.js
module.exports = {
  extends: ["plugin:vue/essential", "eslint:recommended", "@vue/prettier"],
  rules: {
    "no-console":  "off",
    "no-debugger": process.env.NODE_ENV === "production" ? "warn" : "off",
    "quotes": [2, 'single'] // 强制单引号, prittier 默认要双引号引号,冲突
  },
  // ...
};
为了解决冲突,我们可以在 prettier 的配置文件(.prettierrc.js)中加入强制使用单引号的选项,这样就可以了。
// .prettierrc.js
// 修改后注意可能要关闭 vscode 后再重新打开才生效,另外最好保证该项目没有被多层目录嵌套,直接打开的项目
module.exports = {
  singleQuote: true, // 使用单引号替代双引号
  // semi: false, // 行尾自动去掉分号
  // printWidth: 100, // 最大行宽 100
  // tabWidth: 2 // tab 2 个空格
}
一般建议只在 eslint 或 prettier 配置中选一个做配置,除非有解决不了的冲突,才在两个配置文件中都做配置。
参考:vscode 配置 eslint + prettier冲突问题 (opens new window)
# import 出现黄色警告提示,ESLint is disabled since its execution has not been approved
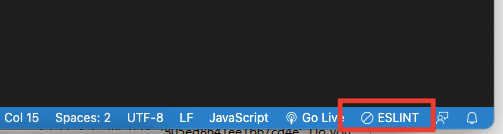
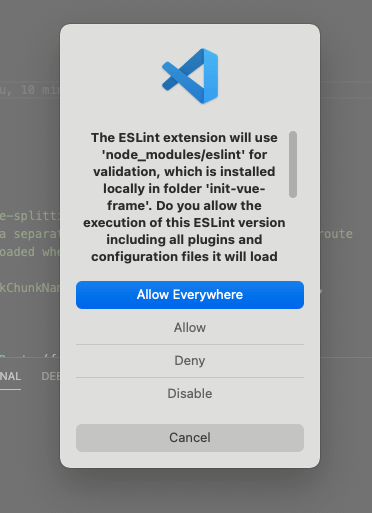
在有 ESLint 的项目中,发现 import 都出现了黄色警告,提示 ESLint is disabled since its execution has not been approved or denied yet. Use the light bulb menu to open the approval dialog.eslint

这是因为初次打开项目,没有 eslint 授权产生的错误提示。点击 vscode 开发工具右下角的 ESLint 就会弹出授权窗口,点击允许即可。
# 2021/03/20 周六
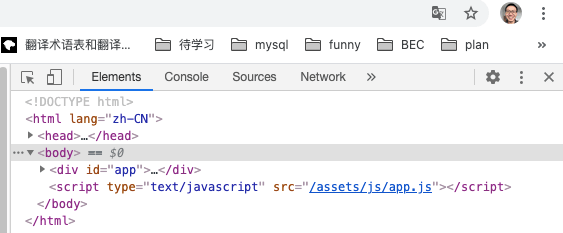
# vuepress html lang 默认为英文,总是弹出 google 翻译怎么解决
默认情况下,vuepress 生成的网页 html lang 属性为 "en-US",当在 Chrome 浏览器打开时,总是会弹出翻译的窗口。如下图
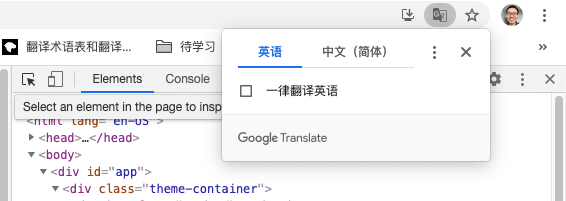
解决这个问题的方法就是将默认的 lang 设置为中文 "zh-CN" 即可。vuepress 支持国际化功能,我们只需要修改下对应的配置即可。
// .vuepress/config.js
module.exports = {
  title: 'dev-zuo 笔记',
  // 国际化相关
  locales: {
    // 键名是该语言所属的子路径
    // 作为特例,默认语言可以使用 '/' 作为其路径。
    '/': {
      lang: 'zh-CN', // 将会被设置为 <html> 的 lang 属性
    }
  },
  // ...
}
修改后的效果如下图,lang 修改了,就不会弹翻译的窗口了
# 2021/03/18 周四
# git clone 输错了密码,怎么重新输入或修改密码
在 windows 系统中,如果是第一次拉取代码,而且是使用的 http 方式,涉及到登录的时候,会要求输入 git 相关账号密码,如果账号密码不小心输入错误。后面每次 git clone 都会提示 auth 失败。这时我们可以在 控制面板 - 用户账户 - 凭据管理器 里修改对应的密码
# vscode terminal 中 the term 'node' is not recognied
windows 系统中,在 vscode 的 Terminal 中,运行 npm install 或 node 命令时都会提示 the term xxx is not recognied...。但是如果打开系统的 terminal 运行命令就是正常的。
仔细看会发现 vscode 中使用的是 Powershell,而一般默认的 bash。Powershell 中无法执行 node 命令,需要运行下面的命令更新环境变量中的 Path
# 运行下面的命令,重启系统即可
$env:path -split ';' | Select-String nodejs
Check the Path in environment variable using script
$env:path -split ';' | Select-String nodejsand once you update the Path in environment variable, make sure to restart powershell and also restart explorer.exe. This would resolve the issue.
参考:windows - The term 'node' is not recognized... In Powershell - Stack Overflow (opens new window)
# 2021/03/17 周三
# 多个 ssh 怎么配置,github、gitlab、gitee 多个平台配置并测试
在之前我们有介绍过 使用ssh方式拉取代码的步骤 (opens new window),仅一个平台时(比如 github)还可以。如果多个 git 平台(比如 github、gitlab、gitee)都需要配置 ssh 时,那怎么配置呢?
首先我们要在 ~/.ssh/ 目录下新建一个 config 文件,内容如下
# github 配置
Host github.com
    HostName github.com
    IdentityFile ~/.ssh/id_rsa
    User guoqzuo@gmail.com

# gitee 配置
Host gitee.com
    HostName gitee.com
    IdentityFile ~/.ssh/gitee/id_rsa_gitee
    User 916707888@qq.com

# gitlab 配置
Host gitlab.com
    HostName gitlab.com
    IdentityFile ~/.ssh/gitlab/id_rsa_gitlab
    User i@zuoguoqing.com
其中 IdentityFile 指定的秘钥文件是需要注意的,需要使用 ssh-keygen -t rsa -C "对应的邮箱" 生成 id_rsa 秘钥对,其中 id_rsa.pub 公钥文件中的内容是需要设置到 github/gitee/gitlab 等平台上的。由于有多个,我们需要指定对应的文件名字,一般以 id_rsa_github 或 id_rsa_gitlab 来与默认的文件名做区别。注意:如果不指定名字,默认会放到 ~/.ssh/id_rsa,自定义文件名后,如果没指定目录,会在当前目录生成。建议都放到 ~/.ssh/ 目录下方便管理。
测试 ssh key 是否配置成功
# 测试 gitee ssh 是否配置成功
ssh -T git@gitee.com
# Hi 左国清! You've successfully authenticated, but GITEE.COM does not provide shell access.

# 测试 github ssh 是否配置成功
ssh -T git@github.com
# Hi zuoxiaobai! You've successfully authenticated, but GitHub does not provide shell access.

# 测试 gitlab ssh 是否配置成功
ssh -T git@gitlab.com
# Welcome to GitLab, @zuoxiaobai!
如果在测试时,没有提示上面的内容,而是提示 The authenticity of host 'github.com (140.82.121.4)' can't be established. RSA key fingerprint is SHA256:xxxx... Are you sure you want to continue connecting (yes/no/[fingerprint])? 选择 yes 即可,会将对应的 key 添加到 ~/.ssh/known_hosts 中,然后就能看到上面的成功信息了。我的 ~/.ssh/ 目录内容如下
# 查看
ls ~/.ssh/
# config		gitee		gitlab		id_rsa		id_rsa.pub	known_hosts
# vscode 下载太慢,vscode 官网下载太慢解决方法
在 vscode 官网下载 vscode 时,发现非常慢,过会儿就下载失败了。如下图

为了解决这个问题,我们可以在下载中,找到对应的下载链接将 url 前面的域名修改为其他源,这样下载会很快。如下图
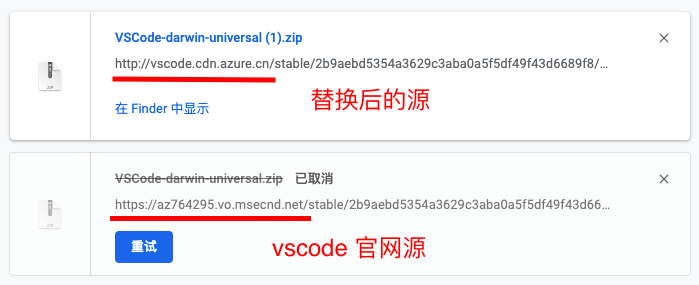
将 vscode 官网默认下载 url 前面的路径改为 vscode.cdn.azure.cn 即可
参考: 国内下载vscode速度慢问题解决 - 知乎 (opens new window)
# git xcrun: error: invalid active developer path
在 mac 下输入 git 命令,突然提示 xcrun: error: invalid active developer path (/Library/Developer/CommandLineTools), missing xcrun at: /Library/Developer/CommandLineTools/usr/bin/xcrun
一般可以通过运行 xcode-select --install 命令来解决
# 2021/03/15 周一
# mac 安装 brew 异常: fatal: unable to access 'https://github.com/Homebrew/brew/'
为了快速安装 svn, git, nginx 等,我想着先在 macbook 上安装 brew,按照常规的方法修改了 ruby 源,但还是出现安装错误 fatal: unable to access 'https://github.com/Homebrew/brew/' LibreSSL SSL_connect: SSL_ERROR_SYSCALL in connection to github.com:443 Failed during: git fetch --force origin
意思大概是在 github 上拉取 brew 时,出现 443 错误。我们可以通过替换安装时的 shell 路径来解决,一般我们使用的安装命令如下
/bin/bash -c "$(curl -fsSL https://raw.githubusercontent.com/Homebrew/install/master/install.sh)"
这样可能会出错,不推荐使用,我们可以使用 gitee 上的一个 shell 脚本 进行安装,命令如下
/bin/zsh -c "$(curl -fsSL https://gitee.com/cunkai/HomebrewCN/raw/master/Homebrew.sh)"
按照提示安装好,就可以使用 brew install 命令来安装 nginx,svn 等工具了
一般常规修改 ruby 源的方法
# 修改源
gem sources --add https://gems.ruby-china.com/ --remove https://rubygems.org/
# 查看当前源
gem sources -l
# *** CURRENT SOURCES ***

# https://gems.ruby-china.com/
参考: mac安装homebrew失败怎么办?- 知乎 (opens new window)
# 2021/03/08 周一
# Declarative 声明式是什么意思?声明式编程与命令式 imperative 编程
React 的 Declarative 特性是什么意思; React Declarative; react declarative
在 React github 的 README.md 中,介绍 react 的特点时,第一个是 Declarative,翻译成中文是声明式,具体要怎么理解呢?下面来看看
React is a JavaScript library for building user interfaces.
- Declarative: React makes it painless to create interactive UIs. Design simple views for each state in your application, and React will efficiently update and render just the right components when your data changes. Declarative views make your code more predictable, simpler to understand, and easier to debug.
- Component-Based: ...
- Learn Once, Write Anywhere: ...
React 是一个用于构建用户界面的 JS 库
- 声明式:React 使创建交互式 UI 变得很轻松。 为应用程序中的每个状态设计简单的视图,当数据更改时,React 将有效地更新和渲染正确的组件。声明式视图使您的代码更具可预测性,更易于理解且易于调试。
在计算机术语中有 声明式编程 declarative 和 命令式编程 imperative 两种编程模式
- 声明式编程:告诉机器,我要做什么(what),具体怎么做(how)由机器自己决定。
- 命令式编程:告诉机器,具体怎么做(how),机器不会管你具体要做什么(what)。
了解上面的两个概念后,我们再来看 React 的 Declarative 声明式渲染就很好理解了。使用 React 时,我们只需要修改数据,表达我们想要在网页上修改对应内容的意图即可,具体怎么做(修改 dom),React 内部会帮我们以最优的方式完成。
参考:声明式编程declarative和命令式编程imperative的比较 (opens new window)
# npx create-react-app my-app 是什么意思
在 react 官网,介绍 create-react-app 构建工具时,直接使用 npx create-react-app my-app 就可以直接创建一个 react 项目的脚手架,那 npx 命令执行和普通的 create-react-app my-app 有什么区别呢?下面来看看
在之前介绍 不全局安装npm包,怎么在项目目录下局部执行对应的命令 (opens new window) 中提到过三种方法
- npm run xxx
- npx 命令
- ./node_modules/.bin/命令
npx 命令可以运行当前项目下的局部命令,而不用添加到 "scripts" 配置中,或者使用 ./node_modules/.bin/xx。
另外它可以直接从 npm 官方库中远程拉取包,并执行对应的命令,避免使用命令前需要全局安装或局部安装该命令才能运行。
npx create-react-app my-app 运行时,会将 create-react-app 下载到一个临时的目录,使用该命令执行 create-react-app my-app,完成后再删除 create-react-app。另外 npx 下载包时还可以指定版本,比如
# 从 npm 拉取 uglify-js 的 3.1.0 版本,并对 main.js 执行混淆压缩,输出到 main.js
npx uglify-js@3.1.0 main.js -o ./dist/main.js
更多 npx 使用方法,参考: npx 使用教程 - 阮一峰的网络日志 (opens new window)
# npm run start 为什么可以简写为 npm start
一般在 node 项目中,npm run xxx 会执行 package.json 配置中 "scripts" 字段中对应的命令,可以用于创建某些命令的快捷执行方式。比如在下面的例子中
// package.json
{
  "scripts": {
    "start": "node foo.js",
    "dev" "node dev.js",
    "build": "vuepress build docs"
  }
}
npm run dev 相当于 node dev.js 命令的快捷方式。另外它还可以用于在未全局安装某个命令时,项目内局部运行命令。上面的例子中 vuepress 命令未全局安装,仅项目内安装,要执行 vuepress 命令就需要使用 scripts 快捷方式执行了。
这里的 npm run build,相当于在项目目录下执行了 ./node_modules/.bin/vuepress build docs
知道这些后,再回归我们的主题,npm run start 为什么可以简写为 npm start 呢?是否 npm run xxx,可以直接简写问 npm xxx 呢?
查阅了 npm 官方文档,发现 npm start 其实是内置的命令。只是巧合,并不是 npm run xxx 可以简写为 npm xxx
npm start 的运行机制,npm start Description
This runs a predefined command specified in the "start" property of a package's "scripts" object.
If the "scripts" object does not define a "start" property, npm will run node server.js.
它会执行 scripts 中 "start" 属性预先指定的脚本,如果 "scripts" 中没有设置 "start" 属性,那么就运行 "node server.js" 命令。
更多 npm 指令、scripts 相关,参考:
# TypeScript error in 'AntdModal' refers to a value, but is being used as a type here.
在 ts + react + ant-design 的项目中,git clone 项目后,npm install 了,但 npm run serve 时一直提示 TypeScript error in 'AntdModal' refers to a value, but is being used as a type here. 在这个项目的场景下,npm install 安装的包是不全的
需要使用 yarn 来安装,具体命令如下
# 全局安装 yarn
sudo npm install yarn -g
# 在项目下安装所有模块
yarn add # 相当于 npm install
这样安装后,就不会报错了,比较奇怪的一个问题。更多 Yarn 命令用法参考: Yarn CLI 简介 (opens new window)