# 学习 JavaScript 数据结构与算法(第三版) 笔记
原书名为 Learning JavaScript Data Structures and Algorithms, Thrid Edition。作者 Loiane Groner(罗伊安妮·格罗纳),翻译:吴双、邓钢、孙晓博等。
这是一本用 JavaScript/TypeScript 介绍数据结构与算法的书,比较适合前端开发人员。书中的示例代码比较全,JS/TS 都有,而且还有单元测试。示例代码地址:PacktPublishing/Learning-JavaScript-Data-Structures-and-Algorithms-Third-Edition | Github (opens new window)
# 第 1~3 章 JS/TS简介、数组基础
前三章比较基础,对于有 JS/TS 基础的同学,粗略的看看即可。相关内容之前有做笔记
- JavaScript/EcmaScript 基础参考:JavaScript 高级程序设计(第四版) 笔记 (opens new window)
- TypeScript基础参考:TypeScript入门教程笔记 (opens new window)
- JS 数组参考:Array 类型 - 集合引用类型 - JS高程4笔记 (opens new window)
在数组开头插入元素 unshift() 简单实现
Array.prototype.insertFirstPosition = function (value) {
  for (let i = this.length; i >= 0; i--) {
    this[i] = this[i - 1]
  }
  this[0] = value
  return this.length
}
在数组开头删除元素 shift() 简单实现
Array.prototype.deleteFirstPosition = function () {
  let lastIndex = this.length - 1
  let firstValue = this[0]
  for (let i = 0; i < lastIndex; i++) {
    this[i] = this[i + 1]
  }
  this.length = lastIndex
  return firstValue
}
# 第 4 章 栈(Stack)
Stack
[stæk]
第三章介绍了最常用的数据结构 - 数组,本章会介绍栈数据结构。栈是一种遵循 LIFO(last in first out) 后进先出原则的有序集合,类似于一摞书或者餐厅里叠放的盘子。
- 实现一个基于数组的栈
- 实现一个基于对象的栈
- 用栈解决问题
# 实现一个基于数组的栈
创建一个 Stack 类,用于实现栈,通过数组来实现栈。需要实现的方法、属性如下
push()添加一个或多个元素到栈顶pop()移除栈顶的元素,同时返回被删除的元素peek()返回栈顶的元素,不对栈做任何修改isEmpty()返回布尔值,栈里是否没有任何元素clear()移除栈里的所有元素size()返回栈里元素个数,和 length 类似length返回栈里元素个数
class StackArray {
  constructor() {
    this.items = []
  }
  push(...args) {
    this.items.push(...args)
    return this.items.length
  }
  pop() {
    return this.items.pop()
  }
  peek() {
    return this.items[this.length - 1]
  }
  isEmpty() {
    return this.items.length === 0
  }
  clear() {
    this.items = []
  }
  size() {
    return this.items.length
  }
  get length() {
    return this.items.length
  }
  toString() {
    return this.items.join(',')
  }
}
测试 demo
let stack = new StackArray()
stack.push(1) // 1 [1]
stack.push('a', 'b', 'c') // 4 [1, 'a', 'b', 'c']
stack.length // 4
stack.size() // 4
stack.pop() // "c"
stack.toString() // "1,a,b"
stack.peek() // "b"
stack.toString() // "1,a,b"
stack.isEmpty() // false
stack.clear()
stack.isEmpty() // true
以上是手动测试的 demo,我们可以使用 Mocha 来写单元测试。
// test/1-stack-array.spec.js
const StackArray = require('../src/1-stack-array')
const expect = require('chai').expect
let stack = null

describe('StackArray Test', () => {
  beforeEach(() => {
    stack = new StackArray()
  })

  it('empty test', () => {
    expect(stack.isEmpty()).to.equal(true)
    expect(stack.size()).to.equal(0)
  })

  it('push()/size()/toString() test', () => {
    stack.push('a')
    expect(stack.isEmpty()).to.equal(false)
    expect(stack.size()).to.equal(1)
    stack.push('b')
    expect(stack.size()).to.equal(2)
    stack.push('c')
    expect(stack.size()).to.equal(3)
    stack.push('d', 'e', 'f')
    expect(stack.length).to.equal(6)
    expect(stack.toString()).to.equal('a,b,c,d,e,f')
  })

  it('pop()/length test', () => {
    stack.push('a', 'b', 'c', 'd')
    expect(stack.pop()).to.equal('d')
    expect(stack.length).to.equal(3)
    expect(stack.pop()).to.equal('c')
    expect(stack.length).to.equal(2)
    expect(stack.pop()).to.equal('b')
    expect(stack.length).to.equal(1)
    expect(stack.pop()).to.equal('a')
    expect(stack.length).to.equal(0)
    expect(stack.pop()).to.equal(undefined)
    expect(stack.length).to.equal(0)
  })

  it('peek() test', () => {
    stack.push('a', 'b', 'c', 'd')
    expect(stack.peek()).to.equal('d')
    expect(stack.length).to.equal(4)
    stack.pop()
    stack.pop()
    expect(stack.peek()).to.equal('b')
  })

  it('clear()/isEmpty() test', () => {
    stack.push('a', 'b')
    expect(stack.length).to.equal(2)
    expect(stack.isEmpty()).to.equal(false)
    stack.clear()
    expect(stack.length).to.equal(0)
    expect(stack.isEmpty()).to.equal(true)
  })
})
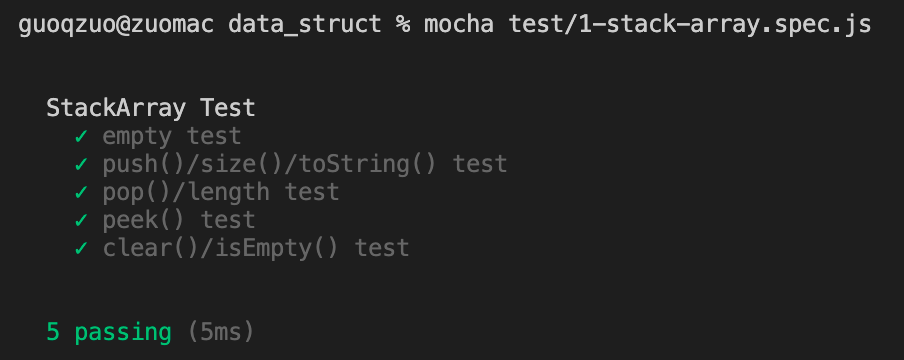
运行 mocha test/1-stack-array.spec.js 测试结果如下图,完整 demo 参见:1-stack-array.spec.js - Github (opens new window)
# 实现一个基于对象的栈
实现栈的最简单方式是用数组来存储其元素。但它有以下缺点
- 使用数组时,大部分方法时间复杂度是 O(n),需要迭代整个数组直到找到对应的元素
- 数组是一个有序集合,为了保证元素排列有序,会占用更多空间
使用对象来存储栈元素,也可以保证 LIFO 原则,下面来看看基于对象的栈实现
class Stack {
  constructor() {
    this.count = 0
    this.items = {}
  }
  // 向栈中插入元素
  push(element) {
    this.items[this.count] = element
    this.count++
  }
  isEmpty() {
    return this.count === 0
  }
  size() {
    return this.count
  }
  get length() {
    return this.count
  }
  // 从栈中弹出元素
  pop() {
    if (this.isEmpty()) {
      return undefined
    }
    this.count--
    const result = this.items[this.count]
    delete this.items[this.count]
    return result
  }
  peek() {
    if (this.isEmpty()) {
      return undefined
    }
    return this.items[this.count - 1]
  }
  clear() {
    this.items = {}
    this.count = 0
    // 或者
    // while(!this.isEmpty()) {
    //   this.pop()
    // }
  }
  toString() {
    if (this.isEmpty()) {
      return ''
    } else {
      let i = 0,
        len = this.count,
        result = ''
      while (i < len) {
        result += this.items[i]
        if (i !== len - 1) {
          result += ','
        }
        i++
      }
      return result
    }
  }
}
以上方法中,除了 toString() 方法,其他方法复杂度均为 O(1),以上代码单元测试地址:2-stack-obj.spec.js - Github (opens new window)
# 用栈解决问题
栈可以用于存储访问过的任务或路径、撤销操作。还可以处理进制转换、平衡括号、汉诺塔问题。
# 十进制转二进制
要将十进制数转化成二进制,可以将 10 进制数除 2(二进制满 2 进 1)取余, 然后 Math.floor(除 2 的结果) 继续取余,直到 Math.floor(除 2) 的结果为 0。将所有余数组合起来就是对于的二进制
10
10 / 2 余 0,Math.floor(10 / 2) => 5
 5 / 2 余 1,Math.floor(5 / 2) => 2
 2 / 2 余 0,Math.floor(2 / 2) => 1
 1 / 2 余 1,Math.ceil(1 / 2) => 0
// 余数 1010 就是 10 的二进制
我们将取余的数 push 到栈中,最后逐个出栈即可将 10 进制转换为二进制
// src/3-stack-to-binary.js
const Stack = require('./2-stack-obj')
function decimalToBinary(num) {
  let stack = new Stack()
  let result = ''
  while (num) {
    stack.push(num % 2)
    num = Math.floor(num / 2)
  }
  while (!stack.isEmpty()) {
    result += stack.pop()
  }
  return result || '0'
}

module.exports = decimalToBinary
单元测试
// test/3-stack-to-binary.spec.js
const expect = require('chai').expect
const decimalToBinary = require('../src/3-stack-to-binary')

describe('DecimalToBinary Test', () => {
  it('10进制转2进制', () => {
    expect(decimalToBinary(0)).to.equal('0')
    expect(decimalToBinary(1)).to.equal('1')
    expect(decimalToBinary(2)).to.equal('10')
    expect(decimalToBinary(5)).to.equal('101')
    expect(decimalToBinary(10)).to.equal('1010')
    expect(decimalToBinary(15)).to.equal('1111')
    expect(decimalToBinary(233)).to.equal('11101001')
    expect(decimalToBinary(1000)).to.equal('1111101000')
  })
})
# 十进制转其他进制
除了将 10 进制转换为 2 进制外,还可以将 10 进制转换为 2 - 36 的任意进制
// src/4-stack-decimal-converter.js
const Stack = require('./2-stack-obj')
function decimalConverter(num, base) {
  let stack = new Stack()
  let result = ''
  const digits = '0123456789ABCDEFGHIJKLMNOPQRSTUVWXYZ'
  if (base < 2 || base > 36) {
    return ''
  }
  while (num) {
    stack.push(num % base)
    num = Math.floor(num / base)
  }
  while (!stack.isEmpty()) {
    result += digits[stack.pop()]
  }
  return result || '0'
}

module.exports = decimalConverter
单元测试
// src/4-stack-decimal-converter.spec.js
const expect = require('chai').expect
const decimalConverter = require('../src/4-stack-decimal-converter')

describe('decimalConverter Test', () => {
  it('10进制转其他进制', () => {
    expect(decimalConverter(0, 2)).to.equal('0')
    expect(decimalConverter(1, 2)).to.equal('1')
    expect(decimalConverter(1, 37)).to.equal('')
    expect(decimalConverter(100345, 2)).to.equal('11000011111111001')
    expect(decimalConverter(100345, 8)).to.equal('303771')
    expect(decimalConverter(100345, 16)).to.equal('187F9')
    expect(decimalConverter(100345, 35)).to.equal('2BW0')
  })
})
# 平衡圆括号
Balanced parentheses means that each opening symbol has acorresponding closing symbol and the pairs of parentheses are properly nested.Consider the following correctly balanced strings of parentheses:
平衡括号的意思是,每个左括号一定对应着一个右括号,括号内又套着括号。看下面这些个括号组成的平衡表达式:
(()()()())
(((())))
(()((())()))
Compare those with the following, which are not balanced:
对比下面这些不平衡的括号:
((((((())
()))
(()()(()
The ability to differentiate between parentheses that are correctlybalanced and those that are unbalanced is an important part of recognizing manyprogramming language structures.
正确地区分平衡和不平衡括号,对很多编程语言来说,都是重要的内容。
The challenge then is to write an algorithm that will read a stringof parentheses from left to right and decide whether the symbols are balanced.
现在的问题就是,写一个算法,读入一串括号字符串,并判断它们是否平衡。
可以使用栈来解决这个问题,遇到左括号 "(" 就将它 push 到栈中,遇到右括号 ")" 就将栈中的内容 pop() 一次。如果出现 ")" 时栈是空的,则缺少 "("。如果字符串到末尾后栈中还有内容,则缺少 ")"。
// src/5-stack-balance-parentheses.js
const Stack = require('./2-stack-obj')
function isBalanceParentheses(str) {
  let stack = new Stack()
  if (typeof str !== 'string') {
    return false
  }
  const len = str.length
  let i = 0
  while (i < len) {
    if (str[i] === '(') {
      stack.push('(')
    }
    if (str[i] === ')') {
      if (stack.isEmpty()) {
        return false
      }
      stack.pop()
    }
    i++
  }
  return stack.isEmpty()
}

module.exports = isBalanceParentheses
单元测试
// test/5-stack-balance-parentheses.spec.js
const expect = require('chai').expect
const isBalanceParentheses = require('../src/5-stack-balance-parentheses')

describe('BalanceParentheses Test', () => {
  it('平衡括号测试', () => {
    expect(isBalanceParentheses(0)).to.be.false
    expect(isBalanceParentheses(')')).to.be.false
    expect(isBalanceParentheses('(')).to.be.false
    expect(isBalanceParentheses('()')).to.be.true
    expect(isBalanceParentheses('(()()()())')).to.be.true
    expect(isBalanceParentheses('(((())))')).to.be.true
    expect(isBalanceParentheses('(()((())()))')).to.be.true
    expect(isBalanceParentheses('((((((())')).to.be.false
    expect(isBalanceParentheses('()))')).to.be.false
    expect(isBalanceParentheses('(()()(()')).to.be.false
  })
})
参考:python数据结构与算法 5栈的应用之圆括号平衡_量变到质变-CSDN博客 (opens new window)
# 汉诺塔
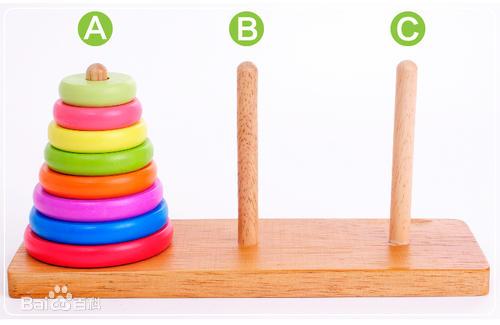
有三根相邻的柱子,标号为 A, B, C。A 柱子上从下到上按金字塔状叠放着 n 个不同大小的圆盘,要把所有盘子移动到柱子 B 上,一次只能移动一个圆盘,且大圆盘不能在小圆盘上面,求移动步骤和次数
有两种解法,一种是递归,一种是栈。先来看递归的实现
- 将 n - 1 个圆盘从 A 移动到 C(借助 B)
- 将第 n 个圆盘从 A 移动到 B
- 将 n - 1 个圆盘从 C 移动到 B(借助 A)
移动次数为 2 的 n 次方 - 1
let count = 0
function move(number, from, to, depend) {
  console.log(`将第 ${number} 号圆盘从 ${from} 移动到 ${to}`)
  count++
}
// 将 n 个圆盘从 a 移动到 b 借助 c
function hanoi(n, a, b, c) {
  if (n === 0) {
    return
  }
  hanoi(n - 1, a, c, b) // 将 n -1 个圆盘从 a 移动到 c,借助 b
  move(n, a, b) // 将第 n 个圆盘从 a 移动到 b
  hanoi(n - 1, c, b, a) // 将 n -1 个圆盘从 c 移动到 b,借助 a
}
hanoi(3, 'A', 'B', 'C')
console.log('移动次数', count)
// 将第 1 号圆盘从 A 移动到 B
// 将第 2 号圆盘从 A 移动到 C
// 将第 1 号圆盘从 B 移动到 C
// 将第 3 号圆盘从 A 移动到 B
// 将第 1 号圆盘从 C 移动到 A
// 将第 2 号圆盘从 C 移动到 B
// 将第 1 号圆盘从 A 移动到 B
// 移动次数 7
重构上面的例子,使用一个函数搞定
function hanoiRecursion(n, a, b, c, moves = []) {
  if (n === 0) {
    return moves
  }
  hanoiRecursion(n - 1, a, c, b, moves) // 将 n -1 个圆盘从 a 移动到 c,借助 b
  moves.push([a, b]) // move(n, a, b) // 将第 n 个圆盘从 a 移动到 b
  hanoiRecursion(n - 1, c, b, a, moves) // 将 n -1 个圆盘从 c 移动到 b,借助 a
  return moves
}
let moves = hanoiRecursion(3, 'A', 'B', 'C')
console.log('移动路径', moves)
console.log('移动次数', moves.length)
// // 移动路径
// // [
// //  ["A", "B"], ["A", "C"], ["B", "C"], ["A", "B"],
// //  ["C", "A"], ["C", "B"], ["A", "B"]
// // ]
// // 移动次数 7
参考:汉诺塔的图解递归算法 - Dmego - 博客园 (opens new window)
使用栈其实也需要使用递归,只是我们通过 3 个栈,表示三个圆柱,可以实时看对应的效果
const Stack = require('./2-stack-obj')
function hanoi(n, source, dest, depend, a, b, c, moves = []) {
  if (n === 0) {
    return
  }
  hanoi(n - 1, source, depend, dest, a, c, b, moves) // 将 n - 1 个圆盘从 source 移动到 depend
  moves.push([a, b])
  dest.push(source.pop()) // 将第 n 个圆盘从 source 移动到 dest
  hanoi(n - 1, depend, dest, source, c, b, a, moves) // 将 n - 1 个圆盘从 depend 移动到 dest
}
function hanoiStack(n) {
  let source = new Stack()
  let dest = new Stack()
  let depend = new Stack()
  let count = n
  while (count) {
    source.push(count--)
  }
  let moves = []
  console.log('source: ', source)
  hanoi(n, source, dest, depend, 'A', 'B', 'C', moves)
  console.log('source: ', source)
  console.log('dest: ', dest)
  console.log('depend: ', depend)
  return moves
}
console.log(hanoiStack(3))
// source:  Stack { count: 3, items: { '0': 3, '1': 2, '2': 1 } }
// source:  Stack { count: 0, items: {} }
// dest:  Stack { count: 3, items: { '0': 3, '1': 2, '2': 1 } }
// depend:  Stack { count: 0, items: {} }
// [
//   [ 'A', 'B' ],
//   [ 'A', 'C' ],
//   [ 'B', 'C' ],
//   [ 'A', 'B' ],
//   [ 'C', 'A' ],
//   [ 'C', 'B' ],
//   [ 'A', 'B' ]
// ]
单元测试
// test/6-stack-hanoi.spec.js
const expect = require('chai').expect
let { hanoiStack, hanoiRecursion } = require('../src/6-stack-hanoi')

describe('Hanoi Test', () => {
  it('递归实现测试', () => {
    for (let i = 1; i <= 10; i++) {
      expect(hanoiRecursion(i, 'a', 'b', 'c').length).to.equal(2 ** i - 1)
    }
  })
  it('栈+递归实现测试', () => {
    for (let i = 1; i <= 10; i++) {
      expect(hanoiStack(i).length).to.equal(2 ** i - 1)
    }
  })
})
# 第 5 章 队列和双端队列
队列和栈非常相似,栈是 LIFO(last in first out)后进先出。队列是遵循先进先出(FIFO,first in first out)原则的一组有序的集合。最常见的队列的例子就是排队。排在第一位的会先接受服务。本章内容包括
- 队列数据结构
- 双端队列数据结构
- 用队列和双端队列来解决问题
# 队列数据结构
我们使用 Queue 类表示队列,队列可以使用数组和对象来实现,这里为了在获取元素时更高效,使用对象实现
class Queue {
  constructor() {
    this.count = 0
    this.lowestCount = 0 // 标记队列的最开始的一位
    this.items = {}
  }
}
enqueue [ɪn'kjuː] 入队,排队; dequeue [di'kju:] 出列、出队
队列需要实现如下方法
enqueue(element(s))向队列尾部添加一个或多个新的项dequeue()移除队列中的第一个元素(排在队列最前面的项),并返回该元素peek()返回队列中第一个元素(最先被添加的元素)队列不做任何变动isEmpty()队列是否为空size()返回队列包含的元素个数clear()清空队列toString()转为字符串
class Queue {
  constructor() {
    this.count = 0
    this.lowestCount = 0
    this.items = {}
  }
  // 入队
  enqueue(element) {
    this.items[this.count] = element
    this.count++
  }
  // 出列
  dequeue() {
    if (this.isEmpty()) {
      return undefined
    }
    let result = this.items[this.lowestCount]
    delete this.items[this.lowestCount]
    this.lowestCount++ // 标记队列的最开始的一位
    return result
  }
  isEmpty() {
    return this.count - this.lowestCount === 0
    // return this.size() === 0
  }
  peek() {
    return this.isEmpty() ? undefined : this.items[this.lowestCount]
  }
  size() {
    return this.count - this.lowestCount
  }
  clear() {
    this.items = {}
    this.count = 0
    this.lowestCount = 0
  }
  toString() {
    if (this.isEmpty()) {
      return ''
    }
    let result = ''
    for (let i = this.lowestCount; i < this.count; i++) {
      result += this.items[i]
      if (i !== this.count - 1) {
        result += ','
      }
    }
    return result
  }
}

module.exports = Queue
单元测试
// test/7-queue-obj.spec.js
const expect = require('chai').expect
const Queue = require('../src/7-queue-obj')
let queue = ''

describe('Queue Test', () => {
  beforeEach(() => {
    queue = new Queue()
  })

  it('enqueue()/size()/toString() test', () => {
    queue.enqueue('a')
    expect(queue.size()).to.equal(1)
    queue.enqueue('b')
    expect(queue.size()).to.equal(2)
    queue.enqueue('c')
    expect(queue.size()).to.equal(3)
    expect(queue.toString()).to.equal('a,b,c')
  })

  it('dequeue()/peek()', () => {
    queue.enqueue('a')
    queue.enqueue('b')
    queue.enqueue('c')
    expect(queue.dequeue()).to.equal('a')
    expect(queue.peek()).to.equal('b')
    expect(queue.size()).to.equal(2)
    expect(queue.dequeue()).to.equal('b')
    expect(queue.peek()).to.equal('c')
    expect(queue.size()).to.equal(1)
    expect(queue.dequeue()).to.equal('c')
    expect(queue.size()).to.equal(0)
    expect(queue.dequeue()).to.equal(undefined)
  })

  it('clear()/isEmpty()', () => {
    queue.enqueue('a')
    queue.enqueue('b')
    queue.enqueue('c')
    expect(queue.isEmpty()).to.be.false
    queue.clear()
    expect(queue.peek()).to.be.undefined
    expect(queue.isEmpty()).to.be.true
  })
})
# 双端队列数据结构
双端队列(deque [dek],或称为 double-ended queue)是一种允许同时从前端和后端添加和移除元素的特殊队列,比如在电影院、餐厅排队的队伍中,一个刚买票的人需要在询问一些简单信息,可以直接回到队伍的头部,另外再队伍末尾的人,如果赶时间,可以离开队伍
在计算机科学中,双端队列的一个常见应用是存储一系列的撤销操作,将每个操作依次保存在双端队列中,当需要撤销时,最后的操作会从双端队列中移除。另外,当记录的操作数达到上限时,最先的操作会从双端队列前端移除。
由于双端队列同时遵循先进先出、后进先出原则,因此它是队列和栈相结合的一种数据结构。
创建一个 Deque 类
class Deque {
  constructor() {
    this.count = 0
    this.lowestCount = 0
    this.items = {}
  }
}
它支持如下方法:
addFront(element)在双端队列前端添加新元素addBack(element)在双端队列后端添加新元素removeFront()从双端队列的前端移除第一个元素removeBack()从双端队列的后端移第一个元素peekFront()返回双端队列前端的第一个元素peekBack()返回双端队列后端的第一个元素isEmpty()判断是否为空clear()清空size()返回队列长度toString()转字符串
// 8-deque-obj.js
class Deque {
  constructor() {
    this.count = 0
    this.lowestCount = 0
    this.items = {}
  }
  addFront(element) {
    if (this.isEmpty()) {
      this.addBack(element)
    } else if (this.lowestCount > 0) {
      // 如果之前队列从前端移出过元素
      this.lowestCount--
      this.items[this.lowestCount] = element
    } else {
      // 如果队列没有从前端移出过元素  this.lowestCount = 0
      // 新进来的需要替换原来的 lowestCount = 0 的元素
      // 新增 this.items[this.count] 且把每个值向后移动一位
      for (let i = this.count; i > 0; i--) {
        this.items[i] = this.items[i - 1]
      }
      this.count++
      this.items[this.lowestCount] = element
    }
  }
  addBack(element) {
    this.items[this.count] = element
    this.count++
  }
  removeFront() {
    if (this.isEmpty()) {
      return undefined
    }
    let result = this.items[this.lowestCount]
    delete this.items[this.lowestCount]
    this.lowestCount++
    return result
  }
  removeBack() {
    if (this.isEmpty()) {
      return undefined
    }
    let result = this.items[this.count - 1]
    delete this.items[this.count - 1]
    this.count--
    return result
  }
  peekFront() {
    return this.isEmpty() ? undefined : this.items[this.lowestCount]
  }
  peekBack() {
    return this.isEmpty() ? undefined : this.items[this.count - 1]
  }
  isEmpty() {
    return this.size() === 0
  }
  clear() {
    this.items = {}
    this.count = 0
    this.lowestCount = 0
  }
  size() {
    return this.count - this.lowestCount
  }
  toString() {
    if (this.isEmpty()) {
      return ''
    }
    let result = ''
    for (let i = this.lowestCount; i < this.count; i++) {
      result += this.items[i]
      if (i !== this.count - 1) {
        result += ','
      }
    }
    return result
  }
}

module.exports = Deque
单元测试
// 8-deque-obj.spec.js
const expect = require('chai').expect
const Deque = require('../src/8-deque-obj')
let deque = ''

describe('Deque Test', () => {
  beforeEach(() => {
    deque = new Deque()
  })

  it('基础功能测试', () => {
    deque.addFront('a') // a
    deque.addBack('b') // a b
    deque.addFront('c') // c a b
    deque.addFront('d') // d c a b
    deque.addBack('e') // d c a b e
    expect(deque.toString()).to.equal('d,c,a,b,e')
    expect(deque.peekBack()).to.equal('e')
    expect(deque.peekFront()).to.equal('d')
    expect(deque.removeBack()).to.equal('e') // d c a b
    expect(deque.removeFront()).to.equal('d') // c a b
    deque.addFront('f') // f c a b
    expect(deque.peekBack()).to.equal('b')
    expect(deque.peekFront()).to.equal('f')
    expect(deque.toString()).to.equal('f,c,a,b')
  })

  it('clear()/size()/isEmpty()', () => {
    deque.addBack('a')
    deque.addBack('b')
    deque.addBack('c')
    expect(deque.size()).to.equal(3)
    expect(deque.isEmpty()).to.be.false
    deque.clear()
    expect(deque.size()).to.equal(0)
    expect(deque.isEmpty()).to.be.true
  })
})
# 用队列和双端队列来解决问题
使用队列模拟击鼓传花游戏,使用双端队列检测是否是回文字符串
# 循环队列 - 击鼓传花游戏
hot potato 烫手山芋 potato [pəˈteɪtəʊ] n. [作物] 土豆
循环队列是队列中的一种,击鼓传花(hot potato)游戏就是其中的例子。在这个游戏中,孩子们围成一个圆圈,把花尽快的传递给旁边的人,某一时刻传花停止,这个时候花在谁手里,谁就退出圆圈,重复这个过程,直到只剩下一个孩子,即为胜者。
使用队列,不停的将出列(dequeue)的元素入列(enqueue),这样就模拟了一个循环队列。循环到某个次数后,淘汰(dequeue)一个再继续,直到只有一个为止。
const Queue = require('./7-queue-obj')

/**
 * 进行击鼓传花游戏,每循环 num 次时踢出一个人
 * @param {*} elementList 名单 ['张三', '李四', '王五']
 * @param {*} num 每循环多少次踢出去一个人
 */
function hotPotato(elementList, num) {
  const queue = new Queue()
  const eliminateList = [] // 淘汰列表 [ɪˈlɪmɪneɪt]
  // 将名单中的人加入队列
  elementList.forEach((item) => queue.enqueue(item))
  while (queue.size() > 1) {
    for (let i = 0; i < num; i++) {
      queue.enqueue(queue.dequeue())
    }
    // 传递 num 次后踢出一个人
    eliminateList.push(queue.dequeue())
  }
  return {
    eliminateList: eliminateList,
    winner: queue.dequeue(),
  }
}

module.exports = hotPotato
单元测试
// test/9-queue-hot-patato.spec.js
const expect = require('chai').expect
const hotPotato = require('../src/9-queue-hot-patato')

describe('hotPotato Test', () => {
  it('击鼓传花游戏测试', () => {
    let names = ['张三', '李四', '王五', '赵六', '陈七']
    let { eliminateList, winner } = hotPotato(names, 7)
    let expectList = ['王五', '李四', '陈七', '赵六']
    expect(eliminateList).to.deep.equal(expectList)
    expect(winner).to.equal('张三')
  })
})
整个过程
// 初始值  '张三', '李四', '王五', '赵六', '陈七'
// 开始游戏
0 '李四' '王五' '赵六' '陈七' '张三'
1 '王五' '赵六' '陈七' '张三' '李四'
2 '赵六' '陈七' '张三' '李四' '王五'
3 '陈七' '张三' '李四' '王五' '赵六'
4 '张三' '李四' '王五' '赵六' '陈七'
5 '李四' '王五' '赵六' '陈七' '张三'
6 '王五' '赵六' '陈七' '张三' '李四'
淘汰 '王五'
0 '陈七' '张三' '李四' '赵六'
1 '张三' '李四' '赵六' '陈七'
2 '李四' '赵六' '陈七' '张三'
3 '赵六' '陈七' '张三' '李四'
4 '陈七' '张三' '李四' '赵六'
5 '张三' '李四' '赵六' '陈七'
6 '李四' '赵六' '陈七' '张三'
淘汰 '李四'
0 '陈七' '张三' '赵六'
1 '张三' '赵六' '陈七'
2 '赵六' '陈七' '张三'
3 '陈七' '张三' '赵六'
4 '张三' '赵六' '陈七'
5 '赵六' '陈七' '张三'
6 '陈七' '张三' '赵六'
淘汰 '陈七'
0 '赵六' '张三'
1 '张三' '赵六'
2 '赵六' '张三'
3 '张三' '赵六'
4 '赵六' '张三'
5 '张三' '赵六'
6 '赵六' '张三'
淘汰 '赵六'
winner '张三'
# 回文检查器(palindrome checker)
palindrome
[ˈpalɪndrəʊm]回文 是正反都能读通的单词、词组、数或一系列字符的序列,例如 madam 或 racecar
有不同的算法可以检查一个词组或字符串是否为回文
- 将字符串反向排列并检查它和原字符串是否相同
- 也可以用栈来完成,push 后,再 pop 出来,比较是否相同
- 利用数据结构来解决这个问题最简单的方式是使用双端队列,通过不断比较 deque.removeFront() 是否等于 deque.removeBack(),即可判断是否是回文
const Deque = require('./8-deque-obj')
const Stack = require('../src/2-stack-obj')

// 字符串方式
function palindromeChecker(str) {
  let reverseStr = str.split('').reverse().join('')
  // return arr.join('') === str
  // 比较之前,消除空格、大小写影响
  function clear(src) {
    src = src.split(' ').join('').toLowerCase()
    return src
  }
  return clear(reverseStr) === clear(str)
}

// 栈方式
function palindromeChecker(str) {
  let stack = new Stack()
  let result = ''
  // 比较之前,消除空格、大小写影响
  function clear(src) {
    src = src.split(' ').join('').toLowerCase()
    return src
  }
  str = clear(str)
  for (let i = 0, len = str.length; i < len; i++) {
    stack.push(str[i])
  }
  while (!stack.isEmpty()) {
    result += stack.pop()
  }
  return str === result
}

// 双端队列方式
function palindromeChecker(str) {
  let deque = new Deque()
  let result = ''
  // 比较之前,消除空格、大小写影响
  function clear(src) {
    src = src.split(' ').join('').toLowerCase()
    return src
  }
  str = clear(str)
  for (let i = 0, len = str.length; i < len; i++) {
    deque.addBack(str[i])
  }
  while (deque.size() > 1) {
    if (deque.removeFront() !== deque.removeBack()) {
      return false
    }
  }
  return true
}

module.exports = palindromeChecker
单元测试
const expect = require('chai').expect
const palindromeChecker = require('../src/a-deque-palindrome')

describe('palindrome Test', () => {
  it('回文测试', () => {
    expect(palindromeChecker('ak')).to.be.false
    expect(palindromeChecker('akkac')).to.be.false
    expect(palindromeChecker('a')).to.be.true
    expect(palindromeChecker('aa')).to.be.true
    expect(palindromeChecker('kayak')).to.be.true
    expect(palindromeChecker('level')).to.be.true
    expect(palindromeChecker('madam')).to.be.true
    expect(palindromeChecker('racecar')).to.be.true
    expect(palindromeChecker('Was it a Car or a cat I saw')).to.be.true
    expect(palindromeChecker('Step on no pets')).to.be.true
  })
})
# JavaScript 任务队列/事件循环
当我们在浏览器中打开新标签时,会创建一个任务队列。这是因为每个标签都是单线程处理所有的任务,称为事件循环。详情参考:Tasks, microtasks, queues and schedules - JakeArchibald.com (opens new window)
除了比较好理解的宏任务与微任务外,还有 JS 调用栈概念,主要是 UI 事件相关的细节
- 如果是用户点击 UI 触发的事件,事件分派(dispatch)后,JS 调用栈仅有一个事件分派。执行完该事件的微任务队列后,事件冒泡,这才开始执行对应事件处理函数。
- 如果是 JS 触发 xx.click() 事件,冒泡事件会同步分派,JS 调用栈会有两个事件回调等待执行。
# 第 6 章 链表
链表是一种数据结构,数组数据结构的缺陷:大小是固定的,从数组起点或终点添加到或删除元素的成本较高,因为要移动元素。链表相比数组的优点:无需移动元素就能轻松添加或移除元素
链表和数组类似,存储有序元素集合。链表的元素在内存中并不是连续的。链表中每个元素节点都存放当前节点本身内容,以及下一个元素的引用(指针),生活中类似链表的例子:火车、寻宝游戏
# 单向链表
下面来实现链表 LinkedList 类,需要借助节点 Node 类
class Node {
  constructor(element) {
    this.element = element
    this.next = undefined
  }
}

class LinkedList {
  constructor() {
    this.count = 0
    this.head = undefined
  }
}

let list = new LinkedList()
list.push(1)
list.push(2)
链表支持如下方法
push(element)在链表尾部添加一个元素removeAt(pos)从链表特定位置移除一个元素,返回移除的元素getElementAt(index)返回链表指定位置的元素,如果不存在返回 undefinedinsert(element, position)向链表指定位置插入元素,成功 true,失败 falseindexOf(element)返回元素在链表中的索引remove(element)移除元素isEmpty()判断链表是否为空size()链表元素个数,和数组 length 类似getHead()获取链表 headtoString()返回表示链表的字符串
完整实现如下
class Node {
  constructor(element) {
    this.element = element
    this.next = undefined
  }
}

class LinkedList {
  constructor() {
    this.count = 0
    this.head = undefined
  }

  // 向尾部添加元素
  push(element) {
    const node = new Node(element)
    // 如果链表为空
    if (!this.head) {
      this.head = node
    } else {
      // 找到尾部节点
      let lastNode = this.head
      while (lastNode.next) {
        lastNode = lastNode.next
      }
      lastNode.next = node
    }
    this.count++
  }

  // 从指定位置移除元素
  removeAt(index) {
    // 越界检查
    if (index < 0 || index >= this.count) {
      return undefined
    }
    let current = this.head
    // 如果是移除 head 节点
    if (index === 0) {
      this.head = current.next
    } else {
      // index >= 1 找到前一个元素,找到后一个元素(current.next)
      let prevNode = undefined
      while (index--) {
        prevNode = current
        current = current.next
      }
      prevNode.next = current.next
      // let prevNode = this.getElementAt(index - 1)
      // current = prevNode.next
      // prevNode.next = current.next
    }
    this.count--
    return current
  }

  // 获取指定位置的元素
  getElementAt(index) {
    // 越界检查
    if (index < 0 || index >= this.count) {
      return undefined
    }
    let current = this.head
    while (index--) {
      current = current.next
    }
    return current
  }

  // 指定位置插入元素
  insert(element, index) {
    // 越界检查
    if (index < 0 || index > this.count) {
      return false
    }
    let node = new Node(element)
    if (index === 0) {
      node.next = this.head
      this.head = node
    } else {
      // index >= 1
      let prevNode = this.getElementAt(index - 1)
      // prevNode xxx xxx
      node.next = prevNode.next
      prevNode.next = node
    }
    this.count++
    return true
  }

  indexOf(element) {
    let current = this.head
    for (let i = 0; i < this.count; i++) {
      // 可以在构造函数中传入 equalsFn,判定节点相等的函数
      if (current.element === element) {
        return i
      }
      current = current.next
    }
    return -1
  }

  remove(element) {
    let index = this.indexOf(element)
    return this.removeAt(index)
  }

  isEmpty() {
    return this.size() === 0
  }
  size() {
    return this.count
  }
  getHead() {
    return this.head
  }
  toString() {
    if (!this.head) {
      return ''
    }
    // 链表不为空
    let current = this.head
    let str = ''
    for (let i = 0; i < this.count; i++) {
      str += current.element
      if (i !== this.count - 1) {
        str += ','
      }
      current = current.next
    }
    return str
  }
}

module.exports = LinkedList
单元测试
// test/b-linked-list.spec.js
const expect = require('chai').expect
const LinkedList = require('../src/b-linked-list')
let list = null

describe('LinkedList test', () => {
  beforeEach(() => {
    list = new LinkedList()
  })

  it('push(),isEmpty(),size(),toStriing() test', () => {
    expect(list.isEmpty()).to.be.true
    list.push(1)
    list.push(3)
    list.push(2)
    expect(list.isEmpty()).to.be.false
    expect(list.size()).to.equal(3)
    expect(list.toString()).to.equal('1,3,2')
  })

  it('getElementAt(),removeAt() test', () => {
    expect(list.getElementAt(0)).to.be.undefined
    list.push(1)
    list.push(3)
    list.push(2)
    expect(list.getElementAt(3)).to.be.undefined
    expect(list.getElementAt(2).element).to.equal(2)
    expect(list.getElementAt(1).element).to.equal(3)
    expect(list.getElementAt(0).element).to.equal(1)
    expect(list.removeAt(0).element).to.equal(1)
    expect(list.size()).to.equal(2)
    expect(list.toString()).to.equal('3,2')
    expect(list.removeAt(2)).to.be.undefined
  })

  it('insert(),indexOf(),remove() test', () => {
    list.insert(1, 0)
    list.insert(2, 0) // 2 1
    list.insert(3, 1) // 2 3 1
    list.insert(4, 3) // 2 3 1 4
    expect(list.insert(5, 5)).to.be.false
    expect(list.toString()).to.equal('2,3,1,4')
    expect(list.indexOf(12)).to.equal(-1)
    expect(list.indexOf(4)).to.equal(3)
    expect(list.indexOf(2)).to.equal(0)
    expect(list.indexOf(3)).to.equal(1)
    expect(list.remove(4).element).to.equal(4)
    expect(list.size()).to.equal(3)
    expect(list.remove(2).element).to.equal(2)
    expect(list.size()).to.equal(2)
  })
})
链表有多种不同的类型,除了上面介绍的单向链表外,还有双向链表、循环链表等
# 双向链表
双向链表在单向链表的基础上,多了一个尾节点引用(指针)tail,每个节点多了一个 prev 引用
class DoublyNode extends Node {
  constructor(element) {
    super(element)
    this.prev = undefined
    // 等价于
    // this.element = element
    // this.next = undefined
    // this.prev = undefined
  }
}
class DoublyLinkedList extends LinkedList {
  constructor() {
    super()
    this.tail = undefined // 尾巴
    // 等价于
    // this.count = 0
    // this.head = undefined
    // this.tail = undefined
  }
}
需要重写 push()、removeAt()、insert()、getElementAt() 方法
const LinkedList = require('./b-linked-list')

class Node {
  constructor(element) {
    this.element = element
    this.next = undefined
  }
}

class DoublyNode extends Node {
  constructor(element) {
    super(element)
    this.prev = undefined
  }
}

class DoublyLinkedList extends LinkedList {
  constructor() {
    super()
    this.tail = undefined // 尾部节点
  }

  // 向尾部添加元素(重写)
  push(element) {
    const node = new DoublyNode(element)
    // 如果链表为空
    if (!this.head) {
      this.head = node
      this.tail = node
    } else {
      // 首尾相连
      this.tail.next = node
      node.prev = this.tail
      this.tail = node
    }
    this.count++
  }

  // 从指定位置移除元素
  removeAt(index) {
    // 越界检查
    if (index < 0 || index >= this.count) {
      return undefined
    }
    let current = this.head
    // 如果是移除 head 节点
    if (index === 0) {
      this.head = current.next
      this.head && (this.head.prev = undefined)
      // this.tail 可能会发生变更
      if (this.size() === 1) {
        this.tail = undefined
      }
    } else if (index === this.count - 1) {
      // 如果是末尾,可以不用遍历,直接使用 tail 指针
      // index >= 1, count >= 2
      current = this.tail
      this.tail = this.tail.prev
      this.tail.next = undefined
    } else {
      // index >= 1, count >= 2,不是末尾
      while (index--) {
        current = current.next
      }
      let prevNode = current.prev
      let nextNode = current.next
      prevNode.next = nextNode
      nextNode.prev = prevNode
    }
    this.count--
    return current
  }

  // 获取指定位置的元素
  getElementAt(index) {
    // 越界检查
    if (index < 0 || index >= this.count) {
      return undefined
    }
    if (index === this.count - 1) {
      return this.tail
    }
    let current = this.head
    while (index--) {
      current = current.next
    }
    return current
  }

  // 指定位置插入元素
  insert(element, index) {
    // 越界检查
    if (index < 0 || index > this.count) {
      return false
    }
    let node = new DoublyNode(element)
    if (index === 0) {
      if (!this.head) {
        this.head = node
        this.tail = node
      } else {
        node.next = this.head
        this.head.prev = node
        this.head = node
      }
    } else if (index === this.count) {
      // 尾部插入
      this.tail.next = node
      node.prev = this.tail
      this.tail = node
    } else {
      // index >= 1,非尾部
      let prevNode = this.getElementAt(index - 1)
      node.next = prevNode.next
      prevNode.next.prev = node
      prevNode.next = node
      node.prev = prevNode
    }
    this.count++
    return true
  }
}

module.exports = DoublyLinkedList
单元测试可以直接使用单向链表的单元测试,替换下 class 即可
# 循环链表
循环链表指的是,尾部节点的 next 指向头部节点
class CircularLinkedList extends LinkedList {
}
需要重写 push()、removeAt()、insert() 方法
const LinkedList = require('./b-linked-list')
class Node {
  constructor(element) {
    this.element = element
    this.next = undefined
  }
}
class CircularLinkedList extends LinkedList {
  // 向尾部添加元素
  push(element) {
    const node = new Node(element)
    node.next = this.head
    // 如果链表为空
    if (!this.head) {
      this.head = node
      this.head.next = this.head
    } else {
      // 找到尾部节点
      let lastNode = this.head
      while (lastNode.next !== this.head) {
        lastNode = lastNode.next
      }
      lastNode.next = node
    }
    this.count++
  }

  // 从指定位置移除元素
  removeAt(index) {
    // 越界检查
    if (index < 0 || index >= this.count) {
      return undefined
    }
    let current = this.head
    // 获取尾部节点
    let tail = this.getElementAt(this.count - 1)
    // 如果是移除 head 节点
    if (index === 0) {
      if (this.size() === 1) {
        this.head = undefined
      } else {
        this.head = current.next
        tail.next = this.head
      }
    } else {
      // index >= 1 找到前一个元素,找到后一个元素(current.next)
      let prevNode = undefined
      while (index--) {
        prevNode = current
        current = current.next
      }
      prevNode.next = current.next
      // let prevNode = this.getElementAt(index - 1)
      // current = prevNode.next
      // prevNode.next = current.next
    }
    this.count--
    return current
  }

  // 指定位置插入元素
  insert(element, index) {
    // 越界检查
    if (index < 0 || index > this.count) {
      return false
    }
    let node = new Node(element)
    if (index === 0) {
      if (!this.head) {
        this.head = node
        this.head.next = this.head
      } else {
        let tail = this.getElementAt(this.count - 1)
        node.next = this.head
        this.head = node
        tail.next = this.head
      }
    } else {
      // index >= 1
      let prevNode = this.getElementAt(index - 1)
      // prevNode xxx xxx
      node.next = prevNode.next
      prevNode.next = node
    }
    this.count++
    return true
  }
}

module.exports = CircularLinkedList
单元测试和单向链表单元测试基本一致,修改个 class 即可
# 有序链表
有序链表,一般指的是按大小顺序存放的链表,当然也可以使用其他指标来排序
function defaultCompare(a, b) {
  if (a === b) {
    return 0
  }
  return a > b ? 1 : -1
}

class SortedLinkedList extends LinkedList {
  constructor(compareFn = defaultCompare) {
    super()
    this.compareFn = compareFn
  }
}
需要重写 insert(),push() 方法,完整实现如下:
const LinkedList = require('./b-linked-list')
class Node {
  constructor(element) {
    this.element = element
    this.next = undefined
  }
}

function defaultCompare(a, b) {
  if (a === b) {
    return 0
  }
  return a > b ? 1 : -1
}

class SortedLinkedList extends LinkedList {
  constructor(compareFn = defaultCompare) {
    super()
    this.compareFn = compareFn
  }

  getInsertIndex(element) {
    let current = this.head
    for (let i = 0; i < this.count; i++) {
      if (this.compareFn(element, current.element) < 0) {
        return i
      }
      current = current.next
    }
    return this.count
  }

  // 向尾部添加元素
  push(element) {
    const pos = this.getInsertIndex(element)
    return super.insert(element, pos)
  }

  // 指定位置插入元素
  insert(element) {
    const pos = this.getInsertIndex(element)
    // console.log(pos)
    return super.insert(element, pos)
  }
}

module.exports = SortedLinkedList
单元测试
// test/e-sorted-linked-list.js
const expect = require('chai').expect
const SortedLinkedList = require('../src/e-sorted-linked-list')
let list = null

describe('SortedLinkedList test', () => {
  beforeEach(() => {
    list = new SortedLinkedList()
  })

  it('push(),isEmpty(),size(),toStriing() test', () => {
    expect(list.isEmpty()).to.be.true
    list.push(1)
    list.push(3)
    list.push(2)
    expect(list.isEmpty()).to.be.false
    expect(list.size()).to.equal(3)
    expect(list.toString()).to.equal('1,2,3')
  })

  it('getElementAt(),removeAt() test', () => {
    expect(list.getElementAt(0)).to.be.undefined
    list.push(1)
    list.push(3)
    list.push(2)
    expect(list.getElementAt(3)).to.be.undefined
    expect(list.getElementAt(2).element).to.equal(3)
    expect(list.getElementAt(1).element).to.equal(2)
    expect(list.getElementAt(0).element).to.equal(1)
    expect(list.removeAt(0).element).to.equal(1)
    expect(list.size()).to.equal(2)
    expect(list.toString()).to.equal('2,3')
    expect(list.removeAt(2)).to.be.undefined
  })

  it('insert(),indexOf(),remove() test', () => {
    list.insert(1, 0)
    list.insert(2, 0) // 1 2
    list.insert(3, 1) // 1 2 3
    list.insert(4, 3) // 1 2 3 4
    expect(list.insert(5, 5)).to.be.true
    expect(list.toString()).to.equal('1,2,3,4,5')
    expect(list.indexOf(12)).to.equal(-1)
    expect(list.indexOf(4)).to.equal(3)
    expect(list.indexOf(2)).to.equal(1)
    expect(list.indexOf(3)).to.equal(2)
    expect(list.remove(4).element).to.equal(4)
    expect(list.size()).to.equal(4)
    expect(list.remove(2).element).to.equal(2)
    expect(list.size()).to.equal(3)
  })
})
# 使用链表实现栈
我们可以使用链表来实现栈、队列、双向队列等数据结构,下面使用 双向链表来创建 栈 数据结构,可以重用链表数据结构内部的方法,快速的实现栈
const DoublyLinkedList = require('./c-doubly-linked-list')

class StackLinkedList {
  constructor() {
    this.items = new DoublyLinkedList()
  }

  push(element) {
    this.items.push(element)
  }

  pop() {
    if (this.isEmpty()) {
      return undefined
    }
    return this.items.removeAt(this.size() - 1).element
  }

  peek() {
    if (this.isEmpty()) {
      return undefined
    }
    return this.items.getElementAt(this.size() - 1).element
  }

  isEmpty() {
    return this.items.isEmpty()
  }

  get length() {
    return this.size()
  }

  size() {
    return this.items.size()
  }

  clear() {
    this.items = new DoublyLinkedList()
  }

  toString() {
    return this.items.toString()
  }
}

module.exports = StackLinkedList
单元测试
// test/f-stack-linked-list.spec.js
const StackLinkedList = require('../src/f-stack-linked-list')
const expect = require('chai').expect
let stack = null

describe('StackLinkedList Test', () => {
  beforeEach(() => {
    stack = new StackLinkedList()
  })

  it('empty test', () => {
    expect(stack.isEmpty()).to.equal(true)
    expect(stack.size()).to.equal(0)
  })

  it('push()/size()/toString() test', () => {
    stack.push('a')
    expect(stack.isEmpty()).to.equal(false)
    expect(stack.size()).to.equal(1)
    stack.push('b')
    expect(stack.size()).to.equal(2)
    stack.push('c')
    expect(stack.size()).to.equal(3)
    stack.push('d')
    stack.push('e')
    stack.push('f')
    expect(stack.length).to.equal(6)
    expect(stack.toString()).to.equal('a,b,c,d,e,f')
  })

  it('pop()/length test', () => {
    // stack.push('a', 'b', 'c', 'd')
    const arr = ['a', 'b', 'c', 'd']
    arr.forEach((item) => stack.push(item))
    expect(stack.pop()).to.equal('d')
    expect(stack.length).to.equal(3)
    expect(stack.pop()).to.equal('c')
    expect(stack.length).to.equal(2)
    expect(stack.pop()).to.equal('b')
    expect(stack.length).to.equal(1)
    expect(stack.pop()).to.equal('a')
    expect(stack.length).to.equal(0)
    expect(stack.pop()).to.equal(undefined)
    expect(stack.length).to.equal(0)
  })

  it('peek() test', () => {
    const arr = ['a', 'b', 'c', 'd']
    arr.forEach((item) => stack.push(item))
    expect(stack.peek()).to.equal('d')
    expect(stack.length).to.equal(4)
    stack.pop()
    stack.pop()
    expect(stack.peek()).to.equal('b')
  })

  it('clear()/isEmpty() test', () => {
    const arr = ['a', 'b']
    arr.forEach((item) => stack.push(item))
    expect(stack.length).to.equal(2)
    expect(stack.isEmpty()).to.equal(false)
    stack.clear()
    expect(stack.length).to.equal(0)
    expect(stack.isEmpty()).to.equal(true)
  })
})
# 第 7 章 集合
前面介绍了数组、栈、队列、链表这些 顺序 数据结构,本章介绍集合,它是一种不允许值重复的顺序数据结构
- 从头创建一个 Set 类
- 用 Set 进行数学运算:交集、并集、差集、子集
- ES6 原生 Set 类型
集合 是由一组无序且唯一的项组成的,使用了与有限集合相同数学概念。例如:集合 N = { 0, 1, 2, 3, ..}
空集 就是不包含任何元素的集合
可以把集合想象成一个没有重复元素、没有顺序概念的数组
# 创建集合类
这里我们使用 对象 而不是 数组 来表示集合 items,因为 JS 中不允许一个键指向两个不同的属性,这就保证了集合中元素的唯一性,也可以使用数组来实现。
class Set {
  constructor() {
    this.items = {}
  }
}
集合需要实现如下方法
add(element)将 element 添加到集合delete(element)删除集合中的 element 元素has(element)判断元素是否在集合中clear()清空集合size()返回结合长度values()方法一个包含集合中所有元素的数组
class Set {
  constructor() {
    this.items = {}
  }

  has(element) {
    return element in this.items
    // return this.items.hasOwnProperty(element)
    // return Object.prototype.hasOwnProperty.call(this.items, element)
  }

  add(element) {
    if (this.has(element)) {
      return false
    }
    this.items[element] = element
    return true
  }

  delete(element) {
    if (this.has(element)) {
      delete this.items[element]
      return true
    }
    return false
  }

  clear() {
    this.items = {}
  }

  size() {
    return Object.keys(this.items).length
    // let keys = []
    // for (key in this.items) {
    //   if (this.items.hasOwnProperty(key)) {
    //     keys.push(key)
    //   }
    // }
    // return keys.length
  }

  values() {
    return Object.values(this.items)
    // let values = []
    // for (key in this.items) {
    //   if (this.items.hasOwnProperty(key)) {
    //     values.push(this.items[key])
    //   }
    // }
    // return values
  }
}

module.exports = Set
单元测试
// test/g-set.spec.js
const Set = require('../src/g-set')
const expect = require('chai').expect
let set = null

describe('Set Test', () => {
  beforeEach(() => {
    set = new Set()
  })

  it('has(),add(),size(),values(),delete(),clear() test', () => {
    set.add(1)
    expect(set.values()).to.deep.equal([1])
    expect(set.has(1)).to.be.true
    expect(set.size()).to.equal(1)
    set.add(2)
    expect(set.values()).to.deep.equal([1, 2])
    expect(set.has(2)).to.be.true
    expect(set.size()).to.equal(2)
    set.add(3)
    expect(set.has(9)).to.be.false
    expect(set.values()).to.deep.equal([1, 2, 3])
    set.delete(2)
    set.delete(4)
    set.delete(5)
    expect(set.size()).to.equal(2)
    set.clear()
    expect(set.size()).to.equal(0)
  })
})
# 集合运算
集合是数学中的概念,在计算机领域也非常重要,主要应用之一是 数据库。集合被用于查询的设计和处理,当创建一条关系型数据库的查询语句时,使用的就是集合运算,返回一个数据集合。我们创建 SQL 查询命令时
- 可以指定从表中获取全部数据还是获取其中的子集
- 也可以获取两张表共有的数据或者只存在于一张表中(不存在与另一张表中)的数据。
这些 SQL 领域的运算叫做 联接,而 SQL 联接 的基础就是集合运算。可以对集合进行如下运算
并集 unionA ∪ B = { x | x ∈ A 或 x ∈ B } 返回一个包含两个集合中所有元素的新集合交集 intersectionA ∩ B = { x | x ∈ A 且 x ∈ B } 返回一个包含两个集合中共有元素的新集合差集 differenceA - B = { x | x ∈ A 且 x ∉ B } 返回一个包含所有存在于第一个集合且不存在于第二个集合的元素的新集合子集 isSubsetOfA ⊆ B 验证一个给定集合是否是另一个集合的子集
class Set {
  // ....
  // 集合其他方法

  union(otherSet) {
    let unionSet = new Set()
    this.values().forEach((item) => unionSet.add(item))
    otherSet.values().forEach((item) => unionSet.add(item))
    return unionSet
  }

  intersection(otherSet) {
    let intersectionSet = new Set()
    // 使用比较小的集合来遍历
    let curValues = this.values()
    let otherValues = otherSet.values()
    let smallerSet = curValues
    let biggerSet = otherValues
    if (curValues.length > otherValues.length) {
      smallerSet = otherValues
      biggerSet = curValues
    }
    smallerSet.forEach((item) => {
      if (biggerSet.includes(item)) {
        intersectionSet.add(item)
      }
    })
    return intersectionSet
  }

  difference(otherSet) {
    let differenceSet = new Set()
    this.values().forEach((value) => {
      if (!otherSet.has(value)) {
        differenceSet.add(value)
      }
    })
    return differenceSet
  }

  isSubsetOf(otherSet) {
    if (this.size() > otherSet.size()) {
      return false
    }
    for (let i = 0, len = this.size(); i < len; i++) {
      if (!otherSet.has(this.values()[i])) {
        return false
      }
    }
    return true
  }
}
单元测试部分
// ...
it('union(),intersection(),difference(),isSubsetOf() test', () => {
  let setArr = [1, 2, 3]
  let setBArr = [3, 4, 5, 6]
  let setCArr = [4, 5]
  let setB = new Set()
  let setC = new Set()
  setArr.forEach((value) => set.add(value))
  setBArr.forEach((value) => setB.add(value))
  setCArr.forEach((value) => setC.add(value))
  expect(set.union(setB).values()).to.deep.equal([1, 2, 3, 4, 5, 6])
  expect(set.union(setC).values()).to.deep.equal([1, 2, 3, 4, 5])
  expect(set.intersection(setB).values()).to.deep.equal([3])
  expect(setB.intersection(setC).values()).to.deep.equal([4, 5])
  expect(set.difference(setB).values()).to.deep.equal([1, 2])
  expect(setB.difference(setC).values()).to.deep.equal([3, 6])
  expect(set.isSubsetOf(setB)).to.be.false
  expect(setC.isSubsetOf(setB)).to.be.true
})
// ...
# ES6 原生 Set
ES6 原生支持 Set,使用方法如下
let set = new Set()
set.add(1)
set.add(2)
console.log(set.values()) // SetIterator {1, 2}
console.log(set.has(1)) // true
console.log(set.size) // 2
另外还支持 delete(),clear(), forEach(), entries() 等
原生 Set 也可以自己实现并集、交集、差集,另外也可以通过扩展运算符(...) 来实现
let setA = new Set([1, 3, 2])
let setB = new Set([2, 5])
// 并集 Set(4) {1, 3, 2, 5}
console.log(new Set([...setA, ...setB]))
// 交集 Set(1) {2}
console.log(new Set([...setA].filter(x => setB.has(x))))
// 差集 Set(2) {1, 3}
console.log(new Set([...setA].filter(x => !setB.has(x))))
# 多重集或袋
前面了解到,集合数据结构不允许重复的元素,但数学中,有一种叫做 多重集(multiset) 的概念,允许我们向集合中添加之前已经添加的元素。它在计算集合中元素的出现次数时很有用,在数据库系统中得到了广泛的应用。
# 第 8 章 字典和散列表
字典和散列表是非顺序结构,和集合类似,也是存储唯一值(不重复值)的数据结构。字典和散列表是以键、值对的形式来存储数据,两种数据结构的实现方式略有不同,字典中每个键只能有一个值,散列表中,一个键可以有多个值。本章主要介绍如下内容
- 字典数据结构
- 散列表数据结构
- 处理散列表中的冲突
- ES6 Map、WeakMap 和 WeakSet
# 字典
字典也称作 映射、符号表或关联数组,对应 ES6 中的 Map 实现
在字典中,理想的情况是使用字符串作为键名,值可以是任何类型,由于 JS 不是强类型的语言,所以我们这里使用一个函数将 key 转换为字符串
class Dictionary {
  constructor(toStrFn = defaultToString) {
    this.toStrFn = toStrFn
    this.table = {}
  }
}
字典需要实现如下方法
set(key, value)向字典中添加新元素,如果 key 已经存在,原来的 value 值会被新值覆盖remove(key)通过 key 移除字典中对应的数据值hasKey(key)字段中是否有对应的 keyget(key)获取 key 对应的值clear()清空字典中的所有值size()返回字典中包含值的数量isEmpty()判断字典是否为空keys()将字典中的所有键名,以数组的方式返回values()将字典中的所有数值,以数组的方式返回keyValues()将字典中所有的[{key: xx, value: ''}, ...]对返回forEach(callbackFn)迭代字典中所有的键值对,callbackFn 有两个参数,key 和 value,callbackFn 中 return false 会结束循环
完整代码如下
function defaultToString(item) {
  if (item === null) {
    return 'NULL'
  } else if (item === undefined) {
    return 'UNDEFINED'
  } else if (typeof item === 'string' || item instanceof String) {
    return `${item}`
  }
  return item.toString()
}

class ValuePair {
  constructor(key, value) {
    this.key = key
    this.value = value
  }
  toString() {
    return `[#${this.key}: ${this.value}]`
  }
}

class Dictionary {
  constructor(toStrFn = defaultToString) {
    this.toStrFn = toStrFn
    this.table = {}
  }

  set(key, value) {
    if (key != null && value != null) {
      this.table[this.toStrFn(key)] = new ValuePair(key, value)
      return true
    }
    return false
  }

  remove(key) {
    if (this.hasKey(key)) {
      delete this.table[this.toStrFn(key)]
      return true
    }
    return false
  }

  hasKey(key) {
    return this.table[this.toStrFn(key)] != null
  }

  get(key) {
    let valuePair = this.table[this.toStrFn(key)]
    return valuePair == null ? undefined : valuePair.value
  }

  keyValues() {
    return Object.values(this.table) // 键值对数组
  }

  keys() {
    return Object.values(this.table).map((item) => item.key)
  }

  values() {
    return Object.values(this.table).map((item) => item.value)
  }

  forEach(callbackFn) {
    let valuePairs = this.keyValues()
    for (let i = 0, len = valuePairs.length; i < len; i++) {
      let result = callbackFn(valuePairs[i].key, valuePairs[i].value)
      if (result === false) {
        break
      }
    }
  }

  clear() {
    this.table = {}
  }

  size() {
    return Object.keys(this.table).length
  }

  isEmpty() {
    return this.size() === 0
  }

  toString() {
    if (this.isEmpty()) {
      return ''
    }
    let valuePairs = this.keyValues()
    let str = ''
    for (let i = 0, len = valuePairs.length; i < len; i++) {
      str += valuePairs[i].toString()
      if (i !== len - 1) {
        str += ','
      }
    }
    return str
  }
}

module.exports = Dictionary
单元测试
// test/h-dictionary.spec.js
const Dictionary = require('../src/h-dictionary')
const expect = require('chai').expect
let dictionary = null

describe('Dictionary Test', () => {
  beforeEach(() => {
    dictionary = new Dictionary()
  })

  it('set(),hasKey(),size(),keys(),values(),get(),keyValues() test', () => {
    dictionary.set('a', 'a@gmail.com')
    dictionary.set('b', 'b@gmail.com')
    dictionary.set('c', 'c@gmail.com')
    expect(dictionary.hasKey('a')).to.be.true
    expect(dictionary.hasKey('e')).to.be.false
    expect(dictionary.size()).to.equal(3)
    expect(dictionary.keys()).to.deep.equal(['a', 'b', 'c'])
    expect(dictionary.values()).to.deep.equal(['a@gmail.com', 'b@gmail.com', 'c@gmail.com'])
    expect(dictionary.get('a')).to.equal('a@gmail.com')
    dictionary.remove('b')
    expect(dictionary.keys()).to.deep.equal(['a', 'c'])
    expect(dictionary.keyValues()).to.deep.equal([
      { key: 'a', value: 'a@gmail.com' },
      { key: 'c', value: 'c@gmail.com' },
    ])
  })

  it('forEach(),isEmpty(),clear(),toString test', () => {
    dictionary.set('a', '1')
    dictionary.set('b', '2')
    expect(dictionary.isEmpty()).to.be.false
    expect(dictionary.toString()).to.equal('[#a: 1],[#b: 2]')
    let arr = []
    dictionary.set('c', '3')
    dictionary.forEach((key, value) => {
      arr.push([key, value])
      if (key === 'b') {
        return false
      }
    })
    expect(arr).to.deep.equal([
      ['a', '1'],
      ['b', '2'],
    ])
    expect(dictionary.size()).to.equal(3)
    dictionary.clear()
    expect(dictionary.isEmpty()).to.be.true
  })
})
# 散列表
散列表 HashTable 类,也叫 HashMap 类,他是 Dictionary 类的一种散列(hash)实现方式
散列 算法的作用是尽可能快的在数据结构中找到一个值。
在 Dictionary 中获取一个值,使用 get 方法,需要迭代整个数据结构来找到它,如果使用散列表,就知道值的具体位置,因此能够快速的检索到该值。散列函数的作用是给定一个键值,然后返回值在表中的地址。
- 散列表可以用来对数据库进行索引,它可以保存键和表中记录的引用
- JS 语言内部使用散列表来表示每个对象
class HashTable {
  constructor(toStrFn = defaultToString) {
    this.toStrFn = toStrFn
    this.table = {}
  }
}
实现如下方法
put(key, value)向删列表增加一个新项,或更新值remove(key)根据键值,移除散列表中的值get(key)获取散列表中 key 对应的值
和字典不同的地方在于,字典的 key 是将用户传入的 key 转换字符串当做键值。散列表是将用户传入的 key 通过 hash 函数,转为 hash code 后当做存储时的键值。keyValues()、keys()、values()、size()、isEmpty()、toString() 等方法和 字典 基本一致
class HashTable {
  constructor(toStrFn = defaultToString) {
    this.toStrFn = toStrFn
    this.table = {}
  }

  // 简单的散列函数,容易生成重复的 hash code,后面会介绍怎么解决
  loseloseHashCode(key) {
    if (typeof key === 'number') {
      return key
    }
    let tableKey = this.toStrFn(key)
    let hash = 0
    for (let i = 0, len = tableKey.length; i < len; i++) {
      hash += tableKey.charCodeAt(i)
    }
    return hash % 37
  }

  // 将用户传入的 key ,通过 hash 函数转为 hash code 用于内部实际的键值
  hashCode(key) {
    return this.loseloseHashCode(key)
    // return this.djb2HashCode(key)
  }

  put(key, value) {
    if (key != null && value != null) {
      let position = this.hashCode(key)
      this.table[position] = new ValuePair(key, value)
      return true
    }
    return false
  }

  get(key) {
    let valuePair = this.table[this.hashCode(key)]
    return valuePair == null ? undefined : valuePair.value
  }

  remove(key) {
    let hash = this.hashCode(key)
    let valuePair = this.table[hash]
    if (valuePair !== null) {
      delete this.table[hash]
      return true
    }
    return false
  }
  // ... 省略和字典一致的一些方法
}

// ... 省略和字典一致的内容

module.exports = HashTable
单元测试
const HashTable = require('../src/i-hash-table')
const expect = require('chai').expect
let hashTable = null

describe('HashTable Test', () => {
  beforeEach(() => {
    hashTable = new HashTable()
  })

  it('put(),remove(),get() test', () => {
    hashTable.put('zhangsan', '1')
    hashTable.put('lisi', '2')
    console.log(hashTable)
    // table: {
    //   '7': ValuePair { key: 'zhangsan', value: '1' },
    //   '26': ValuePair { key: 'lisi', value: '2' }
    // }
    expect(hashTable.get('lisi')).to.equal('2')
    expect(hashTable.get('zhangsan')).to.equal('1')
    expect(hashTable.toString()).to.equal('[#zhangsan: 1],[#lisi: 2]')
    hashTable.remove('lisi')
    expect(hashTable.toString()).to.equal('[#zhangsan: 1]')
  })
})
# 更好的散列函数
上面的散列函数中,生成的 hash code 很容易重复,会导致数据有问题,可以使用更加更高级的散列函数,这样生成的 hash code 重复率会大大减少
// 并不是最好的散列函数,但这是最受社区推崇的散列函数之一
djb2HashCode(key) {
  const tableKey = this.toStrFn(key)
  let hash = 5381
  for (let i = 0; i < tableKey.length; i++) {
    hash = hash * 33 + tableKey.charCodeAt(i)
  }
  return hash % 1013
}
// table: {
//   '142': ValuePair { key: 'zhangsan', value: '1' },
//   '920': ValuePair { key: 'lisi', value: '2' }
// }
# 散列值重复时的处理(散列集合)
当散列函数生成的散列值,不可避免重复时,有三种解决方法
- 分离链接 separate chaining,每个散列表的值都是一个链表(linked list),每次新增 (put) 值时,如果该 key 的值不是 链表,创建一个链表。向链表中 push 键值对对象 ValuePair
put(key, value) {
  if (key != null && value != null) {
    const position = this.hashCode(key);
    if (this.table[position] == null) {
      this.table[position] = new LinkedList();
    }
    this.table[position].push(new ValuePair(key, value));
    return true;
  }
  return false;
}

get(key) {
  const position = this.hashCode(key);
  const linkedList = this.table[position];
  if (linkedList != null && !linkedList.isEmpty()) {
    let current = linkedList.getHead();
    while (current != null) {
      if (current.element.key === key) {
        return current.element.value;
      }
      current = current.next;
    }
  }
  return undefined;
}
- 线性探查 linear probing, 如果 position 位置被占用了,就尝试找 position++ 的位置,直到找到空闲位置存储
put(key, value) {
  if (key != null && value != null) {
    const position = this.hashCode(key);
    if (this.table[position] == null) {
      this.table[position] = new ValuePair(key, value);
    } else {
      let index = position + 1;
      while (this.table[index] != null) {
        index++;
      }
      this.table[index] = new ValuePair(key, value);
    }
    return true;
  }
  return false;
}

get(key) {
  const position = this.hashCode(key);
  if (this.table[position] != null) {
    if (this.table[position].key === key) {
      return this.table[position].value;
    }
    let index = position + 1;
    while (this.table[index] != null && this.table[index].key !== key) {
      index++;
    }
    if (this.table[index] != null && this.table[index].key === key) {
      return this.table[position].value;
    }
  }
  return undefined;
}
# ES6 原生 Map 类
与字典不同的是 Map 的 values 和 keys 等方法都返回一个 Iterator 迭代器,而不是值或键构成的数组,另外 size 是属性,而不是方法。
Map 的键可以是对象、数组等
const map = new Map()
map.set('zhangsan', '1')
map.set('lisi', '2')
map.set('wangwu', '3')
console.log(map.has('zhangsan')) // true
console.log(map.size) // '3'
console.log(map.keys()) // MapIterator {"zhangsan", "lisi", "wangwu"}
console.log(map.values()) // MapIterator {"1", "2", "3"}
console.log(map.get('lisi')) // '2'
另外它还支持 delete()、entries() 等方法
# ES6 WeakMap 类和 WeakSet 类
除了 Set 和 Map 外,ES6 还增加了他们的弱化版本 WeakSet 和 WeakMap。他们的区别是
- WeakSet 和 WeakMap 不可迭代,没有 keys, values, entries 等方法
- 只能用对象作为键
创建这两个类主要是为了性能,没有强引用的键,有利于垃圾回收。由于不可迭代,因此必须知道键才能取到值,类似于私有属性。
# 第 9 章 递归
之前的章节中,我们学习了不同的可迭代数据结构,后面我们在操作 树 和 图 数据结构时,使用 递归 会更简单。学习树和图之前,需要先理解递归是如何工作的。
递归 recursion [rɪˈkɜːʃn] 是一种解决问题的方法,函数自己调用自己
function recursionFn(someParam) {
  // 退出递归条件
  if (condition) {
    return
  }
  recursionFn(someParam)
}
# factorial 阶乘
计算一个数的阶乘,n! = 1 * 2 * ... * n。其中 0 的阶乘为 1
使用循环(迭代)来计算阶乘
function factorialIterative(n) {
  if (n < 0) {
    return
  }
  let total = 1
  for (let i = 1; i <= n; i++) {
    total *= i
  }
  return total
}
使用递归来计算阶乘
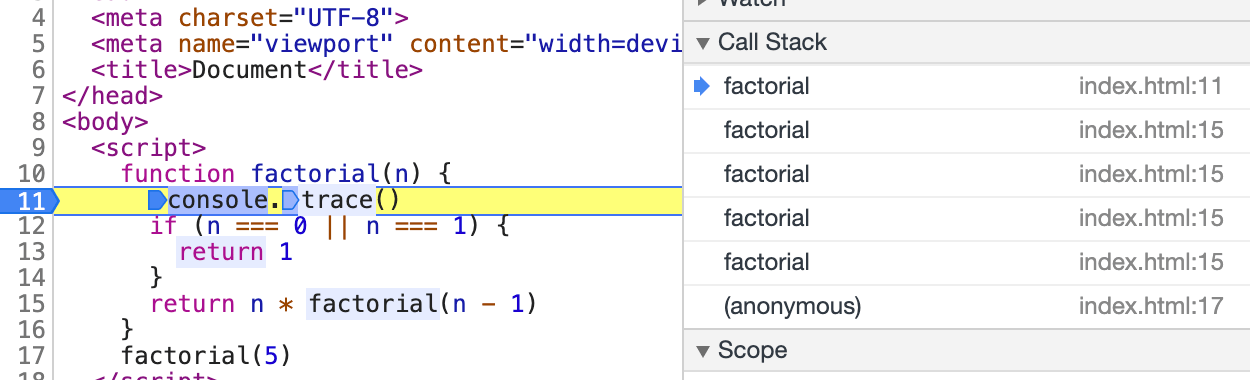
function factorial(n) {
  console.trace() // 调试 Call Stack
  if (n === 0 || n === 1) {
    return 1
  }
  return n * factorial(n - 1)
}
factorial(5) // 120
# 调用栈
每当函数被调用时,函数会进入 调用栈 的顶端,每个调用函数都依赖前一个调用的结果
// 顺序执行
// factorial(5) 5 * factorial(4)
// factorial(4) 4 * factorial(3)
// factorial(3) 3 * factorial(2)
// factorial(2) 2 * factorial(1)
// factorial(1) 1

// 调用栈
// factorial(1) 1
// factorial(2) 2 * 1
// factorial(3) 3 * 2
// factorial(4) 4 * 6
// factorial(5) 5 * 24
// 返回 120
# JS 调用栈大小的限制
如果递归忘记加停止条件,会形成死循环,一般会抛出 stack overflow 栈溢出的错误
ES6 新增了尾调用优化(tail call optimization),可以不创建新的栈帧,而是清除并重用当前栈帧
问题:在ES5中,尾调用的实现与其他函数调用实现类似:创建一个新的栈帧(stack frame),将其推入调用栈来表示函数调用。也就是说,在循环调用中,每一个未用完的栈帧都会被保存在内存中,当调用栈变得过大时会造成程序问题,也就是我们常说的栈溢出(stack overflow)。
尾调用优化是 ES6 中在系统引擎优化上做的一个改进, 如果满足以下条件,尾调用不再创建新的栈帧,而是清除并重用当前栈帧。
- 尾调用不访问当前栈帧的变量(也就是说函数不是一个闭包);
- 在函数内部,尾调用是最后一条语句;
- 尾调用的结果作为函数值返回;
更多细节参考:函数的扩展 - 尾调用优化 - ES6入门笔记 (opens new window)
# fibonacci 数列
斐波那契数:1 1 2 3 5 8 ....
使用迭代方法计算 fibonacci 数
function fibonacciIterative(n) {
  if (n < 1) {
    return 0
  }
  if (n <= 2) {
    return 1
  }
  let numA = 1
  let numB = 1
  let result = 0
  // numA numbB x
  for (let i = 3; i <= n; i++) {
    result = numA + numB
    numA = numB
    numB = result
  }
  return result
}
递归方式
function fibonacci(n) {
  if (n < 1) {
    return 0
  }
  if (n <= 2) {
    return 1
  }
  return fibonacci(n - 1) + fibonacci(n - 2)
}
执行过程如下,可以看到 fibonacci(3) 会被重复计算,为了优化该算法,可以把之前计算的值存起来,称之为记忆化
// fibonacci(5)
// fibonacci(4) + fibonacci(3)
// fibonacci(3) + fibonacci(2) | fibonacci(2) +  fibonacci(1)
记忆化菲波那切数
function fibonacciMemorization(n) {
  const memory = [0, 1]
  const fobonacci = (n) => {
    if (memory[n] != null) {
      return memory[n]
    }
    return (memory[n] = fibonacci(n - 1, memory) + fibonacci(n - 2, memory))
  }
  return fobonacci
}
单元测试
const { fibonacci, fibonacciIterative, fibonacciMemorization } = require('../src/k-fibonacci')
const expect = require('chai').expect

describe('Fibonacci Test', () => {
  it('fibonacciIterative(), fibonacci(),fibonacciMemorization() test', () => {
    expect(fibonacciIterative(1)).to.equal(1)
    expect(fibonacciIterative(2)).to.equal(1)
    expect(fibonacciIterative(3)).to.equal(2)
    expect(fibonacciIterative(5)).to.equal(5)
    expect(fibonacciIterative(12)).to.equal(144)
    expect(fibonacciIterative(10)).to.equal(55)
    expect(fibonacciIterative(30)).to.equal(832040)
    expect(fibonacci(0)).to.equal(0)
    expect(fibonacci(2)).to.equal(1)
    expect(fibonacci(3)).to.equal(2)
    expect(fibonacci(5)).to.equal(5)
    expect(fibonacci(12)).to.equal(144)
    expect(fibonacci(10)).to.equal(55)
    expect(fibonacci(30)).to.equal(832040)
    expect(fibonacciMemorization()(1)).to.equal(1)
    expect(fibonacciMemorization()(2)).to.equal(1)
    expect(fibonacciMemorization()(3)).to.equal(2)
    expect(fibonacciMemorization()(5)).to.equal(5)
    expect(fibonacciMemorization()(12)).to.equal(144)
    expect(fibonacciMemorization()(10)).to.equal(55)
    expect(fibonacciMemorization()(30)).to.equal(832040)
  })
})
# 为什么要用递归,它更快吗?
上面三种不同的 fibonacci 函数执行顺序分别是
迭代版本 > 记忆化递归 > 递归
迭代版本比递归快很多,但递归代码量少更容易理解。对于有些算法迭代可能无法使用。使用尾递归优化,递归多余消耗甚至可能被消除。
因此,我们经常使用递归,因为用它来解决问题会更简单。
# 第 10 章 树
之前介绍的都是顺序数据结构,第一个非顺序结构是散列表。下面来学习另一种非顺序结构:树,它对于快速查找数据非常有用
生活中常见的树结构:家谱、公司组织架构图
根节点树顶部的节点,没有父节点内部节点至少有一个子节点的节点外部节点(叶节点)没有子元素的节点子树节点和它的后代可以组成子树节点深度(树高度)第 0 层为 根节点,第 1 层为根节点的子节点,以此类推
# 二叉树和二叉搜索树(BST)
二叉树 中的节点最多只能有两个子节点:左侧节点,右侧节点。该定义有助于写出高效地在树中插入、查找和删除节点的算法。
二叉搜索树(BST,Binary Search Tree) 是二叉树的一种。它只允许在左侧子节点存储比父节点小的值,在右侧子节点存储比父节点大的值。
            11
     7              15
  5     9       13       20
3   6 8   10 12    14 18    25
创建 BinarySearchTree 类
class Node {
  constructor() {
    this.key = key    // 节点值
    this.left = null  // 左侧子节点
    this.right = null // 右侧子节点
  }
}

class BinarySearchTree {
  constructor() {
    this.root = null
  }
}
实现的方法:
insert(key)向树中插入新的键inOrderTraverse()中序遍历preOrderTraverse()先序遍历postOrderTraverse()后序遍历search(key)在树中查找一个键,节点存在返回 true,不存在返回 falsemin()返回树中最小的键/值max()返回树中最大的键/值remove(key)从树中移除某个键
树的遍历有三种方式:
- 中序 先遍历左侧、再遍历自己、再遍历右侧。以上行顺序访问 BST 所有节点,从最小到最大的顺序访问所有节点
- 先序 先遍历自己,再遍历左侧,再遍历右侧。以优先于后代节点的顺序访问每个节点,可用于打印结构化的文档
- 后序 先遍历左侧,再遍历右侧,再遍历自己。先访问节点的后代节点,再访问节点本身,可用于计算一个目录及其子目录中所有文件占用空间大小
class Node {
  constructor(key) {
    this.key = key // 节点值
    this.left = null // 左侧子节点
    this.right = null // 右侧子节点
  }
}

class BinarySearchTree {
  constructor() {
    this.root = null
  }

  // 递归:将 key 插入对应的位置
  insertNode(node, key) {
    // 比较 node 的键 和 key 的值谁大,大的放右边,小的放左边
    if (node.key > key) {
      // 放左边
      if (node.left === null) {
        node.left = new Node(key)
      } else {
        this.insertNode(node.left, key)
      }
    } else {
      // 放右边
      if (node.right === null) {
        node.right = new Node(key)
      } else {
        this.insertNode(node.right, key)
      }
    }
  }

  // 向树中插入新的键
  insert(key) {
    if (this.root) {
      this.insertNode(this.root, key)
    } else {
      this.root = new Node(key)
    }
  }

  // 中序遍历
  inOrderTraverse(cb) {
    this.inOrderTraverseNode(this.root, cb)
  }
  inOrderTraverseNode(node, cb) {
    if (node != null) {
      this.inOrderTraverseNode(node.left, cb)
      cb(node.key)
      this.inOrderTraverseNode(node.right, cb)
    }
  }

  // 先序遍历
  preOrderTraverse(cb) {
    this.preOrderTraverseNode(this.root, cb)
  }
  preOrderTraverseNode(node, cb) {
    if (node != null) {
      cb(node.key)
      this.preOrderTraverseNode(node.left, cb)
      this.preOrderTraverseNode(node.right, cb)
    }
  }

  // 后序遍历
  postOrderTraverse(cb) {
    this.postOrderTraverseNode(this.root, cb)
  }
  postOrderTraverseNode(node, cb) {
    if (node != null) {
      this.postOrderTraverseNode(node.left, cb)
      this.postOrderTraverseNode(node.right, cb)
      cb(node.key)
    }
  }

  //返回树中最小的键/值
  min() {
    return this.minNode(this.root)
  }
  // 最左侧是最小值
  minNode(node) {
    let current = node
    while (current != null && current.left != null) {
      current = current.left
    }
    return current
  }

  //返回树中最大的键/值
  max() {
    return this.maxNode(this.root)
  }
  // 最右侧是最大值
  maxNode(node) {
    let current = node
    while (current != null && current.right != null) {
      current = current.right
    }
    return current
  }

  // 在树中查找一个键,节点存在返回 true,不存在返回 false
  search(key) {
    return this.searchNode(this.root, key)
  }
  searchNode(node, key) {
    if (node == null) {
      return false
    }
    if (node.key > key) {
      return this.searchNode(node.left, key)
    } else if (node.key < key) {
      return this.searchNode(node.right, key)
    } else {
      // 等于
      return true
    }
  }

  //从树中移除某个键
  remove(key) {
    this.root = this.removeNode(this.root, key)
  }
  removeNode(node, key) {
    if (node == null) {
      return null
    }
    if (node.key > key) {
      node.left = this.removeNode(node.left, key)
      return node
    } else if (node.key < key) {
      node.right = this.removeNode(node.right, key)
      return node
    } else {
      // 相等
      // 1. 如果是叶子节点
      if (node.left == null && node.right == null) {
        node = null
        return node
      }
      // node.left node.right 不都为空

      // 2. 左侧为空,右侧有值。或者左侧有值,右侧为空
      if (node.left == null) {
        node = node.right
        return node
      } else if (node.right == null) {
        node = node.left
        return node
      }

      // 3.两侧都有节点,寻找右侧最小的替代自己,然后从右侧子树移除自己
      let minNode = this.minNode(node.right)
      node.key = minNode.key
      node.right = this.removeNode(node.right, minNode.key)
      return node
    }
  }
}
module.exports = BinarySearchTree
示例
const tree = new BinarySearchTree()
let arr = [11, 7, 15, 5, 3, 9, 8, 10, 13, 12, 14, 20, 18, 25]
arr.forEach((item) => tree.insert(item))

function getArr(tree, type) {
  const typeMap = {
    inOrder: 'inOrderTraverse',
    preOrder: 'preOrderTraverse',
    postOrder: 'postOrderTraverse',
  }
  let arr = []
  tree[typeMap[type]]((item) => arr.push(item))
  return arr
}

console.log(getArr(tree, 'inOrder'))
// [ 3,  5,  7,  8,  9, 10, 11, 12, 13, 14, 15, 18, 20, 25 ]
console.log(getArr(tree, 'preOrder'))
// [ 11,  7,  5,  3,  9,  8, 10, 15, 13, 12, 14, 20, 18, 25 ]
console.log(getArr(tree, 'postOrder'))
// [ 3,  5,  8, 10,  9,  7, 12, 14, 13, 18, 25, 20, 15, 11 ]

console.log(tree.min()) // Node { key: 3, left: null, right: null }
console.log(tree.max()) // Node { key: 25, left: null, right: null }

console.log(tree.search(1)) // false
console.log(tree.search(8)) // true

tree.remove(6)
console.log(getArr(tree, 'inOrder'))
// [ 3,  5,  7,  8,  9, 10, 11, 12, 13, 14, 15, 18, 20, 25]
tree.remove(5)
console.log(getArr(tree, 'inOrder'))
// [ 3, 7,  8,  9, 10, 11, 12, 13, 14, 15, 18, 20, 25]
tree.remove(15)
console.log(getArr(tree, 'inOrder'))
// [ 3, 7,  8,  9, 10, 11, 12, 13, 14, 18, 20, 25]
# 自平衡树
二叉搜索树(BST)存在一个问题,树的某一条分支可能非常深,这样树的一条分支有很多层,而其他分支就只有几层。
在这条非常深的分支进行添加、移除和删除某个节点时,会有性能问题。为了解决这个问题,有一种树叫做 Adelson-Velsky-Landi 树(AVL 树)
AVL 树是一种自平衡的二叉搜索树(Self-balancing binary search tree),任何一个节点左右两侧子树高度之差最多为 1
# Adelson-Velsky-Landi 树(AVL树)
AVL 是为了解决 二叉查找树(BST)退化为链表的情况。
AVL 树得名于它的发明者G. M. Adelson-Velsky 阿杰尔松-韦利斯基 (苏联数学家、计算机科学家) 和 E. M. Landis 叶夫根尼·兰迪斯(苏联数学家),他们在 1962 年的论文《An algorithm for the organization of information》中发表了它。
AVL 的完整写法有两个版本,其中 Velsky 和 Velskii 都可以,这可能是德语、英语之间转换的原因
添加或移除节点时 AVL 树会尝试保持自平衡。任意一节点的左子树和右子树高度最多相差 1,添加或移除节点时,AVL 树会尽可能尝试转换为完全树(Complete Binary Tree)。
什么是 完全二叉树?先来看什么是 满二叉树?深度为 k,且有 2 的 k 次方 - 1 个节点的树即为 满二叉树。
# 深度 2,子节点树 3
  2
1   3
# 深度 3,子节点树 7
     4
  2      6
1   3  5   7
如果一棵树是 满二叉树,那他一定是完全二叉树。满二叉树在最底部的叶子节点中删除某些节点,就是 完全二叉树。
下面来实现一个 AVL 树,它直接继承 BST,区别在于 在树中添加节点,或移除节点时,AVL 树会检测当前树是否平衡,如果不平衡,进行翻转处理,使其平衡。
const BinarySearchTree = require('./l-binary-search-tree')
class AVLTree extends BinarySearchTree {
  constructor() {
    super()
    this.root = null
  }
}
当树不平衡时(左子树与右子树高度差值 > 1),有 4 种情况,需要做平衡操作,一般称之为 AVL 旋转。4种情况,分别对应 4 种翻转逻辑
- 左子树高度 > 右子树高度 且 左侧子节点也是平衡或左侧较重,简称 LL
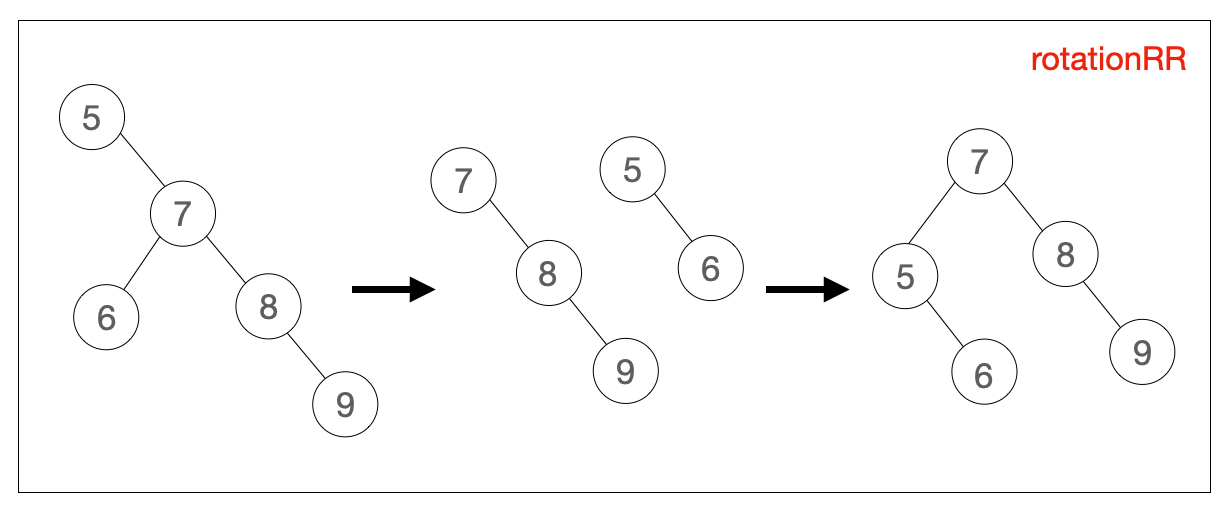
- 右子树高度 > 左子树高度 且 右侧子节点也是平衡或右侧较重,简称 RR
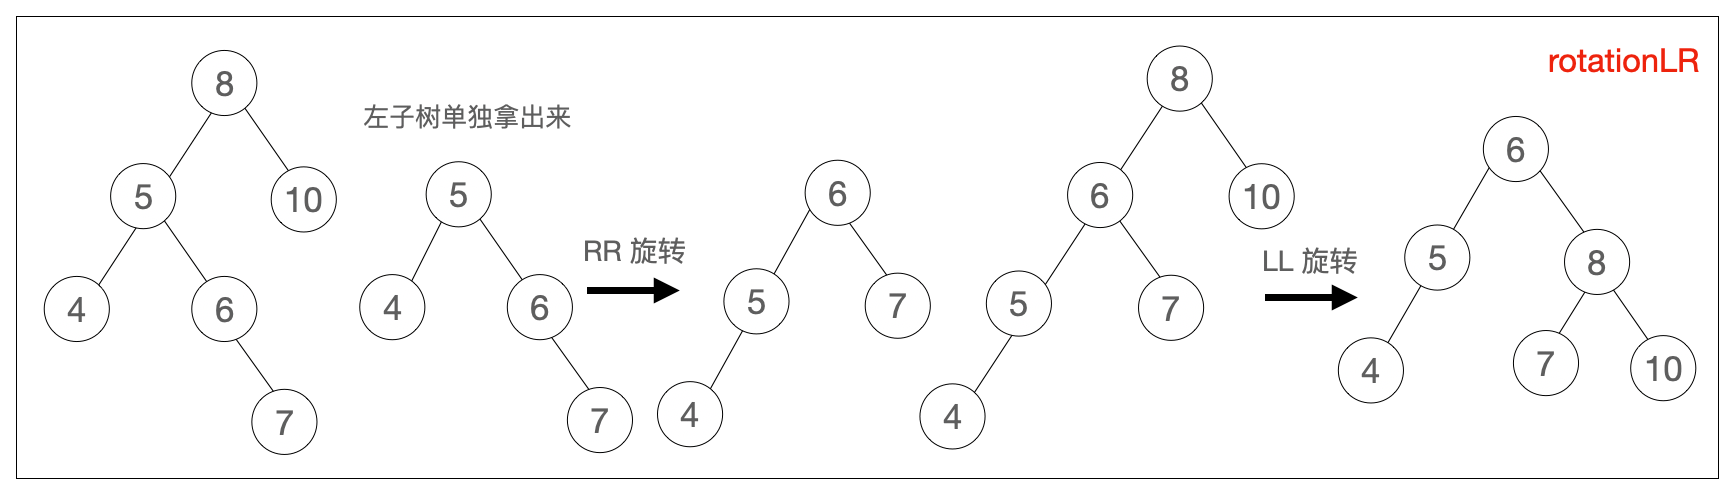
- 左侧子树高度 > 右子树高度 且 左侧子节点右侧较重,简称 LR
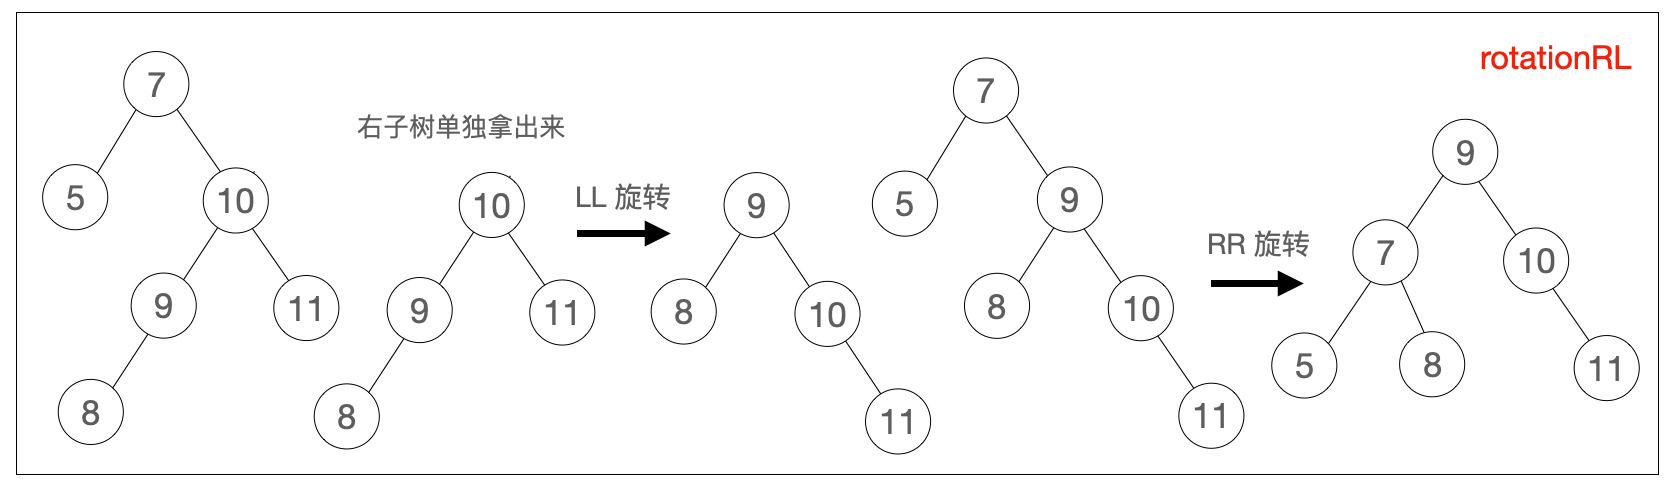
- 右子树高度 > 左子树高度 且 右侧子几点左侧较重,简称 RL
以下是上面 4 中情况的平衡处理,翻转逻辑
rotationLL(node) {
  let temp = node.left // node 的左侧子节点作为新的根节点,先保存
  node.left = temp.right // 将新根节点的右侧子节点移动到原根节点左侧
  temp.right = node // 将原根节点移动到新根节点的右侧
  return temp // 返回新的根节点
}

rotationRR(node) {
  let temp = node.right // node 的右侧子节点作为新的根节点,先保存
  node.right = temp.left // 将新根节点的左侧子节点移动到原根节点右侧
  temp.left = node // 将原根节点移动到新根节点的左侧
  return temp // 返回新的根节点
}
rotationLR(node) {
  node.left = this.rotationRR(node.left)
  return this.rotationLL(node)
}
rotationRL(node) {
  node.right = this.rotationLL(node.right)
  return this.rotationRR(node)
}
AVL 树实现如下
const BinarySearchTree = require('./l-binary-search-tree')
class Node {
  constructor(key) {
    this.key = key // 节点值
    this.left = null // 左侧子节点
    this.right = null // 右侧子节点
  }
}
class AVLTree extends BinarySearchTree {
  constructor() {
    super()
    this.root = null
  }
  // 省略
  // rotationLL(node) {}
  // rotationRR(node) {}
  // rotationLR(node) {}
  // rotationRL(node) {}

  insert(key) {
    this.root = this.insertNode(this.root, key)
  }
  insertNode(node, key) {
    if (node == null) {
      return new Node(key)
    }
    if (node.key > key) {
      node.left = this.insertNode(node.left, key)
    } else if (node.key < key) {
      node.right = this.insertNode(node.right, key)
    } else {
      return node // 已经有值相同的节点
    }
    // 验证树是否平衡
    // node.left 高度 - node.right 高度,其高度差也叫平衡因子 相差大于2 ,即不平衡
    // 由于树本来就是平衡的,且每次都有做做平衡处理,因此插入新值后,最多高度相差 2
    const balanceFactor = this.getBalanceFactor(node)
    if (balanceFactor === 2) {
      // 左侧不平衡
      return node.left.key > key ? this.rotationLL(node) : this.rotationLR(node)
    }
    if (balanceFactor === -2) {
      // 右侧不平衡,比较 node.right 的 key 与当前 key 大小
      // 如果大于,插入左侧,左侧不平衡 RL,否则插入右侧 RR
      return node.right.key > key ? this.rotationRL(node) : this.rotationRR(node)
    }
    return node
  }
  // 获取平衡因子
  getBalanceFactor(node) {
    return this.getNodeHeight(node.left) - this.getNodeHeight(node.right)
    // -2 右不平衡
    // 2 左不平衡
  }
  // 获取节点高度
  getNodeHeight(node) {
    if (node == null) {
      return -1
    }
    return Math.max(this.getNodeHeight(node.left), this.getNodeHeight(node.right)) + 1
  }

  removeNode(node, key) {
    node = super.removeNode(node, key) // 调用 BST 的移除节点方法
    if (node == null) {
      return node // 不需要平衡
    }
    // 检测树是否平衡
    const balanceFactor = this.getBalanceFactor(node)
    if (balanceFactor === 2) {
      // 左侧不平衡,说明右侧删了节点,需要再判断左侧是 LL 还是 LR
      let balanceFactorLeft = this.getBalanceFactor(node.left)
      // 左侧子节点平衡(0)或者左右相差(1) 则为 LL 否则为 LR
      return [0, 1].includes(balanceFactorLeft) ? this.rotationLL(node) : this.rotationLR(node)
    }
    if (balanceFactor === -2) {
      // 右侧不平衡
      let balanceFactorRight = this.getBalanceFactor(node.left)
      // 右侧子节点平衡(0)或者左右相差(-1) 则为 RR 否则为 RL
      return [0, -1].includes(balanceFactorRight) ? this.rotationRR(node) : this.rotationRL(node)
    }
  }
}
示例
const tree = new AVLTree()
// let arr = [11, 7, 15, 5, 3, 9, 8, 10, 13, 12, 14, 20, 18, 25] // 标准树
let arr = [11, 3, 8, 9, 10, 13, 12, 14, 20, 18, 25, 7, 15, 5] // 标准树
// let arr = [11, 7]
arr.forEach((item) => tree.insert(item))

function getArr(tree, type) {
  const typeMap = {
    inOrder: 'inOrderTraverse',
    preOrder: 'preOrderTraverse',
    postOrder: 'postOrderTraverse',
  }
  let arr = []
  tree[typeMap[type]]((item) => arr.push(item))
  return arr
}

console.log(getArr(tree, 'inOrder'))
// [ 3,  5,  7,  8,  9, 10, 11, 12, 13, 14, 15, 18, 20, 25]
console.log(getArr(tree, 'preOrder'))
// [(10, 8, 5, 3, 7, 9, 14, 12, 11, 13, 20, 18, 15, 25)]
console.log(getArr(tree, 'postOrder'))
// [ 3,  7,  5,  9,  8, 11, 13, 12, 15, 18, 25, 20, 14, 10 ]

tree.remove(9)
console.log(getArr(tree, 'inOrder'))
console.log(getArr(tree, 'preOrder'))
console.log(getArr(tree, 'postOrder'))
# 红黑树(RBT)
红黑树(RBT,Red Black Tree)是为了解决 平衡树(AVL树) 在删除、插入操作时需要频繁调整(旋转)的情况。
与 AVL 树一样,红黑树 也是一个自平衡二叉搜索树。它的左右子树高差有可能大于 1,所以红黑树不是严格意义上的平衡搜索二叉树。如果插入和删除的频率低(需要更多搜索操作),那么 AVL 树比红黑树更好。如果插入、删除频率高(旋转可能较多),红黑树性能比 AVL 树好。
红黑树遵循以下原则
- 每个节点不是红的就是黑的
- 树的根节点是黑的
- 所有叶节点(用 NULL 引用表示的节点)都是黑的,注意:这里的叶节点不是最下面有值的节点,而是不存在的 NULL 空节点
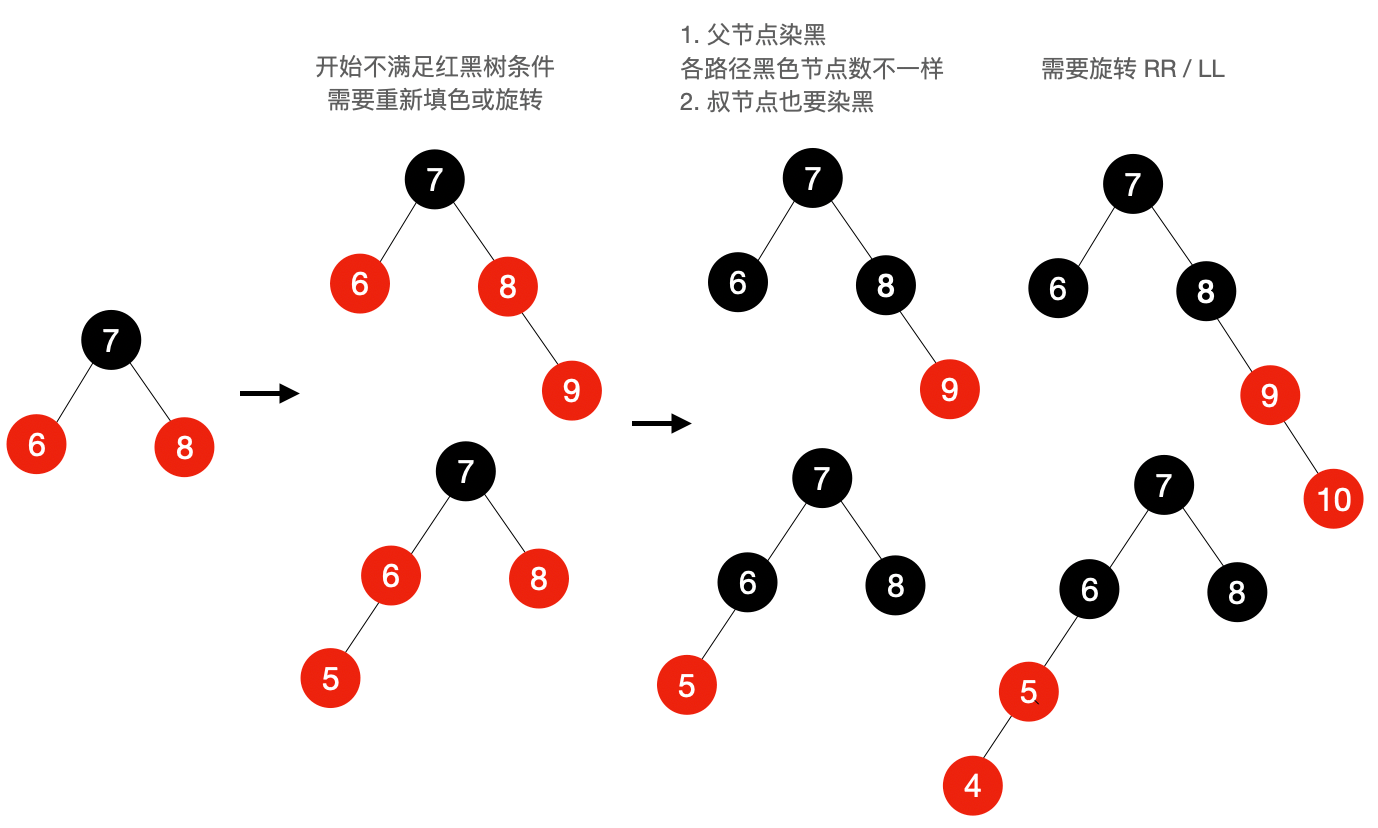
- 如果一个节点时红的,其他两个子节点都是黑的
- 不能有两个相邻的红节点(一个红节点不能有红的父节点或子节点)
- 从给定节点到它的后代节点(叶节点)的所有路径包含相同数量的黑色节点
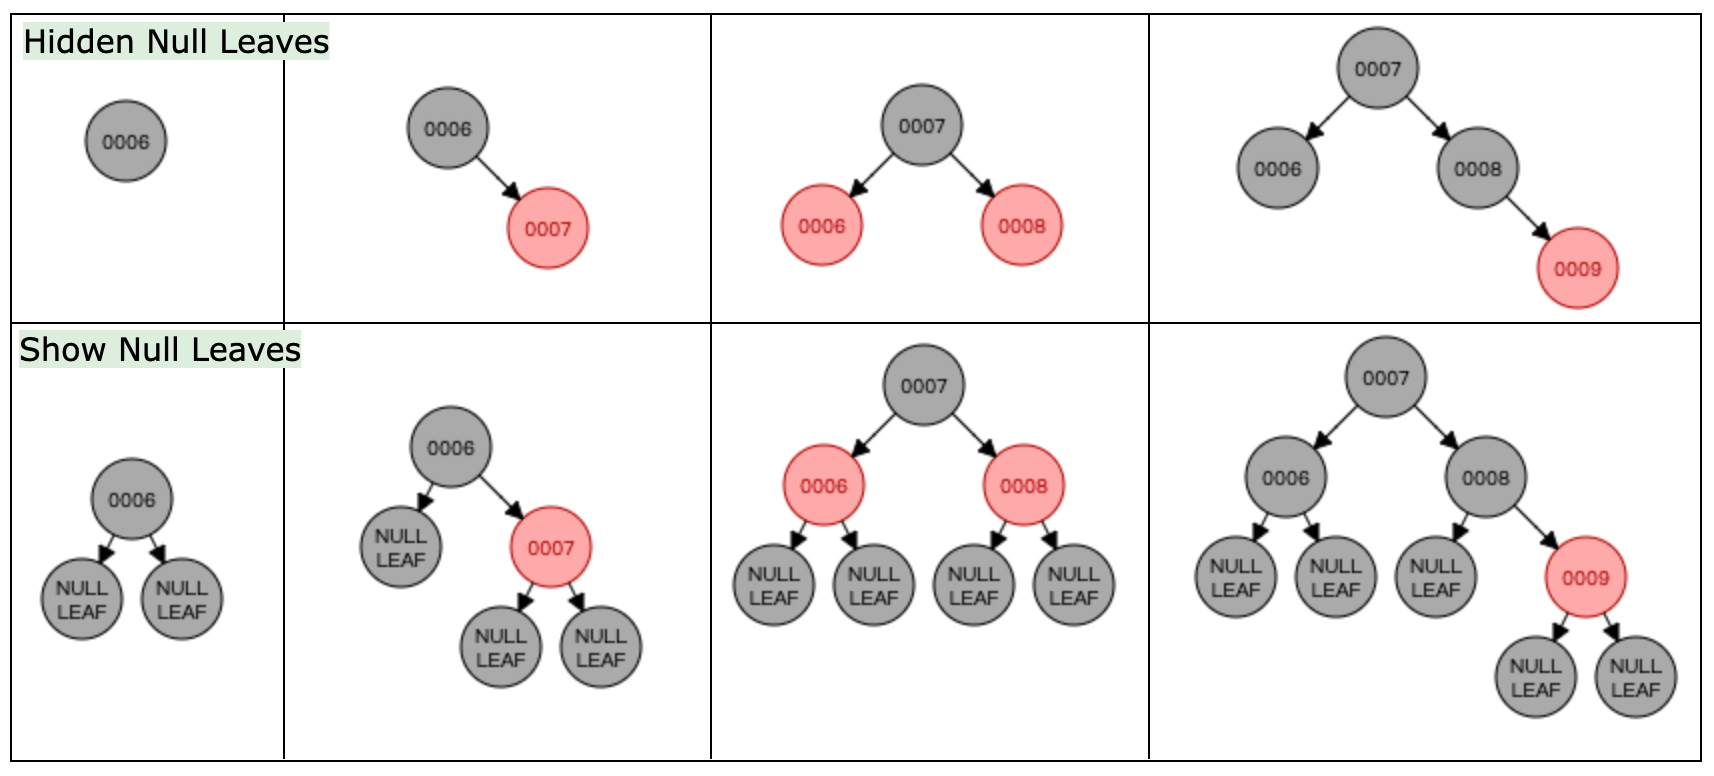
为了更加清楚的理解红黑树,很有必要使用红黑树可视化工具:Red/Black Tree Visualization (opens new window)
下面是红黑树部分代码,书中提供的代码仅 TS 版本有,JS 没有,没有介绍删除的逻辑,整体不怎么好理解,暂时放置,后面有时间再深入了解。
const BinarySearchTree = require('./l-binary-search-tree')
const Colors = {
  BLACK: 'black',
  RED: 'red',
}
class RedBlackNode {
  constructor(key) {
    this.key = key // 节点值
    this.left = null // 左侧子节点
    this.right = null // 右侧子节点
    this.color = Colors.RED
    this.parent = null
  }
  isRed() {
    return this.color === Colors.RED
  }
}

class RedBlackTree extends BinarySearchTree {
  insert(key) {
    // special case: first key
    if (this.root == null) {
      this.root = new RedBlackNode(key)
      this.root.color = Colors.BLACK
    } else {
      const newNode = this.insertNode(this.root, key)
      // 验证红黑树是否还是平衡的,是否满足所有要求:重新填色/旋转
      this.fixTreeProperties(newNode)
    }
  }

  insertNode(node, key) {
    if (key < node.key) {
      if (node.left == null) {
        node.left = new RedBlackNode(key)
        node.left.parent = node
        return node.left
      } else {
        return this.insertNode(node.left, key)
      }
    } else if (node.right == null) {
      node.right = new RedBlackNode(key)
      node.right.parent = node
      return node.right
    } else {
      return this.insertNode(node.right, key)
    }
  }

  fixTreeProperties(node) {
    while (node && node.parent && node.parent.color === Colors.RED && node.color !== Colors.BLACK) {
      let parent = node.parent
      const grandParent = parent.parent

      // case A 父节点是左侧子节点
      if (grandParent && grandParent.left === parent) {
        const uncle = grandParent.right

        // case 1: uncle of node is also red - only recoloring
        // 叔节点也是红色重新填色
        if (uncle && uncle.color === Colors.RED) {
          grandParent.color = Colors.RED
          parent.color = Colors.BLACK
          uncle.color = Colors.BLACK
          node = grandParent
        } else {
          // case 2: node is right child - left rotate
          // 节点是右侧子节点 - RR
          if (node === parent.right) {
            this.rotationRR(parent)
            node = parent
            parent = node.parent
          }

          // case 3: node is left child - right rotate
          // 节点是左侧子节点 - LL
          this.rotationLL(grandParent)
          // swap color
          parent.color = Colors.BLACK
          grandParent.color = Colors.RED
          node = parent
        }
      } else {
        // case B: parent is right child of grand parent
        // 父节点是右侧子节点

        const uncle = grandParent.left

        // case 1: uncle is read - only recoloring
        // 叔节点是红色节点 - 只需重新填色
        if (uncle && uncle.color === Colors.RED) {
          grandParent.color = Colors.RED
          parent.color = Colors.BLACK
          uncle.color = Colors.BLACK
          node = grandParent
        } else {
          // case 2: node is left child - left rotate
          // 节点是左侧子节点 LL
          if (node === parent.left) {
            this.rotationLL(parent)
            node = parent
            parent = node.parent
          }

          // case 3: node is right child - left rotate
          // 节点是右侧子节点 RR
          this.rotationRR(grandParent)
          // swap color
          parent.color = Colors.BLACK
          grandParent.color = Colors.RED
          node = parent
        }
      }
    }
    this.root.color = Colors.BLACK
  }

  /**
   * Left left case: rotate right
   *
   *       b                           a
   *      / \                         / \
   *     a   e -> rotationLL(b) ->   c   b
   *    / \                             / \
   *   c   d                           d   e
   *
   * @param node Node<T>
   */
  rotationLL(node) {
    const tmp = node.left
    node.left = tmp.right
    if (tmp.right && tmp.right.key) {
      tmp.right.parent = node
    }
    tmp.parent = node.parent
    if (!node.parent) {
      this.root = tmp
    } else {
      if (node === node.parent.left) {
        node.parent.left = tmp
      } else {
        node.parent.right = tmp
      }
    }
    tmp.right = node
    node.parent = tmp
  }

  /**
   * Right right case: rotate left
   *
   *     a                              b
   *    / \                            / \
   *   c   b   -> rotationRR(a) ->    a   e
   *      / \                        / \
   *     d   e                      c   d
   *
   * @param node Node<T>
   */
  rotationRR(node) {
    const tmp = node.right
    node.right = tmp.left
    if (tmp.left && tmp.left.key) {
      tmp.left.parent = node
    }
    tmp.parent = node.parent
    if (!node.parent) {
      this.root = tmp
    } else {
      if (node === node.parent.left) {
        node.parent.left = tmp
      } else {
        node.parent.right = tmp
      }
    }
    tmp.left = node
    node.parent = tmp
  }
}
# 第 11 章 二叉堆和堆排序
二叉堆是一种特殊的二叉树,也叫堆数据结构,它能高效、快速的找出最大值和最小值,常被应用于 优先队列、堆排序算法 中
二叉堆有两个特性:
- 它是一颗完全二叉树,树的每一层都有左侧和右侧子节点(除了最后一层的叶节点),并且最后一层的叶节点尽可能都是左侧子节点,这叫做结构特性。
- 二叉堆不是最小堆就是最大堆。最小堆允许快速导出树的最小值,最大堆允许快速导出树的最大值。所有节点都大于等于(最大堆)或小于等于(最小堆)每个它的子节点。
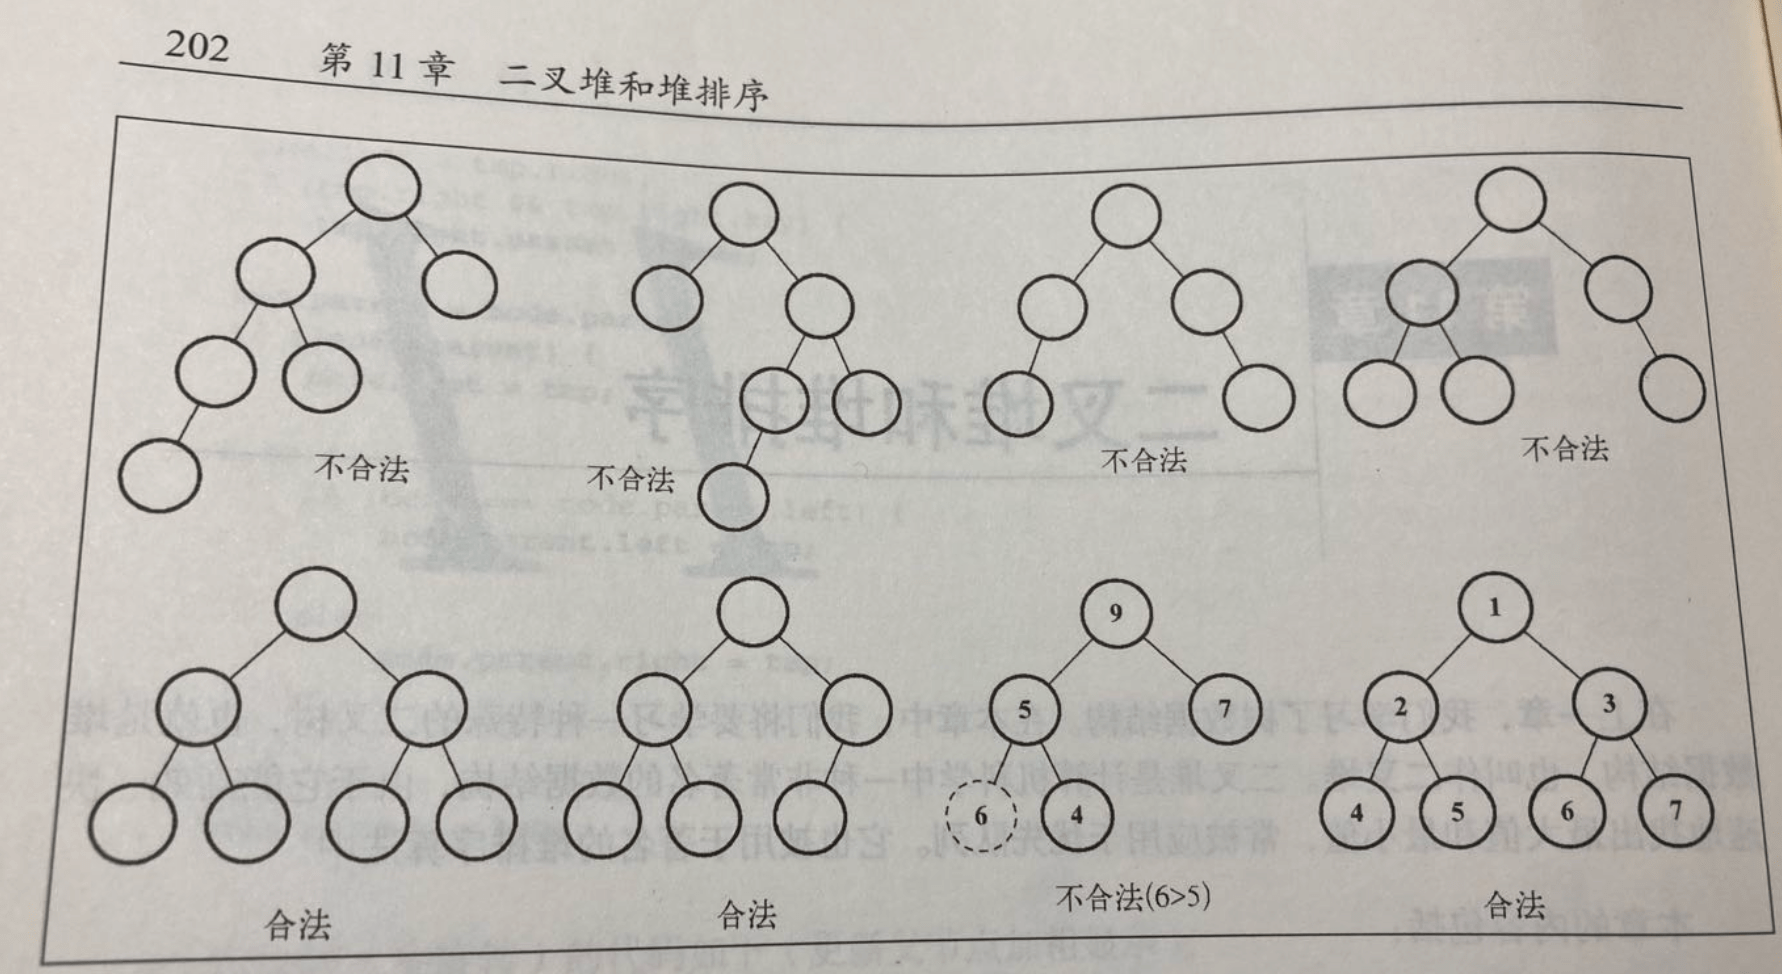
# 最小堆(MinHeap)
所有节点都小于它的子节点。
二叉树有两种表示方法:
- Node(节点) 指针表示方法
- 数组
这里使用数组来表示 heap 堆,如下图
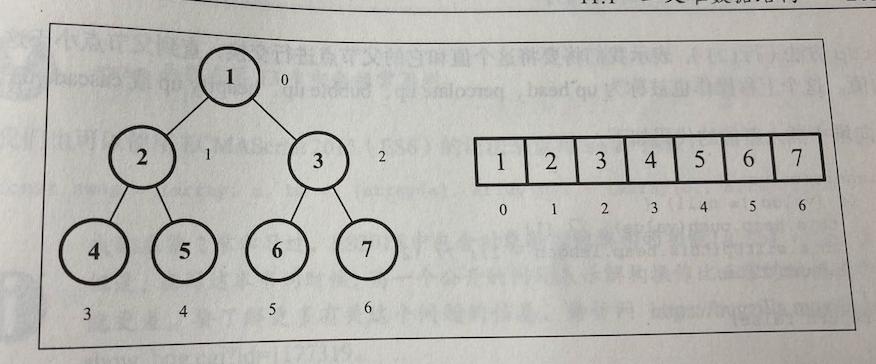
class MinHeap {
  constructor() {
    this.heap = []
  }
}
对于给定位置 index 的节点:
- left 左侧节点 2 * index + 1
- right 右侧节点 2 * index + 2
- parent 父节点 index 为 0 时 undefined, 如果位置可用为 Math.floor((index - 1) / 2)
堆主要操作
insert(value)向堆中插入一个值,成功返回 true,失败返回 falseextract()[ˈekstrækt]提取,移除最小值(最小堆)或最大值,并返回这个值findMinimum()返回最小值(最小堆)或最大值(最大堆)且不会移除这个值
insert 时,一般插入到数组最后,然后比较它与 parent 元素的大小,决定是否上移动,最小堆上移过程如下图
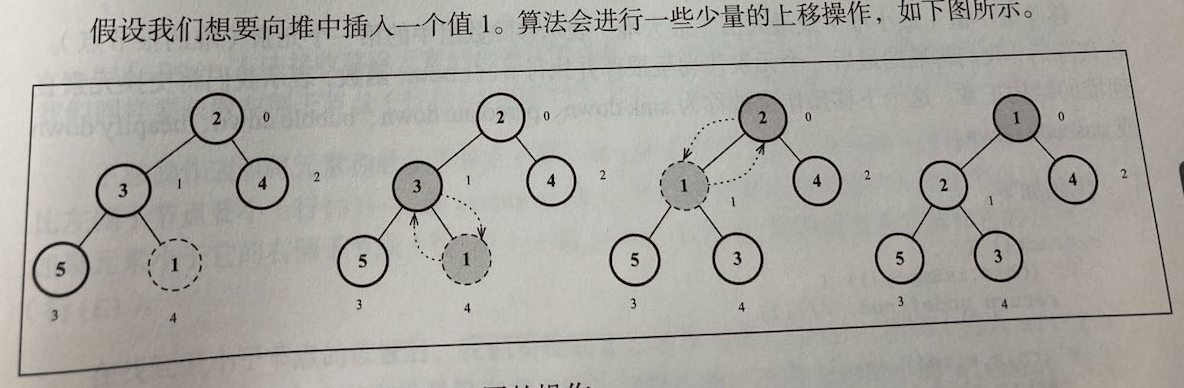
extract() 时,与 insert 相反,我们把第一个元素要删除,将最后一个元素替换到第一个元素。然后判断大小,进行下移,过程如下图
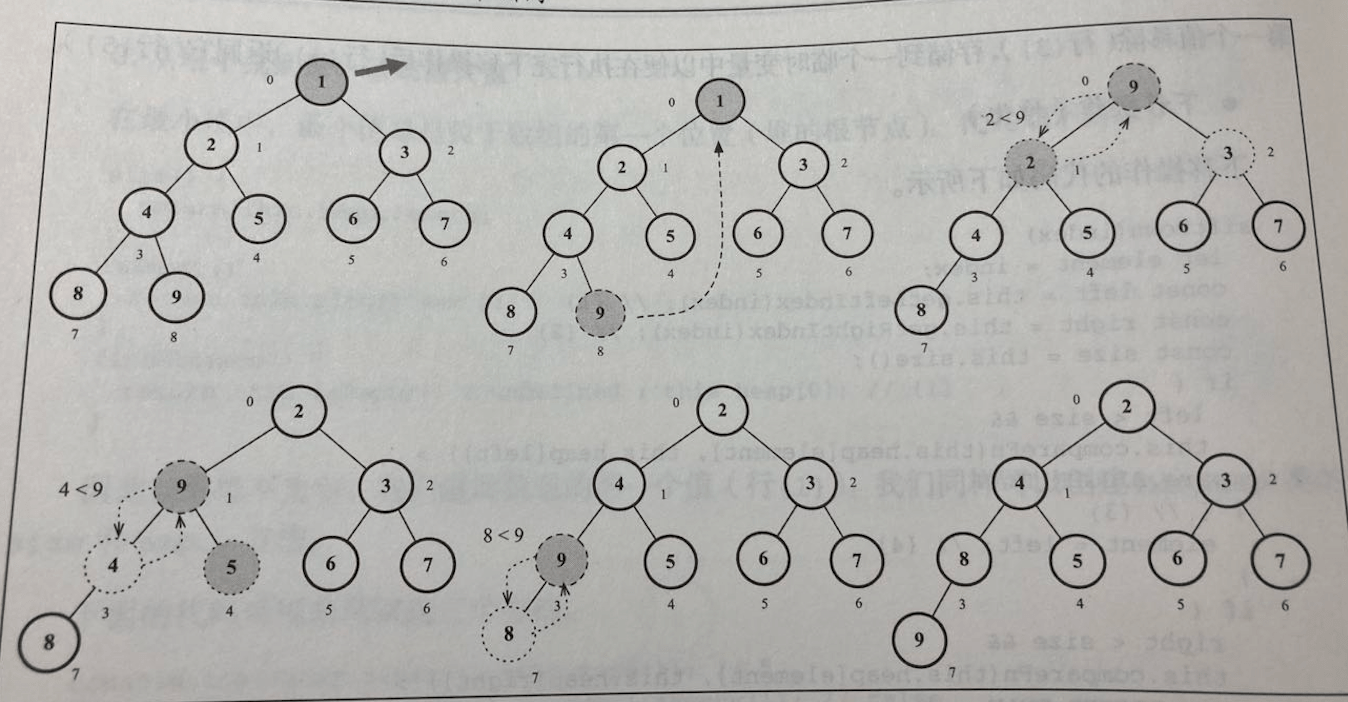
下面是最小堆具体实现代码
class MinHeap {
  constructor() {
    this.heap = []
  }

  getLeftIndex(index) {
    return 2 * index + 1
  }

  getRightIndex(index) {
    return 2 * index + 2
  }

  getParentIndex(index) {
    if (index === 0) {
      return undefined
    }
    return Math.floor((index - 1) / 2)
  }

  insert(value) {
    if (value != null) {
      // 添加到末尾
      this.heap.push(value)
      // 将最后一个节点和其父节点比较,如果 > 就和父节点交换 sift [sɪft] 筛选
      this.siftUp(this.heap.length - 1)
      return true
    }
    return false
  }

  // 上移操作
  siftUp(index) {
    let parent = this.getParentIndex(index)
    while (index > 0 && this.heap[parent] > this.heap[index]) {
      this.swap(this.heap, parent, index)
      index = parent
      parent = this.getParentIndex(index)
    }
  }

  // 交换数组中 a 和 b 的值
  swap(arr, a, b) {
    const temp = arr[a]
    arr[a] = arr[b]
    arr[b] = temp
  }

  size() {
    return this.heap.length
  }

  isEmpty() {
    return this.size() === 0
  }

  // 最小值或最大值
  findMinimum() {
    return this.isEmpty() ? undefined : this.heap[0]
  }

  extract() {
    if (this.isEmpty()) {
      return undefined
    }
    if (this.size() === 1) {
      return this.heap.shift()
    }
    // 返回最小值/最大值,末尾元素替代 root 元素,再下移操作
    const removedValue = this.heap[0]
    this.heap[0] = this.heap.pop()
    this.siftDown(0)
    return removedValue
  }

  // 下移操作,堆化
  siftDown(index) {
    let element = index
    const left = this.getLeftIndex(index)
    const right = this.getRightIndex(index)
    const size = this.size()
    // 左侧子节点比父节点小,不是最小堆,需要处理
    if (left < size && this.heap[element] > this.heap[left]) {
      element = left
    }
    // 右侧子节点比原 index 或左侧子节点大,将 element 设置为 右侧子节点位置
    if (right < size && this.heap[element] > this.heap[right]) {
      element = right
    }
    if (index !== element) {
      this.swap(this.heap, index, element)
      this.siftDown(element)
    }
  }

  getAsArray() {
    return this.heap
  }

  clear() {
    this.heap = []
  }

  heapify(array) {
    if (array) {
      this.heap = array
    }
    const maxIndex = Math.floor(this.size() / 2) - 1
    // official demo error
    // for (let i = 0; i <= maxIndex; i++) {
    for (let i = maxIndex; i >= 0; i--) {
      this.siftDown(i)
    }
    return this.heap
  }
}

module.exports = {
  MinHeap,
}
# 最大堆(MaxHeap)
最大堆和最小堆的比较正好相反,为了节省代码,我将比较函数直接写成了 > 或 <,在这里就显示出它的不足了。
如果我们像书里那样写的比较函数,我们只需要重写比较函数即可,而不用再修改比较的代码了。用以下代码可以零最小堆轻松实现最大堆。
export class MaxHeap extends MinHeap {
  constructor(compareFun = defaultCompare) {
    super(compareFn)
    this.compareFn = reverseCompare(compareFn)
    function reverseCompare(compareFn) {
      return (a, b) => compareFn(b, a)
    }
  }
}
# 堆排序算法
可以使用二叉堆数据结构来帮助我们创建一个排序算法:堆排序算法
先将数组堆化,然后使用 extract 删除提取顶部元素(最大值或最小值),extract 内部会自动 shiftDown 下移并堆化。
  heapSort(array, compareFn) {
    if (array.length <= 1) {
      return array
    }

    let result = []
    this.heapify(array) // 堆化
    // 每次取堆顶部即可
    while (this.size() >= 1) {
      result.push(this.extract())
    }
    this.heap = result
    return result
  }
整体单元测试
const expect = require('chai').expect
const { MinHeap, heapSort } = require('../src/o-min-heap')

describe('Heap', () => {
  let heap

  beforeEach(() => {
    heap = new MinHeap()
  })

  it('starts empty MinHeap', () => {
    expect(heap.size()).to.equal(0)
    expect(heap.isEmpty()).to.equal(true)
  })

  it('inserts values in the MinHeap', () => {
    const resultArray = []
    for (let i = 1; i < 10; i++) {
      resultArray.push(i)
      heap.insert(i)
      expect(heap.getAsArray()).to.deep.equal(resultArray)
    }
  })

  it('finds the min value from the MinHeap', () => {
    const resultArray = []
    for (let i = 10; i >= 1; i--) {
      resultArray.push(i)
      heap.insert(i)
      // console.log(heap.findMinimum(), i)
      expect(heap.findMinimum()).to.equal(i)
    }
  })

  it('performs heapify in the MinHeap', () => {
    const resultArray = []
    for (let i = 10; i >= 1; i--) {
      resultArray.push(i)
    }
    expect(heap.heapify(resultArray)).to.deep.equal(resultArray)
  })

  it('extracts the min value from the MinHeap', () => {
    let resultArray = []
    for (let i = 1; i < 10; i++) {
      resultArray.push(i)
      heap.insert(i)
      expect(heap.getAsArray()).to.deep.equal(resultArray)
    }

    resultArray = [
      [],
      [2, 4, 3, 8, 5, 6, 7, 9],
      [3, 4, 6, 8, 5, 9, 7],
      [4, 5, 6, 8, 7, 9],
      [5, 7, 6, 8, 9],
      [6, 7, 9, 8],
      [7, 8, 9],
      [8, 9],
      [9],
      [],
    ]

    for (let i = 1; i < 10; i++) {
      expect(heap.extract()).to.equal(i)
      expect(heap.getAsArray()).to.deep.equal(resultArray[i])
    }
  })

  it('heapify test', () => {
    let arr = [2, 5, 4, 1, 3, 6]
    expect(heap.heapify(arr)).to.deep.equal([1, 2, 4, 5, 3, 6])
  })

  it('Heap Sort', () => {
    const array = [3, 2, 5, 6, 1, 7, 8, 9]
    expect(heap.heapSort(array)).to.deep.equal([1, 2, 3, 5, 6, 7, 8, 9])
  })
})
# 第 12 章 图 Graph
之前学过散列表、树(包含二叉堆)这两种非线性数据结构,现在来看另一种非线性数据结构 ---- 图。
图是网络结构的抽象模型,是一组由边连接的节点(或顶点 vertex [ˈvɜːteks] )。任何社交网络都可以用图来表示,图还可以用来表示道路、航班及通信。
图 G = (V, E),V 是一组顶点,E是一组边,连接顶点
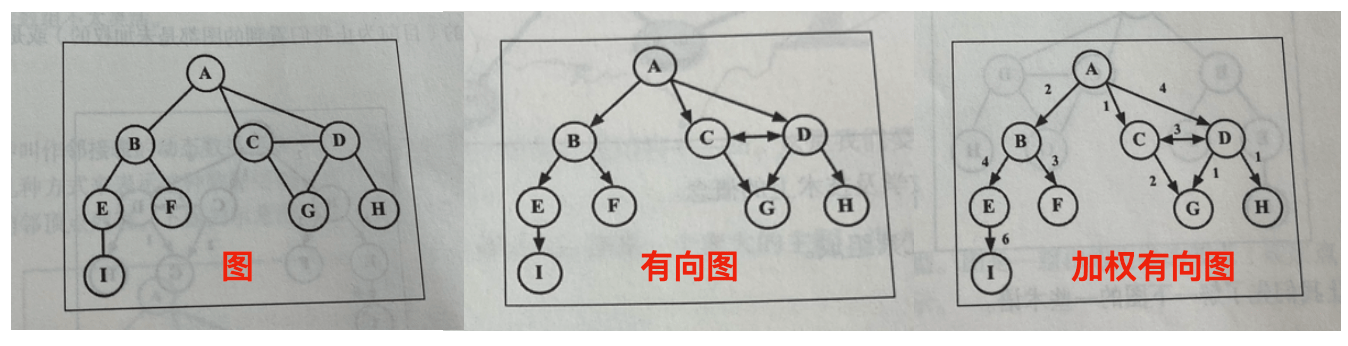
图的相关术语
相邻顶点由一条边连接在一起的顶点度一个顶点的 度 是其相邻顶点的数量路径顶点到顶点的路径,比如上图中的 ABEI、ACDG简单路径要求不包含重复的顶点,不如上图中的 ADG。环比如 ADCA,如果图中不存在环,则该图是 无环的。如果图中每个顶点间都存在路径,则该图是 连通的。有向图和无向图图可以是无向的(边没有方向)或有向的(有向图)。如果图的每两个顶点间在双向上都存在路径,则该图是 强联通的。加权和未加权图的边如果被赋予了权值,图就是加权的。
# 图的三种表示方式
邻接矩阵,图最常见的实现方式。二维数组表示,相邻为 1, 不相邻为 0。A 和 BCD 相邻,B 和 EF 相邻,C 和 A D G 相邻,依次类推 x 和 y 是否相邻,array[x][y]是否为 1邻接表可以用数组、链表、设置是散列表或字典来表示相邻顶点,比如 { a: [b, c, d], b: {a, e, f}, ... }关联矩阵用于边的数量比顶点多的情况,以节省空间和内容。二维数组 x 为边,y 为顶点。v1 边,A B 有值,v2 边 A C 有值,依次类推
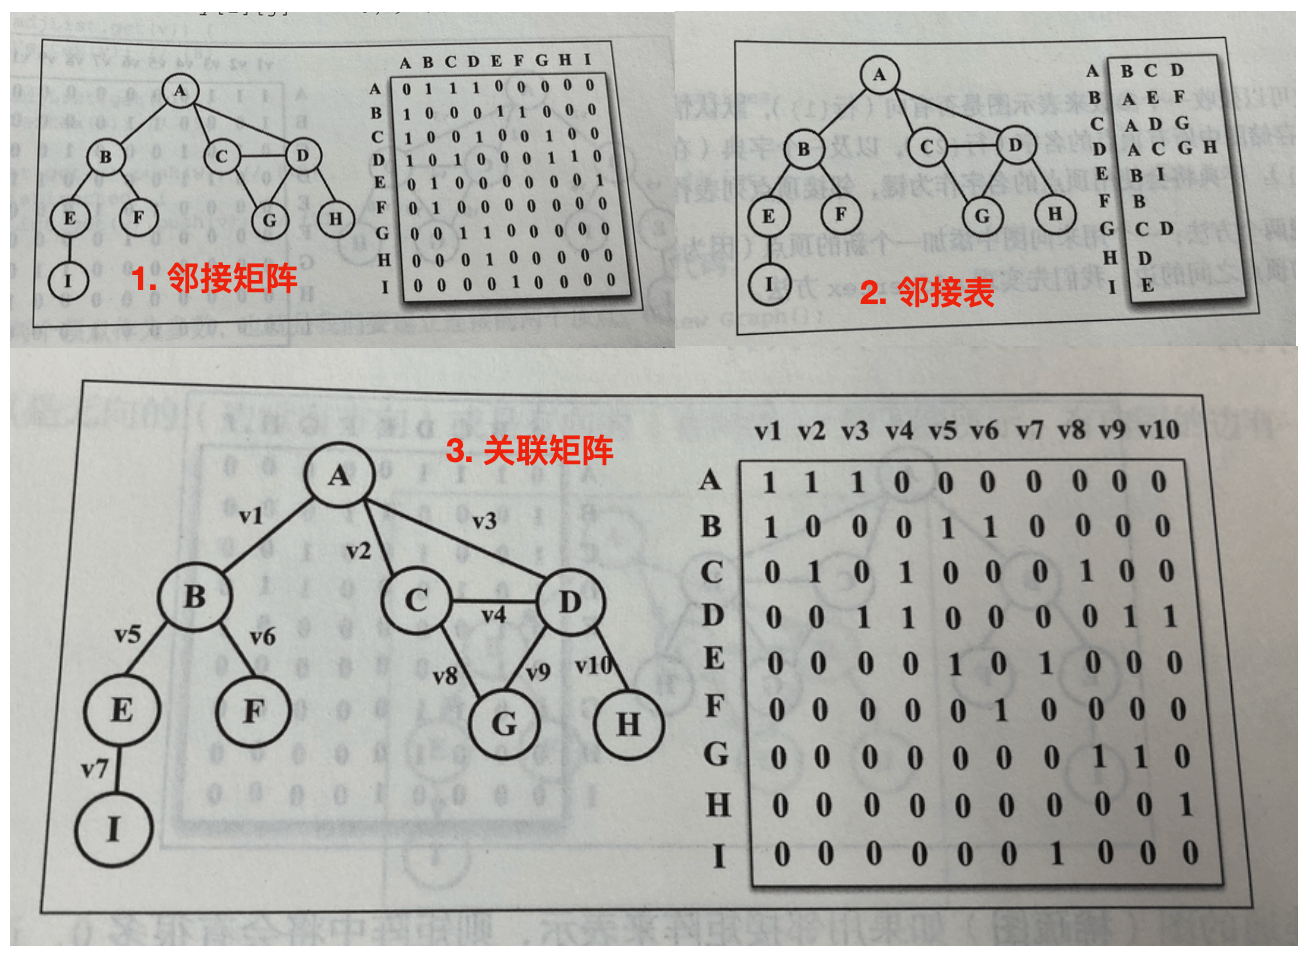
# Graph 实现
这里使用邻接表,字典来实现
const Dictionary = require('./h-dictionary')

class Graph {
  constructor(isDirected = false) {
    this.isDirected = isDirected // 是否有向
    this.vertices = [] // 数组存储顶点
    this.adjList = new Dictionary() // 存储接邻表
  }

  // 添加顶点
  addVertex(v) {
    this.vertices.push(v)
    this.adjList.set(v, [])
  }

  // 添加顶点之间的边,v, w两个顶点
  addEdge(v, w) {
    if (!this.adjList.get(v)) {
      this.addVertex(v)
    }
    if (!this.adjList.get(w)) {
      this.addVertex(w)
    }
    this.adjList.get(v).push(w)
    if (!this.isDirected) {
      // 如果无向,添加一条回去的边
      this.adjList.get(w).push(v)
    }
  }

  getVertices() {
    return this.vertices
  }

  getAdjList() {
    return this.adjList
  }

  toString() {
    let str = ''
    this.vertices.forEach((item) => {
      str += `${item} -> `
      this.adjList.get(item).forEach((subItem) => {
        str += `${subItem}`
      })
      str += '\n'
    })
    return str
  }
}

module.exports = Graph
单元测试
const expect = require('chai').expect
const Graph = require('../src/p-graph')
let graph = null
const myVertices = ['A', 'B', 'C', 'D', 'E', 'F', 'G', 'H', 'I']

describe('graph test', () => {
  beforeEach(() => {
    graph = new Graph()
    myVertices.forEach((item) => graph.addVertex(item))
  })

  it('grap base', () => {
    graph.addEdge('A', 'B')
    graph.addEdge('A', 'C')
    graph.addEdge('A', 'D')
    expect(graph.toString()).to.equal(
      'A -> BCD\nB -> A\nC -> A\nD -> A\nE -> \nF -> \nG -> \nH -> \nI -> \n'
    )
    graph.addEdge('C', 'D')
    graph.addEdge('C', 'G')
    graph.addEdge('D', 'G')
    graph.addEdge('D', 'H')
    graph.addEdge('B', 'E')
    graph.addEdge('B', 'F')
    graph.addEdge('E', 'I')
    console.log(graph.toString())
  })
})
// A -> BCD
// B -> AEF
// C -> ADG
// D -> ACGH
// E -> BI
// F -> B
// G -> CD
// H -> D
// I -> E
# 图的遍历(广度/深度优先)
有两种算法可以进行图的遍历:
广度优先搜索(Breadth-First Search, BFS)深度优先搜索(Depth-First Search, DFS)
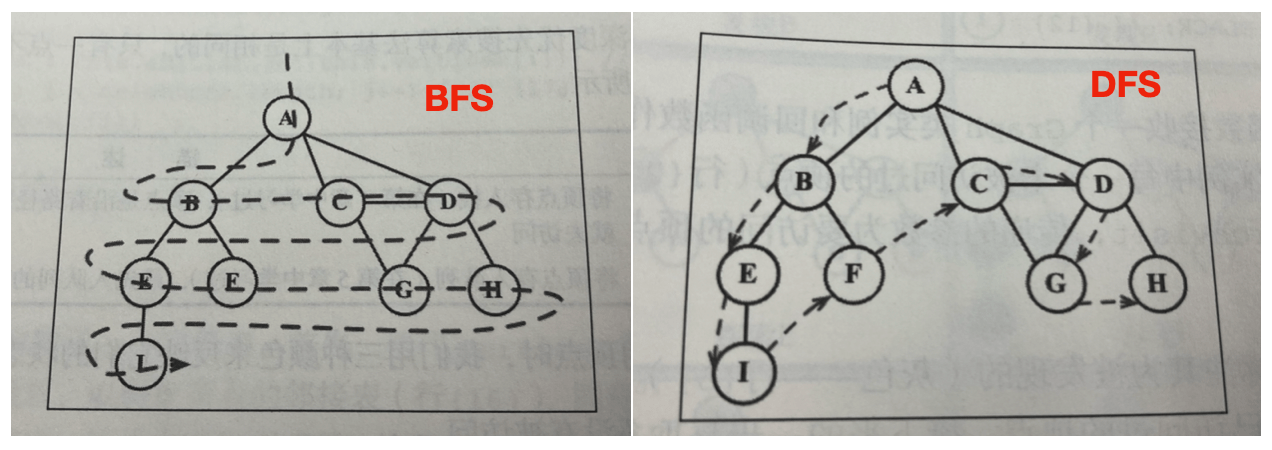
图遍历可以用于:寻找特定的顶点、寻找两个顶点之间的路径、检查图是否连通,检查图是否有环等等
| 算法 | dataStrcut | 描述 |
|---|---|---|
| 深度优先算法 | 栈 | 将顶点存入栈,顶点是沿着路径被搜索的,存在新的相邻顶点就去访问 |
| 广度优先算法 | 队列 | 将顶点存入队列,最先入队列的顶点先被探索 |
标注已经访问过的顶点时,用三种颜色来反映他们的状态
白色表示顶点还没有被访问灰色表示顶点被访问过,但并未被探索过黑色表示顶点被访问,且被完全探索过
const Colors = {
  WHITE: 0,
  GREY: 1,
  BLACK: 2
}

// 初始化每个顶点颜色
const initializeColor = vertices => {
  const color = {}
  vertices.forEach(item => {
    color[item] = Colors.WHITE
  })
  return color
}
# 广度优先搜索
- 使用队列,初始化所有起点为白色
- 将搜索的起点入队列。开一个 while 循环,当队列不为空时执行。
- 出队列,标记当前节点为灰色(访问过),遍历字典中与其连接的顶点,如果顶点是白色(未被访问)入队列,标记为灰色。遍历完后,将自己标记为黑色(已探索),执行回调,参数为顶点自己
- 出队列,上一个顶点的第一个子节点,重复步骤 3,依次类推
const Queue = require('./7-queue-obj')
const breadthFirstSearch = (graph, startVertex, callback) => {
  const vertices = graph.getVertices() // 顶点数组
  const adjList = graph.getAdjList() // 图,字典
  const color = initializeColor(vertices) // 初始化每个顶点颜色
  const queue = new Queue()
  queue.enqueue(startVertex) // 入队列

  // 队列不为空
  while (!queue.isEmpty()) {
    const u = queue.dequeue()
    const neighbors = adjList.get(u) // 获取相邻的顶点列表
    color[u] = Colors.GREY
    neighbors.forEach((item) => {
      if (color[item] === Colors.WHITE) {
        color[item] = Colors.GREY
        queue.enqueue(item)
      }
    })
    color[u] = Colors.BLACK
    if (callback) {
      callback(u)
    }
  }
}

// 简单使用
const Graph = require('./p-graph')
const myVertices = ['A', 'B', 'C', 'D', 'E', 'F', 'G', 'H', 'I']
let graph = new Graph()
myVertices.forEach((item) => graph.addVertex(item))
graph.addEdge('A', 'B')
graph.addEdge('A', 'C')
graph.addEdge('A', 'D')
graph.addEdge('C', 'D')
graph.addEdge('C', 'G')
graph.addEdge('D', 'G')
graph.addEdge('D', 'H')
graph.addEdge('B', 'E')
graph.addEdge('B', 'F')
graph.addEdge('E', 'I')
breadthFirstSearch(graph, myVertices[0], console.log)
// A B C D E F G H I
使用 BFS 寻找最短路径,BFS 算法除了可以输出被访问顶点的顺序外,还可以用于寻找最短路径。来看下面的问题:
给定一个图 G 和源顶点 v,找出每个顶点 u 和 v 之间最短路径距离(以边的数量计算)
对于给定的顶点 v,广度优先算法会先访问所有与其距离为 1 的顶点,接着是距离为 2 的顶点,以此类推。可以使用广度优先算法来解决这个问题。在前面例子的基础上,加两个变量收集距离与上一个顶点:
- 从 v 到 u 的距离
distances[u] - 前溯点(上一个顶点)
predecessors[u],用于推导从 v 到其他每个顶点 u 的最短路径
const Queue = require('./7-queue-obj')
const BFS = (graph, startVertex) => {
  const vertices = graph.getVertices() // 顶点数组
  const adjList = graph.getAdjList() // 图,字典
  const color = initializeColor(vertices) // 初始化每个顶点颜色
  const queue = new Queue()
  const distances = {} // 每个顶点到 startVertex 的距离
  const predecessors = {} // 每个顶点的上一个顶点
  queue.enqueue(startVertex) // 入队列

  // 初始化
  vertices.forEach((item) => {
    distances[item] = 0
    predecessors[item] = null
  })

  // 队列不为空
  while (!queue.isEmpty()) {
    const u = queue.dequeue()
    const neighbors = adjList.get(u) // 获取相邻的顶点列表
    color[u] = Colors.GREY
    neighbors.forEach((item) => {
      if (color[item] === Colors.WHITE) {
        color[item] = Colors.GREY
        // 与顶点的距离 = 上个节点距顶点的距离 + 1
        distances[item] = distances[u] + 1
        // 存储上一个顶点
        predecessors[item] = u
        queue.enqueue(item)
      }
    })
    color[u] = Colors.BLACK
  }
  return { distances, predecessors }
}

const Graph = require('./p-graph')
const myVertices = ['A', 'B', 'C', 'D', 'E', 'F', 'G', 'H', 'I']
let graph = new Graph()
myVertices.forEach((item) => graph.addVertex(item))
graph.addEdge('A', 'B')
// ... 省略部分代码
graph.addEdge('E', 'I')
// breadthFirstSearch(graph, myVertices[0], console.log)
// A B C D E F G H I

console.log(BFS(graph, myVertices[0]))
// {
//   distances: { A: 0, B: 1, C: 1, D: 1, E: 2, F: 2, G: 2, H: 2, I: 3 },
//   predecessors: {
//     A: null,
//     B: 'A',
//     C: 'A',
//     D: 'A',
//     E: 'B',
//     F: 'B',
//     G: 'C',
//     H: 'D',
//     I: 'E'
//   }
// }
由此我们可以得出顶点 A 与 顶点 B、C、D 的距离为 1,与 E、F、G、H 的距离为 2,与 I 的距离为 3。再通过 predecessors 可以找到具体的路径信息。
let { distances, predecessors } = BFS(graph, myVertices[0])
let topVetex = myVertices[0]
const Stack = require('./2-stack-obj')
myVertices.forEach((item, index) => {
  if (index === 0) {
    return
  }
  let stack = new Stack()
  stack.push(item)
  let temp = item
  while (predecessors[temp] !== topVetex) {
    temp = predecessors[temp]
    stack.push(temp) // 插入首部
  }
  stack.push(topVetex)
  let str = ''
  while (!stack.isEmpty()) {
    str += stack.pop() + (stack.isEmpty() ? '' : ' - ')
  }
  console.log(str)
})
// A - B
// A - C
// A - D
// A - B - E
// A - B - F
// A - C - G
// A - D - H
// A - B - E - I
深入学习最短路径算法,本章的图不是加权图,如果需要计算加权图中的最短路径(比如,城市 A 和 城市 B 的最短路径),广度优先算法未必合适。还有一些其他算法,比如
- Dijkstra 算法 解决了单源最短路径问题。
- Bellman-ford 算法 解决了边权值为负的单源最短路径问题。
- A*搜索算法 解决了求仅一对顶点间的最短路径问题,用经验法则来加速搜索过程。
- Floyd-Warshall 算法 解决了求所有顶点对之间最短路径这一问题。
后面会学习 Dijkstra 算法与 Floyd-Warshall 算法。
# 深度优先搜索
# 最短路径算法
# 最小生成树
# 第 13 章 排序和搜索算法
# 第 14 章 算法设计与技巧
# 分而治之
# 动态规划
# 贪心算法
# 回溯算法
# 函数式编程
# 第 15 章 算法复杂度
# 勘误
- p101 getElementAt() 中 index <= this.count 应该是 index < this.count
- p111 CircularLinkedList 前少了个 class
- p190 LR 应该是先做 RR 旋转再做 LL 旋转,示例代码就是这样
- p191 RL 应该是先做 LL 旋转再做 RR 旋转ÅÅ