# 2020年07月技术日常
# 2020/07/30 周四
# 什么是好的代码?
在web前端方面,什么是好的代码?好的代码应该包含以下两个特性
- 高性能,低时延(性能优化)
- 熟悉数据结构与算法,减少时间复杂度或空间复杂度
- 熟悉浏览器渲染基本原理、熟悉HTTP请求与响应细节、熟悉前端框架源码、减少不必要的渲染开销,提高加载速度
- 可读性、可维护性、可扩展性
- 熟悉设计模式,封装变化。代码高内聚、低耦合、指责单一、高度复用。写出好维护、好迭代、好扩展的代码
- 化繁为简,形成特定代码规范,注意命名、注释。写出人能看懂的代码,不做骚操作。尽量保持简单、易懂,在可扩展性和简单之间寻找平衡
前端只要不是写框架,性能问题会很少遇到。简单来讲,在实现功能的基础上,代码简单、易懂、好维护迭代就很好了。技术始终是为业务需求服务的。基础建设是很重要的一个环节,这样有利于快速迭代开发
# vue使用js显示弹窗组件
重点是使用vue的render函数,把单文件vue组件,再封装为一个函数,挂载到vue的实例属性后,其他地方直接调用该函数即可调用组件。
// 在main.js里注册实例属性
import showDialog from '@/views/jsDialog/index.js'
Vue.prototype.$showDialog = showDialog

// 其他地方直接使用 this.$showDialog(options) 即可调用组件
下面来看看实现思路,关于render函数createElement的options的配置,参见 createElement 参数 - 深入数据对象 (opens new window)
import Vue from "vue";
import DialogComponent from '@/views/jsDialog/src/index.vue'

let TheDialog = null
export default function showDialog(options) {
  // 如果未移除,先移除
  TheDialog && TheDialog.remove()

  TheDialog = create(DialogComponent, {
    on: {
      // 单文件组件内部可以emit该事件,销毁TheDialog组件
      'close-dialog': () => {
        TheDialog.remove()
      }
    },
    props: {
      // 需要传入的属性,单文件组件需要使用props接收
      title: '标题',
      content: '内容'
    }
    // 其他参数
    ...options
  })

  function create(Component, options) {
    // 先创建实例
    const vm = new Vue({
      render(h) {
        // h就是createElement,它返回VNode
        return h(Component, options);
      }
    }).$mount();

    // 手动挂载
    document.body.appendChild(vm.$el);

    // 销毁方法
    const comp = vm.$children[0];
    comp.remove = function() {
      document.body.removeChild(vm.$el);
      vm.$destroy();
    };
    return comp;
  }
}
# 2020/07/26 周日
# echarts饼图label两端对齐label距离引导线距离
注意echarts版本要是 v4.6 +
// 两端对齐 + 引导线距离
{
name: '访问来源',
type: 'pie',
minAngle: 90, // label最小扇区大小
label: {
    normal: {
        alignTo: 'edge', // label两端对称布局
        //  ECharts v4.6.0 版本起,提供了 'labelLine' 与 'edge' 两种新的布局方式
        margin: 90, // 布局为两端对称时候需要外边距防止图表变形 数值随意不要太大
        distanceToLabelLine: 0, // label距离引导线距离
        formatter: function(param) {
            return '{a|' + param.name + '}\n{hr|}\n' + '{d|' + param.value + '}';
        },
        rich: {
            a: {
                padding: [4, 10, 0, 10],  // 4边距是文字和hr间距,此处的边距10用于解决label和引导线有间距问题
                color: 'blue'
            },
            d: {
                padding: [0, 10, 4, 10],
                color: 'purple'
            },
            hr: {
                borderWidth: 1,
                width: '100%',
                height: 0,
                borderColor: ' '
            }
        }
    },

}

// 分隔线上线显示内容
label: {
    normal: {
        formatter: '{font|{c}}\n{hr|}\n{font|{d}%}',
        rich: {
            font: {
                fontSize: 20,
                padding: [5, 0],
                color: '#fff'
            },
            hr: {
                height: 0,
                borderWidth: 1,
                width: '100%',
                borderColor: '#fff'
            }
        }
    },
},
labelLine: {
    lineStyle: {
        color: '#fff'
    }
}
参考:
# element表单中,人数输入框怎么限制只能输入正整数
在人数这一栏,输入时,前端需要确保输入的只能是正整数,且不能是负数,且自动校正,来看看怎么实现
<template>
  <div>
    只能输入正整数: {{ peopleCount }}
    <el-input
      v-model="peopleCount"
      @keyup.native="keyUp"
      style="width:200px;margin:50px;"
    ></el-input>
  </div>
</template>

<script>
export default {
  data() {
    return {
      peopleCount: ""
    };
  },
  methods: {
    keyUp(e) {
      // 非数字全部转换为''
      e.target.value = e.target.value.replace(/[^\d]/g, "");
      // 开始的0处理
      if ([0, "0"].includes(e.target.value)) {
        e.target.value = "";
      }
      this.peopleCount = e.target.value;
      return e.target.value;
    }
  }
};
</script>
有了上面的思路后,对于万元输入框怎么限制只能输入最多保留两位小数点的number类型数据,可以思考下
# 怎么开发vscode插件
在vue-cli项目中,每次修改vue.config.js都需要手动停止在运行,怎么一键就搞定呢?能不能开发个vscode插件
带着这个问题,来看看vscode插件的开发。直接找vscode官方教程。按照文档先来跑一个hello word
# Install Yeoman and VS Code Extension Generator with:
npm install -g yo generator-code
运行yo code,生成一个脚手架项目
guoqzuo-mac:vscodeExtension kevin$ yo code

     _-----_     ╭──────────────────────────╮
    |       |    │   Welcome to the Visual  │
    |--(o)--|    │   Studio Code Extension  │
   `---------´   │        generator!        │
    ( _´U`_ )    ╰──────────────────────────╯
    /___A___\   /
     |  ~  |
   __'.___.'__
 ´   `  |° ´ Y `

? What type of extension do you want to create? New Extension (TypeScript)
? What's the name of your extension? zuo-restart
? What's the identifier of your extension? zuo-restart
? What's the description of your extension? A plugin use to auto restart vue.con
fig.js
? Initialize a git repository? Yes
? Which package manager to use? npm

Your extension zuo-restart has been created!

To start editing with Visual Studio Code, use the following commands:

     cd zuo-restart
     code .

Open vsc-extension-quickstart.md inside the new extension for further instructions
on how to modify, test and publish your extension.

For more information, also visit http://code.visualstudio.com and follow us @code.
这样会创建一个空的项目,只注册了helloworld命令,我们按照 vsc-extension-quickstart.md 里的说明运行demo
按F5,进入如下页面,但并没有像官网上的视频那样弹一个新的插件调试窗口,一直在运行中
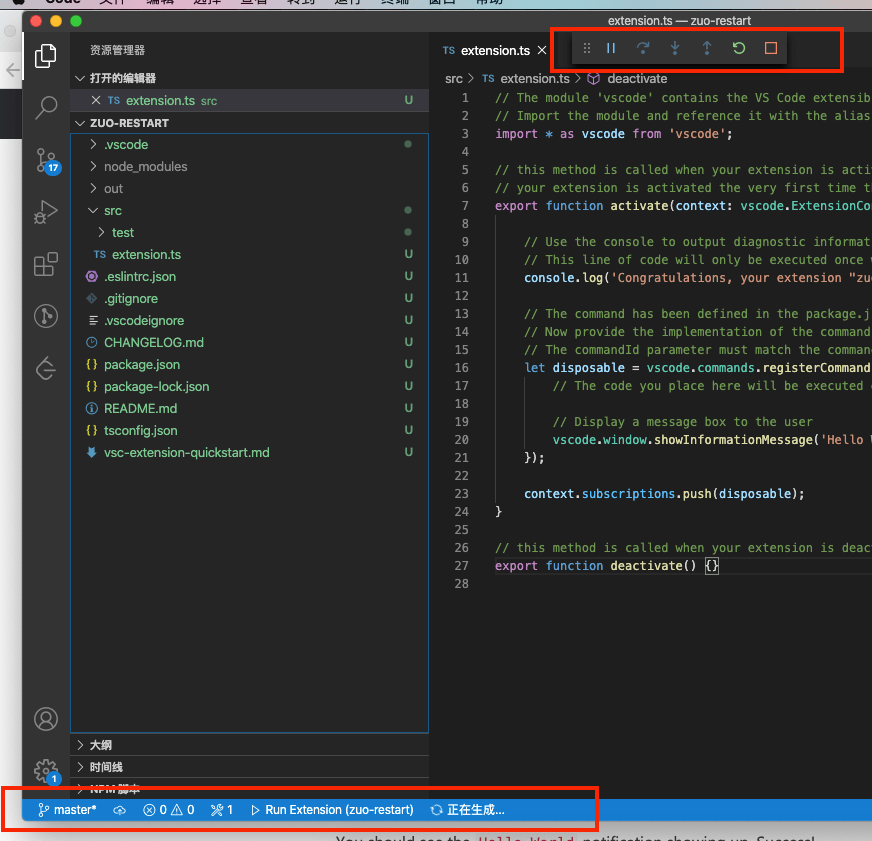
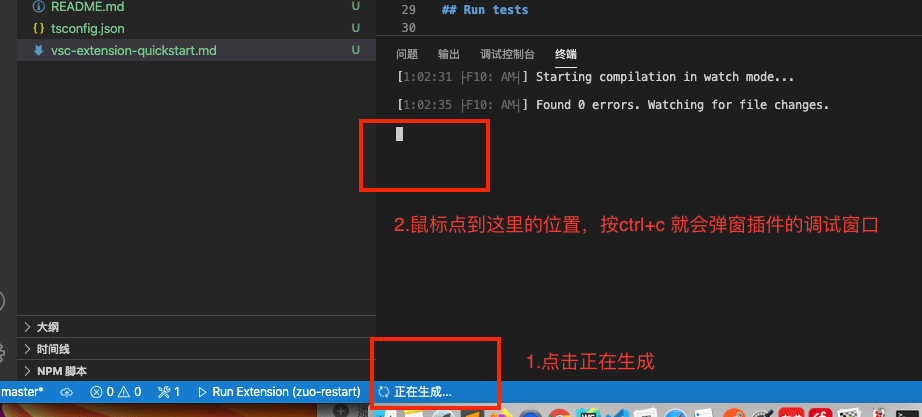
网上说要装一个 run code的 vscode插件,也装了。后面发现还是不行,点击正在生成,ctrl + c 就弹出一个名为 "扩展开发宿主" 的新窗口了,里面可以调试插件,如下图
生成项目的入口是 extension.ts,他默认注册了一个helloword命令,我们输入命令就会显示一个弹窗消息
// The module 'vscode' contains the VS Code extensibility API
// Import the module and reference it with the alias vscode in your code below
import * as vscode from 'vscode';

// this method is called when your extension is activated
// your extension is activated the very first time the command is executed
export function activate(context: vscode.ExtensionContext) {

	// Use the console to output diagnostic information (console.log) and errors (console.error)
	// This line of code will only be executed once when your extension is activated
	console.log('Congratulations, your extension "zuo-restart" is now active!');

	// The command has been defined in the package.json file
	// Now provide the implementation of the command with registerCommand
	// The commandId parameter must match the command field in package.json
	let disposable = vscode.commands.registerCommand('zuo-restart.helloWorld', () => {
		// The code you place here will be executed every time your command is executed

		// Display a message box to the user
		vscode.window.showInformationMessage('Hello World from zuo-restart!');
	});

	context.subscriptions.push(disposable);
}

// this method is called when your extension is deactivated
export function deactivate() {}
我们在插件调试窗口跑下hello world命令
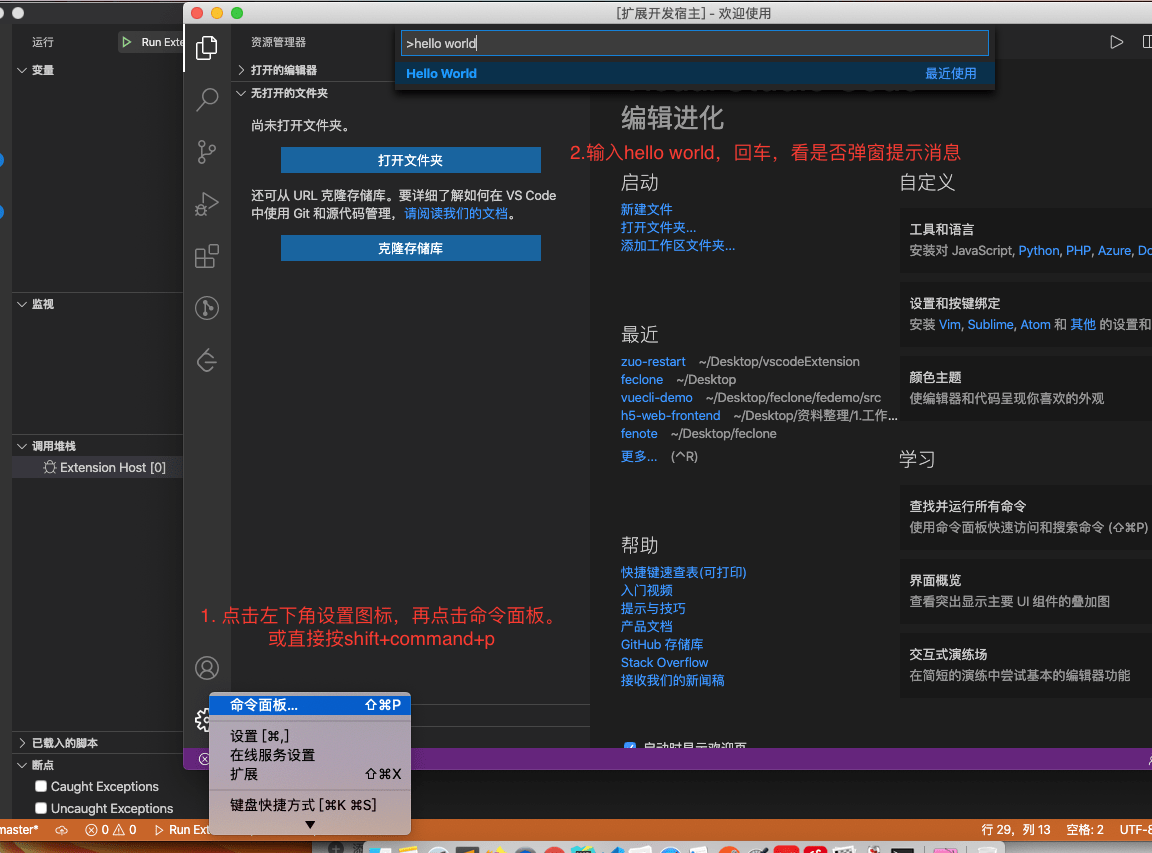
出现如下弹窗消息,就说明跑的没问题了

这样hellowrod就跑起来了,vsc-extension-quickstart.md 里面有构架、发布插件的文档说明
官网提供了一些简单的demo,可以练练手,vscode-extension-samples | github (opens new window),后续有时间了继续研究
参考:
- Extension API | Visual Studio Code Extension API (opens new window)
- Get Started - Your First Extension (opens new window)
- VSCode插件开发入门 (opens new window)
# loadash节流与防抖理解
理论上throttle节流一般用于像监听resize方法,想要减少执行频率时使用。对于点击按钮提交,防止短时间内多次点击可以用防抖
但实际使用时可根据具体情况来看,本质上都是利用setTimeout来处理执行频率或执行间隔。下面是一个简单的防抖示例
import { debounce } from 'loadsh'
export default {
  methods: {
    submitFormDebounce: debounce(function() {
      console.log('submit', +new Date())
      this.submitForm()
    }, 300, {trailing: true}),

    submitForm() {

    }
  }
}
# element源码中节流与防抖的应用
在做input搜索时,由于input change后需要请求接口,这里el-autocomplete有个默认的300豪秒debounce,可以减少请求频率。理论上这里减少频率需要使用节流,但为什么是防抖呢?
我们把element源码中对节流防抖的使用都找一找。可以看到element使用的节流防抖库是 throttle-debounce
发现节流throttle用的比较少,只找到了三个地方:
// Backtop 回到顶部
// packages/backtop/src/main.vue  滚动监听时用到了节流
import throttle from 'throttle-debounce/throttle';
mounted() {
  this.init();
  this.throttledScrollHandler = throttle(300, this.onScroll);
  this.container.addEventListener('scroll', this.throttledScrollHandler);
},

// Carousel 走马灯
// packages/carouse/src/main.vue 鼠标hover,箭头点击使用了节流
import throttle from 'throttle-debounce/throttle';
created() {
  this.throttledArrowClick = throttle(300, true, index => {
    this.setActiveItem(index);
  });
  this.throttledIndicatorHover = throttle(300, index => {
    this.handleIndicatorHover(index);
  });
},

// Image 图片 滚动到区域懒加载时,使用了节流
if (_scrollContainer) {
  this._scrollContainer = _scrollContainer;
  this._lazyLoadHandler = throttle(200, this.handleLazyLoad);
  on(_scrollContainer, 'scroll', this._lazyLoadHandler);
  this.handleLazyLoad();
}
再来看看防抖的地方

总结:涉及到接口请求的基本都是防抖,对于不请求接口,防止多次执行的情况才用节流,其他请求一律防抖
# log2n对数在前端的应用场景:把文件大小或金额自动添加合适的单位
在写下载/导出文件接口时,由于接口文件数据是流的形式而非buffer,导致total为0,无法获取进度。只能通过loaded知道当前下载了多少字节。前端显示时,怎么给出合适的单位,是KB、MB,还是G?
// Math.pow(2, 0) // B
// > Math.pow(2, 10) // KB
// > Math.pow(2, 20) // MB
// > Math.pow(2, 30) // GB
// > Math.pow(2, 40) // TB
// > Math.pow(2, 50) // PB
// 以此类推...
可以通过对数来快速确定区间
/**
 * @description 格式化文件size
 * @param { Number } value 文件大小 B 字节
 * @returns 转换后的文件大小及单位数组,保留两位小数
 * @example
 * formatFileSize(100) =>  [100, "B"]
 * formatFileSize(10000) => [9.77, "KB"]
 * formatFileSize(100000000) => [95.37, "MB"]
 */
function formatFileSize(value) {
  let unitArr = ['B', 'KB', 'MB', 'GB', 'TB', 'PB', 'EB', 'ZB','YB']
  let index = Math.floor(Math.log2(value) / 10) // 计算该value的值为2的多少次方,向下取整
  // 如果超出范围取最大值
  if (index > unitArr.length - 1) {
    index = unitArr.length - 1
  }
  let result = value / Math.pow(2, index * 10) // 装换为合适的单位
  result = (result * 100).toFixed() / 100

  return [result, unitArr[index]]
}
依此类推,假设给定单位为元,将值转换为合适的单位:元/万/亿/兆(万亿),10的4次方 万,10的8次方 亿,10的12次方 兆
/**
 * @description 格式化人民币
 * @param { Number } value 元
 * @returns 转换后的人民币及单位数组,保留两位小数
 * @example
 * formartMoney(1000) => [1000, "元"]
 * formartMoney(98000) => [9.8, "万"]
 * formartMoney(100000000) => [1, "亿"]
 */
function formartMoney(value) {
  let unitArr = ['元', '万', '亿', '兆']
  let index = Math.floor(Math.log10(value) / 4)
  // 如果超出范围取最大值
  if (index > unitArr.length - 1) {
    index = unitArr.length - 1
  }
  let result = value / Math.pow(10, index * 4) // 装换为合适的单位

  result = (result * 100).toFixed() / 100

  return [result, unitArr[index]]
}
扩展:
# 关于常用组件、样式、工具函数封装代码快速复用的思考
怎么让搬砖更有效率,整理常用工具库utils、搜集各种场景常用的代码片段,快速ctrl+c、ctrl+v
接口请求、表单校验(正则)、表单/表格/通用样式、表格分页、图表等常用的碎片化代码搜集整理,形成文档,以便快速复用
# 2020/07/25 周六
# el-input类型为textarea时不能使用v-model.trim
el-input如果type为textarea,不能使用.trim修饰符,否则输入内容时会无法换行,如果需要去掉收尾空格,可以在提交数据时,手动执行.trim()去空格
<template>
  <div>
    <el-input
      type="textarea"
      v-model.trim="text"
      rows="5"
      style="width:200px;margin:100px;"
    ></el-input>
  </div>
</template>

<script>
export default {
  data() {
    return {
      text: ""
    };
  }
};
</script>
# 2020/07/24 周四
# git修改上上次的commit备注信息
由于提交代码时有钩子函数,信息里面没有包含前置的code会无法提交。所以如果commit信息写的有问题需要修改后才能提交
对于修改上一次commit备注信息,我们可以使用 --amend -m 来修改。但它无法修改上上次提交信息,这种情况我们可以使用rebase来做处理,下面来做一个测试
本地做两次提交,第一次提交信息为"测试第一次提交", 第二次提交信息为 "第二次提交",先不push,我们需要修改上上次的提交信息,也就是修改"测试第一次提交"的内容
# 查看git记录
guoqzuo-mac:fedemo kevin$ git log
commit 3814855781da539d21e2072e42a53558587497c6 (HEAD -> master)
Author: guoqzuo <guoqzuo@gmail.com>
Date:   Mon Aug 10 22:28:15 2020 +0800

    第二次提交

commit e889c7ecbcb024037701eb48c9bfe3b9c22f9490
Author: guoqzuo <guoqzuo@gmail.com>
Date:   Mon Aug 10 20:04:27 2020 +0800

    测试第一次提交

commit d5c2f2f3193cf02d6ac1ae995ca00c4082e36cad (origin/master, origin/HEAD)
Author: guoqzuo <guoqzuo@gmail.com>
Date:   Mon Aug 10 00:56:34 2020 +0800

    update cookie研究,合并单元格研究demo
:
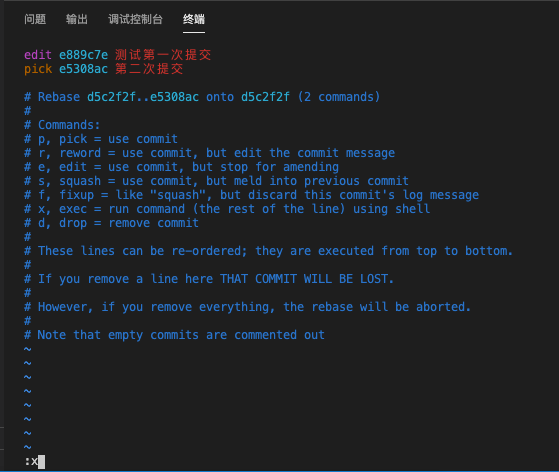
执行 git rebase -i HEAD~2,如下图可以看到最近两次提交,进入一个vim编辑页面
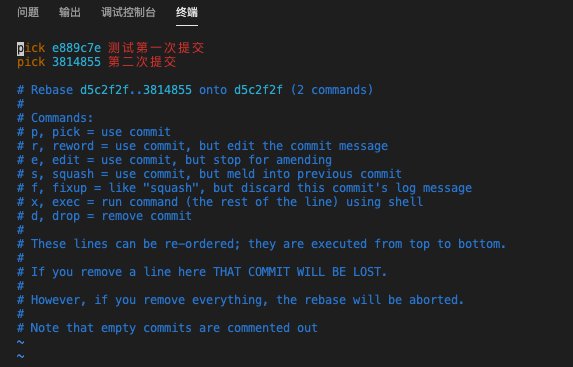
按ESC, 再按a进入INSERT模式, 将上上次提交的信息前的pick改为edit,如下图,按ESC, shift + : 进入命令模式,输入x 或wq保存,不熟悉vim操作的可以搜索下vim教程
保存后,会看到下面log
guoqzuo-mac:fedemo kevin$ git rebase -i HEAD~2
Stopped at e889c7e...  测试第一次提交
You can amend the commit now, with

  git commit --amend

Once you are satisfied with your changes, run

  git rebase --continue
guoqzuo-mac:fedemo kevin$
运行 git commit --amend 会进入下面的修改页面,可以修改上上次的信息
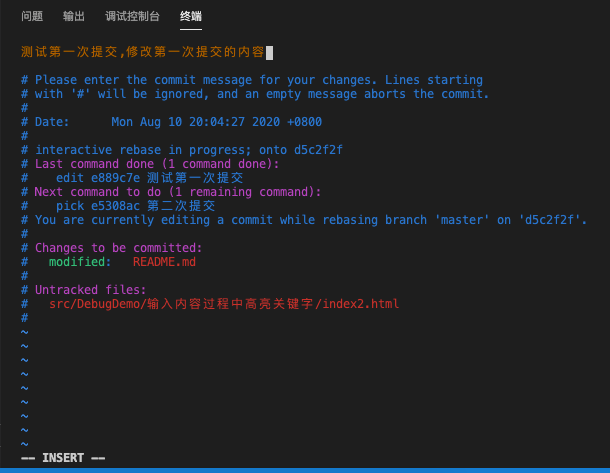
这里我们把上上次信息改为 "测试第一次提交,修改第一次提交的内容",保存后,结果如下
[detached HEAD 45f5911] 测试第一次提交,修改第一次提交的内容
 Date: Mon Aug 10 20:04:27 2020 +0800
 1 file changed, 2 insertions(+)
guoqzuo-mac:fedemo kevin$
然后运行 git rebase --continue,这样就修改好了
guoqzuo-mac:fedemo kevin$ git rebase --continue
Successfully rebased and updated refs/heads/master.
guoqzuo-mac:fedemo kevin$
再来git log 看看提交记录,修改上上次的提交信息已ok
guoqzuo-mac:fedemo kevin$ git log
commit e498bcabf2d2e4c97f47320e1d72693cb82d9db8 (HEAD -> master)
Author: guoqzuo <guoqzuo@gmail.com>
Date:   Mon Aug 10 22:28:15 2020 +0800

    第二次提交

commit 45f591157be44100073de14f5808b816104a8f2b
Author: guoqzuo <guoqzuo@gmail.com>
Date:   Mon Aug 10 20:04:27 2020 +0800

    测试第一次提交,修改第一次提交的内容
参考:修改上上次的commit信息 (opens new window)
# 2020/07/22
# echarts动态改变option里dataZoom的值没有实时生效的问题
这里我们虽然修改了options的值,但不会实时生效,需要手动调用下echarts实例的resize()方法
另外在做echarts时,对于自适应缩放的图表,一定要注意在窗口缩放时,重新调用resize()
# http请求有哪几种传参方式
在swagger文档里,有一个传参类型的描述 Parameter Type,一般有四种
- header 通过请求头传参,也就是参数加到首部 headers 里
- path 参数放到url路径里,比如 /user/123 这里 123是用户id
- query 查询参数,也就是url后面 ? 符号之后的传参,一般用于get请求传参,比如 /user/123?a=xx&b=xx
- body 参数放到请求体,一般用于post请求,相对get请求来说,安全性好,可以传的数据更多
# Object.assgin时是否会忽略null,undefined,空字符串
一般我们在需要设置某个对象的多个值时Object.assgin是一种很好的方法,但又怕当某个属性的值为空字符串、null或undefined时,会自动跳过的情况。这里来做一个简单的测试
objA = {a: 'a', b: 'b', c: 'c', d: 'd'}
Object.assign(objA, {a: 1, b: undefined, c: null, d: ''})
objA // {a: 1, b: undefined, c: null, d: ""}
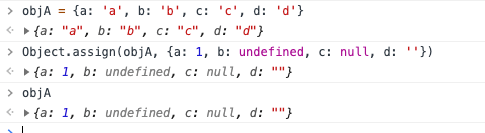
综上,Object.assgin可以放心用
# git将远程仓库A分支合并到B分支
假设要将远程分支的 A 分支合并到 B 分支,一般我会先在A分支将B分支merge,再切到B分支,merge A分支。
以将远程仓库的 dev1.3.4 分支合并到远程的 test1.3.4 分支为例,下面是我一般的合并过程
# 1. 本地切到 dev1.3.4 分支
# 2. merge远程的test1.3.4分支,命令如下
git merge origin/test1.3.4
# 3.如果有冲突(conflict),修改冲突文件
# 4.修改冲突后提交代码到远程仓库,命令如下
git add 修改冲突相关的文件
git commit '修改冲突,fix conflict'
git push
# 5.切换到test1.3.4分支
# 6.merge本地的dev1.3.4,因为本地的dev1.3.4是最新的代码,命令如下
git merge dev1.3.4 => git push
另外,养成习惯,在git push前,先git pull
# 2020/07/17 周五
# 前端修改cookie后,相关cookie改动会传到后台吗
首先我们来捋一捋,什么是cookie?与cookie相关的知识点有两个:
- 前端获取/设置cookie,使用 document.cookie
- HTTP请求与响应相关cookie
我们先下个结论:他们之间是相互关联的,接口响应头设置cookie,会对document.cookie的值产生影响;前端设置docuemnt.cookie也会对请求头cookie值产生影响,但如果后端写到前端的cookie如果使用了HttpOnly属性,前端是无法通过document.cookie做修改的
# 根据功能点写测试demo
纸上得来终觉浅,这里为了弄懂这里面的关系,我们来写一个demo做测试,将涉及的知识点都串起来,首先要有一个html页面,有两个用处
- 在该页面打开F12,在console里通过命令查看或设置document.cookie信息
- 在该页面中请求接口,在F12 Network里观察请求头,响应头里cookie的信息
另外需要写两个接口,用户观察请求响应头里cookie的信息,这里我们用koa来写两个简单的接口。
下面是demo目录层级
# demo 目录层级
├── public
│   └── index.html # 静态页面
├── index.js # 接口
└── package.json # npm init 创建,用于安装index.js引入的koa等npm包
index.html代码如下
<body>
  <h1>test测试</h1>
  <button id="userInfoBtn">获取user信息</button>
  <button id="editInfoBtn">修改user信息</button>
  <script src="https://unpkg.com/axios/dist/axios.min.js"></script>
  <script>
    let userInfoBtn = document.querySelector('#userInfoBtn')
    let eidtInfoBtn = document.querySelector('#userInfoBtn')
    // 请求获取用户信息接口
    // 用于测试响应头设置 'Set-Cookie' 对前端docuemnt.cookie的影响
    userInfoBtn.onclick = () => {
      axios.get('/user').then((res) => {
        console.log(res)
      }).catch((e) => {
        console.error(e.message)
      })
    }
    // 请求修改用户信息接口
    // 用于测试document.cookie设置后或者第一次请求响应头设置Set-Cookie后,对下次接口请求头的影响
    editInfoBtn.onclick = () => {
      axios.put('/user').then((res) => {
        console.log(res)
      }).catch((e) => {
        console.error(e.message)
      })
    }
  </script>
</body>
index.js接口代码
const Koa = require('koa')
const Router = require('koa-router')
const app = new Koa()
const router = new Router()

// 静态服务,用于使用 http://127.0.0.1:9000/ 访问 public下的index.html页面
app.use(new require('koa-static')('./public'))

// GET /user  接口,设置Set-Cookie响应头测试
router.get('/user', ctx => {
  ctx.set({
    // 'Set-Cookie': 'token=123;path=/;max-age=100;HttpOnly',
    'Set-Cookie': ['token=123;path=/;max-age=100;HttpOnly','mark=9;path=/;']
  })
  ctx.body = {
    name: '张三',
    age: 20
  }
})

// PUT /user  接口,用于观察接口请求头
router.put('/user', ctx => {
  ctx.body = {
    code: 0,
    data: {},
    msg: '成功'
  }
})

app.use(router.routes())

// 开启本地HTTP服务,9000端口
app.listen(9000, () => {
  console.log('server listen on 9000 port')
})
# document.cookie设置对请求头的影响
首先我们可以先看 Document.cookie - Web API 接口参考 | MDN (opens new window) 这个文档,对document.cookie有一个大概的了解。
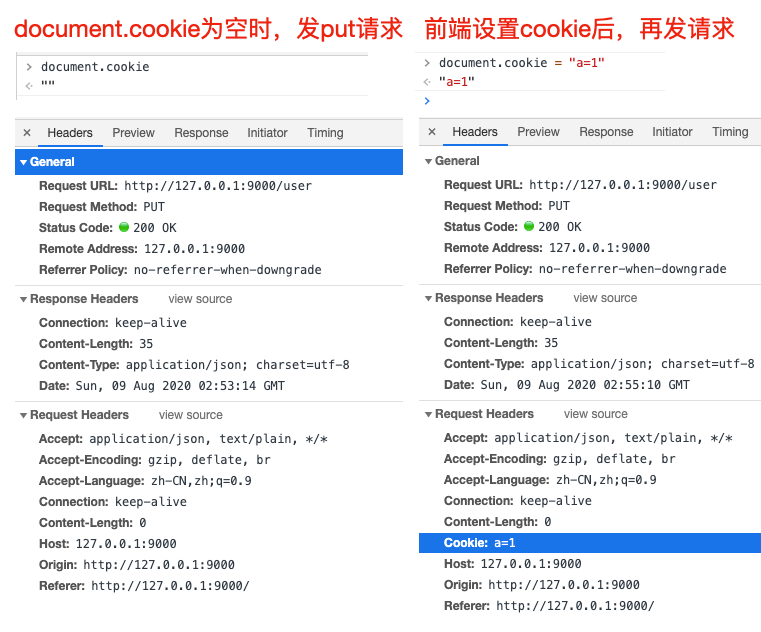
我们先运行demo,nodemon index.js,访问 http://127.0.0.1:9000/ 进入页面,查看cookie信息,如下图

这时,我们发送一个put请求,看接口请求头信息。再通过 document.cookie = "a=1" 设置cookie,然后再发送一个put请求,对比请求头之前的区别,如下图,我们初步得出结论:前端设置cookie后,下次请求,在请求头里会携带这个cookie
# document.cookie操作方法
document.cookie API的设计不怎么友好,一般会使用一个库,来操作docuemnt.cookie,需要注意
document.cookie = "a=1" // 如果cookie中没有a这个key,可以添加key为a,值为1的cookie,否则修改对应的值为1
document.cookie = "" // 不会清空cookie,对cookie基本无影响
// 怎么删除 a=1 的cookie呢?将该cookie的有效时间设置为过去的时间即可
document.cookie = "a=1;expires=" + new Date('1970-1-1')
MDN document.cookie文档里有推荐的一个操作cookie的封装方法,可以参考下
/*\
|*|
|*|  :: cookies.js ::
|*|
|*|  A complete cookies reader/writer framework with full unicode support.
|*|
|*|  https://developer.mozilla.org/en-US/docs/DOM/document.cookie
|*|
|*|  This framework is released under the GNU Public License, version 3 or later.
|*|  http://www.gnu.org/licenses/gpl-3.0-standalone.html
|*|
|*|  Syntaxes:
|*|
|*|  * docCookies.setItem(name, value[, end[, path[, domain[, secure]]]])
|*|  * docCookies.getItem(name)
|*|  * docCookies.removeItem(name[, path], domain)
|*|  * docCookies.hasItem(name)
|*|  * docCookies.keys()
|*|
\*/

var docCookies = {
  getItem: function (sKey) {
    return decodeURIComponent(document.cookie.replace(new RegExp("(?:(?:^|.*;)\\s*" + encodeURIComponent(sKey).replace(/[-.+*]/g, "\\$&") + "\\s*\\=\\s*([^;]*).*$)|^.*$"), "$1")) || null;
  },
  setItem: function (sKey, sValue, vEnd, sPath, sDomain, bSecure) {
    if (!sKey || /^(?:expires|max\-age|path|domain|secure)$/i.test(sKey)) { return false; }
    var sExpires = "";
    if (vEnd) {
      switch (vEnd.constructor) {
        case Number:
          sExpires = vEnd === Infinity ? "; expires=Fri, 31 Dec 9999 23:59:59 GMT" : "; max-age=" + vEnd;
          break;
        case String:
          sExpires = "; expires=" + vEnd;
          break;
        case Date:
          sExpires = "; expires=" + vEnd.toUTCString();
          break;
      }
    }
    document.cookie = encodeURIComponent(sKey) + "=" + encodeURIComponent(sValue) + sExpires + (sDomain ? "; domain=" + sDomain : "") + (sPath ? "; path=" + sPath : "") + (bSecure ? "; secure" : "");
    return true;
  },
  removeItem: function (sKey, sPath, sDomain) {
    if (!sKey || !this.hasItem(sKey)) { return false; }
    document.cookie = encodeURIComponent(sKey) + "=; expires=Thu, 01 Jan 1970 00:00:00 GMT" + ( sDomain ? "; domain=" + sDomain : "") + ( sPath ? "; path=" + sPath : "");
    return true;
  },
  hasItem: function (sKey) {
    return (new RegExp("(?:^|;\\s*)" + encodeURIComponent(sKey).replace(/[-.+*]/g, "\\$&") + "\\s*\\=")).test(document.cookie);
  },
  keys: /* optional method: you can safely remove it! */ function () {
    var aKeys = document.cookie.replace(/((?:^|\s*;)[^\=]+)(?=;|$)|^\s*|\s*(?:\=[^;]*)?(?:\1|$)/g, "").split(/\s*(?:\=[^;]*)?;\s*/);
    for (var nIdx = 0; nIdx < aKeys.length; nIdx++) { aKeys[nIdx] = decodeURIComponent(aKeys[nIdx]); }
    return aKeys;
  }
};
# HTTP cookies后端接口向前端页面写入cookie
可以先看下面两个文档,对http cookie有一个基本的了解
- http请求头或响应头参数cookie Cookie - HTTP Headers | MDN (opens new window)
- http cookies HTTP cookies - HTTP | MDN (opens new window)
An HTTP cookie (web cookie, browser cookie) is a small piece of data that a server sends to the user's web browser. The browser may store it and send it back with later requests to the same server. Typically, it's used to tell if two requests came from the same browser — keeping a user logged-in, for example. It remembers stateful information for the stateless HTTP protocol.(HTTP Cookie 是服务器发送到用户浏览器并保存在本地的一小块数据,它会在浏览器下次向同一服务器再发起请求时被携带并发送到服务器上。通常,它用于告知服务端两个请求是否来自同一浏览器,如保持用户的登录状态。Cookie 使基于无状态的HTTP协议记录稳定的状态信息成为了可能。)
Cookies are mainly used for three purposes(cookie主要由以下三个应用场景):
- Session management (会话管理)
- Logins, shopping carts, game scores, or anything else the server should remember(用户登录状态、购物车、游戏分数或其它需要记录的信息)
- Personalization (个性化)
- User preferences, themes, and other settings(用户自定义配置,主题或其他设置)
- Tracking (用户行为跟踪)
- Recording and analyzing user behavior (用于记录和分析用户行为)
# cookie设置属性详解
服务端通过在接口响应头设置 'Set-Cookie' ,将对应的cookie写到前端,先来看看设置cookie的格式
Set-Cookie: “name=value;domain=.domain.com;path=/;expires=Sat, 11 Jun 2016 11:29:42 GMT;HttpOnly;secure;samesite”
| 属性 | 说明 | 默认值 |
|---|---|---|
| name | 一个唯一确定的cookie名称。如有特殊字符需要编码(encodeURIComponent) | / |
| value | 存储在cookie中的字符串值。如有特殊字符需要编码 | 空字符串 |
| domain | cookie对于哪个域是有效,如果指定了一个域,那么子域也包含在内。.xx.com,对于xx.com的所有子域都有效 | 当前url所在的域名 |
| path | 表示这个cookie影响到的路径,浏览器跟会根据这项配置,像指定域中匹配的路径在请求头发送cookie信息 | 当前url所在的path |
| expires | 失效时间,是一个具体的时间,这个值是GMT时间格式,expires=" + new Date('1970-1-1') 这种即可。如果客户端和服务器端时间不一致,使用expires就会存在偏差。注意两点:1.设置一个过去的时间,可用于删除该cookie 2.当Cookie的过期时间被设定时,设定的日期和时间只与客户端相关,而不是服务端。max-age也是如此 | 如果没有定义,cookie会在对话结束时(关闭浏览器)过期 |
| max-age | 与expires作用相同,用来告诉浏览器此cookie多久过期(单位是秒),而不是一个固定的时间点。正常情况下,max-age的优先级高于expires。 | 同上面的expires |
| HttpOnly | 告知浏览器不允许通过脚本document.cookie去更改这个值,同样这个值在document.cookie中也不可见。但在http请求张仍然会携带这个cookie。注意这个值虽然在脚本中不可获取,但仍然在浏览器安装目录中以文件形式存在。这项设置通常在服务器端设置。有助于缓解跨站点脚本(XSS)攻击。 | 不设置 |
| secure | 安全标志,指定后,只有在使用SSL链接(https)时候才能发送到服务器,如果是http链接则不会传递该信息。就算设置了secure 属性也并不代表他人不能看到你机器本地保存的 cookie 信息,因此未加密的重要信息尽量不要放cookie了 | 不设置 |
| samesite | 当跨域请求是浏览器是否发送cookie,可以阻止跨站请求伪造攻击CSRF。1. 值为None: 浏览器会在同站请求、跨站请求下继续发送 cookies,不区分大小写。2.Strict:浏览器将只在访问相同站点时发送 3.Lax:与 Strict 类似,但用户从外部站点导航至URL时(例如通过链接)除外。 Same-site cookies 将会为一些跨站子请求保留,如图片加载或者 frames 的调用,但只有当用户从外部站点导航到URL时才会发送。如 link 链接 | 以默认值都是None,现在基本新的浏览器基本都是Lax了 |
# 后端设置'Set-Cookie'响应头对前端的影响
我们在 GET /user 接口做了处理,当访问这个接口时,向前端设置cookie, 一个HttpOnly的,一个非httpOnly,看看效果
ctx.set({
  // 单个cookie设置
  // 'Set-Cookie': 'token=123;domain=;path=/;max-age=100;HttpOnly',
  // 多个cookie设置
  'Set-Cookie': ['token=123;path=/;max-age=100;HttpOnly','mark=9;path=/;max-age=60;']
})
先删除之前的cookie,保证document.cookie为空
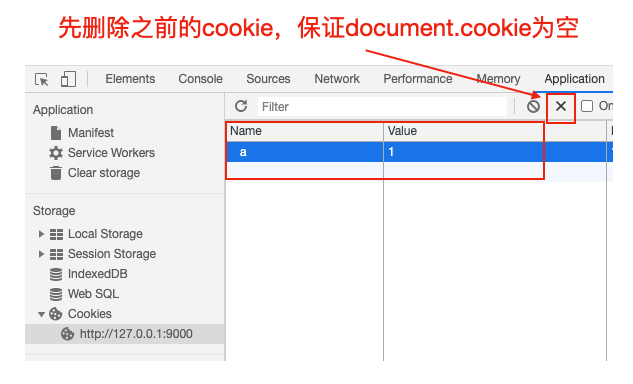
- 先请求获取user信息接口,在F12里看响应头,Respons e Headers可以看到HttpOnly的cookie
- 使用document.cookie看下前端cookie信息。这里获取不到设置了HttpOnly的cookie
- 请求修改user信息接口,看请求头。后端设置的cookie,下次请求会携带
- 100秒后,发现document.cookie以及application面板都没有cookie值了,因为我们设置了有效时间,再次发送修改user的put请求,请求头不会携带任何cookie信息

- 再次请求获取user信息接口,然后用document.cookie修改token的值,发现HttpOnly属性的cookie前端无法通过document.cookie来修改,且再次请求put接口,token值还是原先后端设置的值,所以HttpOnly属性的cookie前端无法修改

# 参考文档
- Document.cookie - Web API 接口参考 | MDN (opens new window)
- Cookie - HTTP Headers | MDN (opens new window)
- HTTP cookies - HTTP | MDN (opens new window)
- Node.js 设置 Set-Cookie 响应头信息 | Node.js v8.17.0 Documentation (opens new window)
- HTTP-服务器端CooKie与浏览器端Cookie (opens new window)
# element合并单元格利用css自定义表格border
有个较为特殊的表格,需要合并单元格,且改变表格border,看看element el-table怎么实现这种表格

<template>
  <div class="table-test">
    <el-table
      :data="dataList"
      border
      size="mini"
      :span-method="arraySpanMethod"
      :header-cell-style="{ background: '#f7f7f7' }"
    >
      <el-table-column
        v-for="item in ['a', 'b', 'c', 'd']"
        :key="item"
        :prop="item"
        :label="item"
      ></el-table-column>
    </el-table>
  </div>
</template>

<script>
export default {
  data() {
    return {
      dataList: []
    };
  },
  mounted() {
    this.dataList = [1, 2, 3, 4].map(() => {
      return { a: "1", b: "2", c: "3", d: 4 };
    });
  },
  methods: {
    arraySpanMethod({ row, column, rowIndex, columnIndex }) {
      console.log(row, column, rowIndex, columnIndex);
      // 只是遍历表格td内容,不包含th表头
      // 对第一列,进行合并列
      if (columnIndex === 0) {
        if (rowIndex === 0) {
          // 第一列,第一行,默认
          return {
            rowspan: 1,
            colspan: 1
          };
        } else if (rowIndex === 1) {
          // 第一列,第二行,合并,占this.dataList.length - 1行
          return {
            rowspan: this.dataList.length - 1,
            colspan: 1
          };
        } else if (rowIndex >= 2) {
          // 第一列,剩余行,为空
          return {
            rowspan: 0,
            colspan: 0
          };
        }
      }
    }
  }
};
</script>

<style lang="less" scoped>
.table-test {
  width: 500px;
  margin: 100px;
  // border处理
  // 去掉表头单元格th右边框
  /deep/ .el-table th:not(:first-child) {
    border-right: 0;
  }
  // 去掉表格内容单元格td的右侧边框、底部边框
  /deep/ .el-table td {
    border-right: 0;
    border-bottom: 0;
  }
  // 为第一行td增加底部border
  /deep/ .el-table__row:first-child td {
    border-bottom: 1px solid #eaeaea;
  }
  // 为第一行第一列td增加右侧border
  /deep/ .el-table__row:first-child td:first-child,
  // 为第二行(合并后的)第一列td设置右侧border
  /deep/ .el-table__row:nth-child(2) td:first-child {
    border-right: 1px solid #eaeaea;
  }
}
</style>
# 2020/07/12 周日
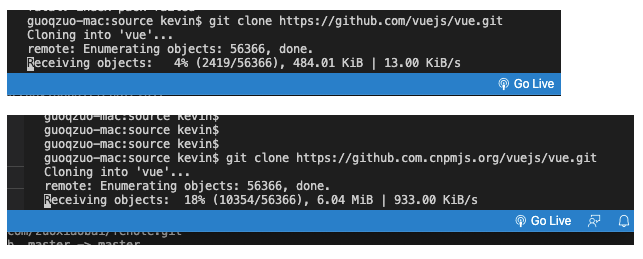
# github clone下载太慢怎么解决
以clone vue源码为例,默认git clone下载非常慢,我们可以把github.com链接改为镜像github.com.cnpmjs.org,这样下载速度就很快了,过程如下
# git clone 下载vue源码
guoqzuo-mac:source kevin$ git clone https://github.com/vuejs/vue.git
Cloning into 'vue'...
remote: Enumerating objects: 56366, done.
^Cceiving objects:   5% (2823/56366), 556.01 KiB | 10.00 KiB/s
guoqzuo-mac:source kevin$
guoqzuo-mac:source kevin$ git clone https://github.com.cnpmjs.org/vuejs/vue.git
Cloning into 'vue'...
remote: Enumerating objects: 56366, done.
remote: Total 56366 (delta 0), reused 0 (delta 0), pack-reused 56366
Receiving objects: 100% (56366/56366), 26.75 MiB | 1.22 MiB/s, done.
Resolving deltas: 100% (39568/39568), done.
guoqzuo-mac:source kevin$
# js获取location.href不真实的问题
macOS 修改host文件 /etc/hosts 后,本地访问某个域名会按照host指定的ip去解析,就会造成前端location.href不准确的问题,下面来看看
# 默认没有写的权限,无法编辑
guoqzuo-mac:~ kevin$ ls -l /etc/hosts
-rw-r--r--  1 root  wheel  244  3 24  2019 /etc/hosts
# 新增写的权限
guoqzuo-mac:~ kevin$ sudo chmod 0666 /etc/hosts
Password:
# 再次查看权限
guoqzuo-mac:~ kevin$ ls -l /etc/hosts
-rw-rw-rw-  1 root  wheel  244  3 24  2019 /etc/hosts
# 使用vi修改该文件
guoqzuo-mac:~ kevin$ vi /etc/hosts
# 新增a.com解析,在本地将a.com解析到47.107.190.93的服务器,也就是zuo11.com解析到的服务器
47.107.190.93 a.com
macOS修改host是实时生效的,修改后,本地浏览器访问a.com,会访问47.107.190.93的服务器,显示的是zuo11.com的内容。这时用location.href就是a.com,而不是zuo11.com。下面是百度统计的数据,显示的就是a.com

# 2020/07/09 周四
# 表格怎么画斜线
在最近的需求中,有个表格表头里有斜线,我特意翻了HTML5权威指南的笔记,发现并没有介绍怎么画表头的斜线。找了下网上的实现,一般都是通过css来实现,效果如下,在线预览地址: 表格画斜线 | github (opens new window)
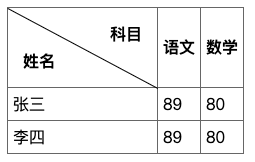
基本实现都是纯css,有的用到的伪元素。我这里直接用了三个元素来实现,如果想要完全理解,需要用到一点点数学方面的知识。
- 比如计算斜线的长度。勾股定理 a² + b² = c²
/* 斜边边长 */
/* Math.sqrt(Math.pow(width, 2) + Math.pow(height, 2)) */
/* Math.sqrt(Math.pow(150, 2) + Math.pow(80, 2)) = 170 */
- 根据th单元格的宽高计算斜线的rotate角度。给定直角三角形的边长,怎么计算角度? 这里我们知道宽高,不知道斜边边长,假设角度A,正切tanA = 对边(高) / 邻边(宽),我们知道这个角度A的正切值,怎么反向计算A的角度呢。就需要用到反正切函数 Math.atan了,他会返回一个弧度值。在JS中 180度对应的值为 Math.PI,计算出来的值乘以 (180 / Math.PI) 就是可以在css中使用的度数了,单位为 deg
/* 角度计算公式 */
/*  Math.atan(height / width) * 180 / Math.PI  */
/*  Math.atan(80 / 150) * 180 / Math.PI  = 28.072486935852954 */
完整代码如下
<!DOCTYPE html>
<html lang="en">
<head>
  <meta charset="UTF-8">
  <meta name="viewport" content="width=device-width, initial-scale=1.0">
  <title>Document</title>
  <style>
    /* 基本表格元素 */
    table {
      border-collapse: collapse;
    }
    th,td {
      border: 1px solid #666;
      padding: 5px;
    }

    /* th单元格 */
    .slash-wrap {
      position: relative;
      box-sizing: border-box;
      width: 150px;
      height: 80px;
    }

    /* 斜线 */
    .slash {
      position: absolute;
      display: block;
      top: 0;
      left: 0;
      /* 斜边边长 */
      /* Math.sqrt(Math.pow(width, 2) + Math.pow(height, 2)) */
      /* Math.sqrt(Math.pow(150, 2) + Math.pow(80, 2)) = 170 */
      width: 170px;
      height: 1px;
      background-color:#000;
      /* 旋转角度计算公式 */
      /*  Math.atan(height / width) * 180 / Math.PI  */
      /*  Math.atan(80 / 150) * 180 / Math.PI  = 28.072486935852954 */
      transform: rotate(28.072486935852954deg);
      transform-origin: top left;
    }

    /* 左下角文字 */
    .left {
      position: absolute;
      /* 左下角 left:0; bottom: 0; */
      left: 15px;
      bottom: 15px;
    }

    /* 右上角文字 */
    .right {
      position: absolute;
      /* 右上角 right:0; top: 0; */
      right: 15px;
      top: 15px;
    }
  </style>
</head>

<body>
  <div>
    <table>
      <tr>
        <th class="slash-wrap">
          <span class="left">姓名</span>
          <span class="slash"></span>
          <span class="right">科目</span>
        </th>
        <th>语文</th>
        <th>数学</th>
      </tr>
      <tr>
        <td>张三</td>
        <td>89</td>
        <td>80</td>
      </tr>
      <tr>
        <td>李四</td>
        <td>89</td>
        <td>80</td>
      </tr>
    </table>
  </div>
</body>

</html>
参考:
- Math.atan | MDN (opens new window)
- 【数学】sin cos tan分别是什么意思 (opens new window)
- 有边长怎么计算三角形的角度 (opens new window)
- 在线三角形的角度计算器 (opens new window)
- vue element 表头添加斜线 (opens new window)
# 权限code状态管理设计
一般使用vuex状态管理,提供一个getter方法获取对应的角色权限,假设getter名为roleMuster,通过mapGetters导入,然后使用
let { role_admin, role_a, role_b, role_c } = this.roleMuster
// 如果有对应的权限,值则为true
在getter的逻辑里可以对角色对应的code进行转换,使用好理解变量代替,消除魔术字符串
# 2020/07/08 周三
# pc样式自适应rem
pc端如果做官网、展示类的UI,就需要使用rem了。为了好还原UI图,1rem通常设计为100px。rem是相对于html元素font-size来计算的,我们可以通过动态的改变html元素的fontSize,来实现页面自适应
怎么动态设置html元素的font-size呢?来看看
export default {
  created() {
    const recalc = () => {
      let designSize = 1920
      let minWidth = 1280
      let html = document.documentElement
      let w = html.clientWidth < minWidth ? minWidth : html.clientWidth
      let rem = ( w / designSize) * 100
      this.rem = rem // 当前页面 使用时宽高使用 this.rem * (设计稿标记尺寸/100)
      // html.style.fontSize = `${rem}px`  // 会影响所有页面
    }
    this.recalc = recalc
    recalc()
    // 窗口变更后,变更rem
    window.addEventListener('resize', recalc)
  },
  // 组件销毁时移除resize事件的recalc
  beforeDestroy() {
    window.removeEventListener('resize', this.recalc, false)
  }
}
这里就凸显出 window.addEventListener('resize') 相对于 window.onresize 的优势,假设项目很大,其他代码已经监听了window.onresize如果你再用window.onresize可能会覆盖原来的方法,要特别小心,而window.addEventListener就不用担心这个问题,你只需要注意remove的时候,只移除你自己的监听函数即可。
# background设置图片背景相关
HTML5权威指南这本书对background的简写貌似有点不正确,使用起来会有问题,这次让图片在某个区域完全显示,是分开写的,如下:
div {
  background: #fff url('/images/xxx.png') no-repeat;
  background-size: cover;
}
后面仔细测试下这块
# 移动端rem自适应
设计图750 * xx(iphone 6/7/8 或 全面屏),以100为基准
function initRem() {
  let html = document.documentElement
  let resizeEventName = 'orientationchange' in window ? 'orientationchange' : 'resize'
  let recalc = () => {
    let w = html.clientWidth < 320 ? 320 : html.clientWidth
    let fontSize = w > 750 ? 200 : ((w / 375) * 100)
    Object.assign(html.style, { fontSize })
  }
  recalc()
  [resizeEventName, 'DOMContentLoaded'].map(eventName => {
    document.addEventListener(eventName, recalc, false)
  })
}
# 2020/07/05 周日
# vue实现一个tree组件
树形组件主要是递归的问题,组件自己调用自己,来写个简单的例子
<template>
  <div>
    <z-tree :data="treeData"></z-tree>
  </div>
</template>

<script>
export default {
  components: {
    ZTree: () => import("./ZTree")
  },
  data() {
    return {
      treeData: [
        {
          label: "冰箱"
        },
        {
          label: "水果",
          list: [
            { label: "苹果" },
            { label: "梨子" },
            { label: "葡萄" },
            {
              label: "喜欢的水果",
              list: [{ label: "水果1" }, { label: "水果2" }, { label: "水果3" }]
            },
            { label: "香蕉" }
          ]
        },
        {
          label: "茶叶",
          list: [
            { label: "铁观音" },
            { label: "西湖龙井" },
            { label: "毛尖" },
            {
              label: "红茶",
              list: [{ label: "红茶1" }, { label: "红茶2" }, { label: "红茶3" }]
            }
          ]
        }
      ]
    };
  }
};
</script>
ZTree.vue实现
<template>
  <!-- z-tree递归组件实现 -->
  <div>
    <ul>
      <li v-for="item in data" :key="item.label">
        {{ item.label }}
        <i class="iconfont el-icon-arrow-right" v-if="item.list"></i>
        <z-tree v-if="item.list" :data="item.list"></z-tree>
      </li>
    </ul>
  </div>
</template>

<script>
export default {
  components: {
    ZTree: () => import("./ZTree")
  },
  props: {
    data: {
      type: Array,
      required: true
    }
  },
  data() {
    return {};
  }
};
</script>
# select渲染上万条数据卡顿的问题
一般下拉选择时会使用select组件,但如果select数据过万,可能会产生卡顿,其实这种数据大的情况使用select就体验很差了。
可以做成弹窗选择或搜索框,那怎么保持select有数万条数据而不卡呢?我的理解是,使用触底刷新,滚动到底部时加载后面的内容